User Guide – Walgreens
This User Guide was developed to cover custom development created specifically for Walgreens. Depending on your role, project, or permissions, some of the user guides may apply to you.
A-GAME Guide for Team Owners
Team Setup - For All Team Owners
A-GAME: Team Setup
1. Go to Acuity 2.0 – WALGREENS
2. Click on A-GAME

3. Click on Xtreme

4. Click on Team Settings

5. Click in the A-Game Team Name field
If desired, click in the team name field to change.

6. Type the new team name

7. Click on Primary Color to change team colors
Select a color from the grid.

8. Click on Highlight Color to change team colors
Select a color from the grid.

9. Click on Save Team Information

10. Click on Owner Home

Player Draft - For Xtreme Team Owners
A-GAME: Xtreme Team Player Draft
A-GAME Xtreme is a fantasy-sports style Executive Gamification solution where senior managers create Xtreme teams via fantasy draft and compete head-to-head in a round-robin tournament.
Season Set Up
- Participants (Xtreme Team owner) that will be participating in A-GAME Xtreme will need to sign up for the Xtreme draft on the Xtreme tab
- After signing up, participants will be able to enter the draft room and select a queue of agents to be drafted for their teams when the draft begins
- An equal number of agents will need to be selected from each available tier. Each tier is based on performance levels for each agent
- If no selections are made, the draft will automatically make selections when the draft begins
- On the date and time of the draft, all teams will be created and will be ready to start the season
Xtreme Season
- Before the start of each game, team owners will be able to select their starting lineups from their rosters
- Starting lineups will be locked at a specific time, at which point, will not be able to be changed until a new game begins
- Each position in the lineup also has a point multiplier assigned to it, allowing some positions to score up to 3X points
- Each game is a head-to-head matchup between teams each week. The team that scores the most points at the end of each game will record a win for that week
- At the end of the season, the teams with the best record will enter the playoffs to compete for the Championship
- The playoffs follow the same format as the regular season
Instructions
1. Go to Acuity 2.0 – WALGREENS
2. Click on A-GAME

3. Click on Owner Home

4. Click on Auto Pick My Players
Select “Auto Pick My Players” for Acuity to randomly select your team (not as fun)

5. Click on Manually Pick My Players
Select Manually Pick My Players to draft the best team possible

6. Click on Enter Draft Room
7. Click on (All)
Click on these fields to view specific criteria

8. Click on any column heading, such as “90 Day Bal Score” to sort the column

9. Click on a Team Member’s Name to add them to your Draft Queue

10. Click on Add to Queue to add the player to the Queue
Repeat this step until the maximum number of players has been added to the Queue

11. Players can be added that are already in another Team Owner’s Draft Queue
Challenge other Team Owners for a player. Team results will be posted after the Draft.

12. Click on ↑ ↓ in the Queue to change the player positions

13. Click on Save Queue after making changes to the Draft Queue

14. Congratulations! Your team has been drafted!

Select Starting Line-up - For All Team Owners
Replacing a Player - For Xtreme Team Owners
Any Xtreme Team Player can be replaced by the Team owner. This is a 2 step process, select the player to be replaced and select the player to be added to your team. The replacement process takes about 10 minutes. **Best practice is to replace and add one at a time**
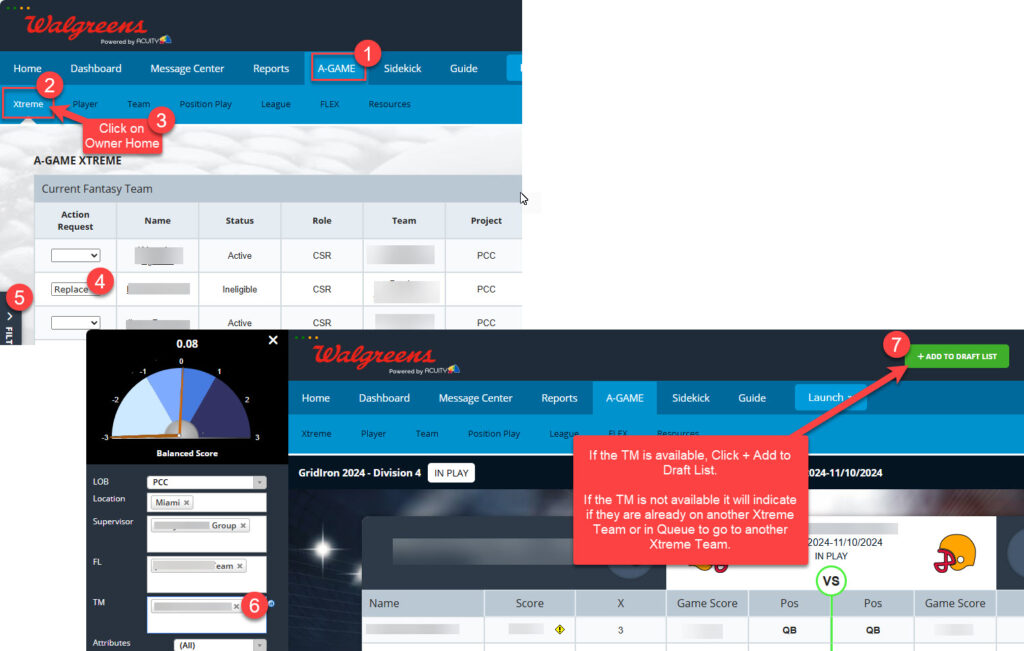
- Go to A-GAME tab
- Click on Xtreme
- Click on Owner Home
- Select the player to be replaced
- Open Filter Panel on left
- Identify and select the Team Member to be added to your team
- If the TM is available, Click +ADD TO DRAFT LIST.
Acuity will send a message via the Message Center to confirm when the replacement process has been completed. This takes approximately 10 minutes for the process to run.
Individual & Group Coaching Forms
Individual & Group Coaching Forms will be created in Acuity by the Function Lead through Sidekick. The Team Member can review, confirm/acknowledge coaching, and rate their support interaction in Acuity. The steps for the Function Lead and Team Members are outlined below.
Note: The screenshots below contain sample data and the Team Member Names have been blurred out.
Create an Individual Coaching Form (for FLs)
1. Create an Individual Coaching Form
Click on the SIDEKICK menu and select Team Member.

2. Click on + twice
Click on the + sign twice until a black line appears above and below the TM’s name.

3. Click on Add New Record

4. Select Individual Coaching Form in the Category list
To create an Individual Coaching Form, click on the Category dropdown, and select Individual Coaching Form.

5. Click Here
The Individual Coaching Form will open in a separate browser window.

6. Fill out the Individual Coaching Form
Notes:
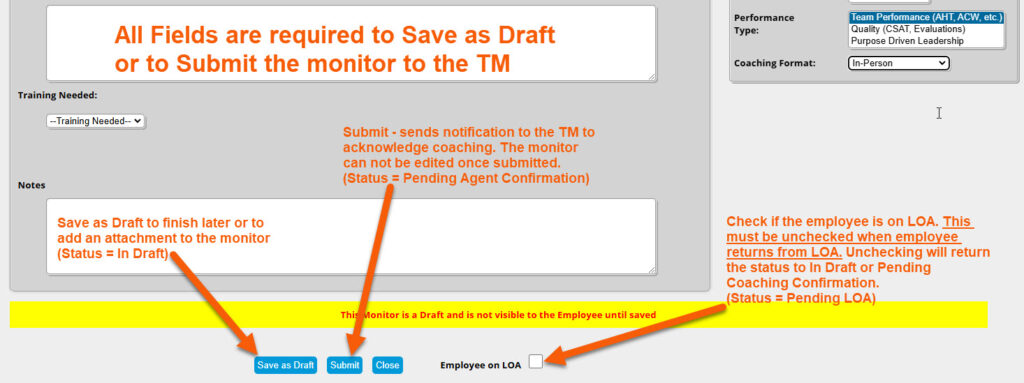
- The form will begin in “Draft Mode”.
- Saving as “Draft” will allow the form to be edited. Once a form is “Saved”, it can not be edited except to indicate that the Team Member is on LOA.
- “Drafts” are not visible to Team Members.
- Attachments can be added to the form after it has been Saved as Draft.
- The reviewer will receive a reminder after 7 days for any form “In Draft” status. This form needs to be completed or deleted.
- If a form is “In Draft” for over 30 days, it will automatically be deleted.
- Team Members will receive notice via Acuity Messages when there is a coaching form that needs to be reviewed/acknowledged once the form is Submitted.
- The term “monitor” in Acuity is synonymous with “form”.
All Monitors will have a status to indicate where it is in the process.
Monitor Statuses:
- Pending LOA – Employee is on LOA, the LOA box on the form must be unchecked upon their return.
- In Draft – The Monitor was saved in Draft and must be finalized and Saved. “In Draft” monitors are not visible to the employee.
- Pending Coaching Confirmation – Waiting for the Team Member to confirm coaching.
- Complete – Team Member confirmed/acknowledged the coaching.
7. View or Edit the Coaching Form in Sidekick
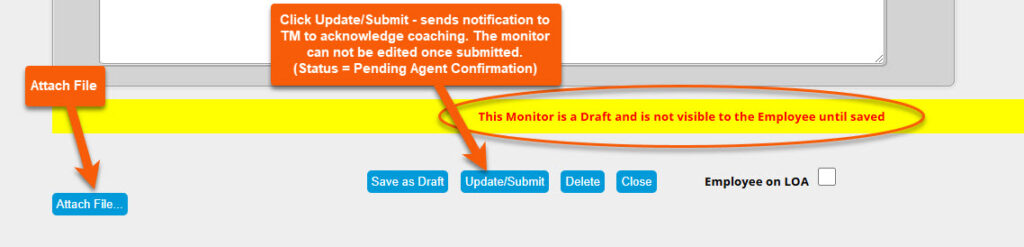
Once the form is saved or saved in Draft. You will be navigated back to Sidekick. To refresh this view, click on the – then +. The form will be there. If Saved as Draft, it can be opened and edited from here. This can also be done in the Coaching Form – Pending Status Report. (see the Reports for Individual & Group Coaching Form section of this guide below)

8. Click on Pencil to Edit or View

9. Edit Form
If the form was saved as Draft, the form will still be editable. If the form was Submitted, the fields will be grayed out and can not be edited. Once the form is In Draft status an Attachment can be added. If needed, update the form and click Update/Submit to deliver the coaching form to the employee. They will receive notification via Acuity Messages. (see Review & Acknowledge the Individual Coaching Form (for TMs) section of this guide below)
NOTE: When a monitor is Saved as Draft, the coaching form is not visible to the employee. If a monitor is “In Draft” over 7 days, an Acuity message will be sent to the Reviewer to complete or delete the draft. Only monitors that are “In Draft” can be deleted.
Create a Group Coaching Form (for FLs)
1. Create a Group Coaching Form
Click on the SIDEKICK menu and select a Team Member name. The other group coaching participants will be added in the form.
2. Click on + twice
Click on the + sign twice until a black line appears above and below the TM’s name.
3. Click on Add New Record
4. Select Group Coaching Form in the Category list
To create a Group Coaching Form, click on the Category dropdown, and select Group Coaching Form.
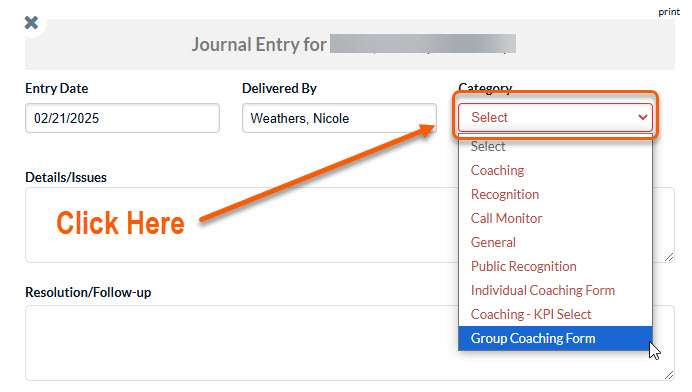
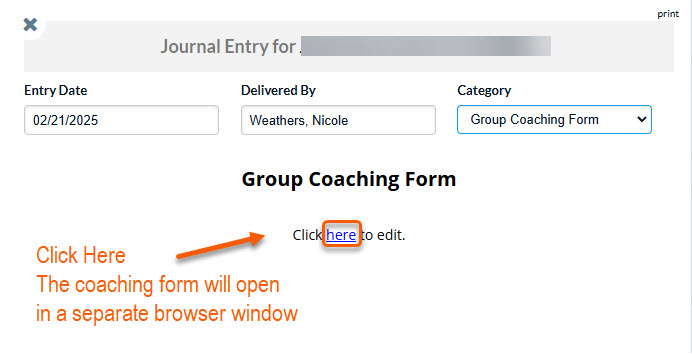
5. Click Here
The Group Coaching Form will open in a separate browser window.
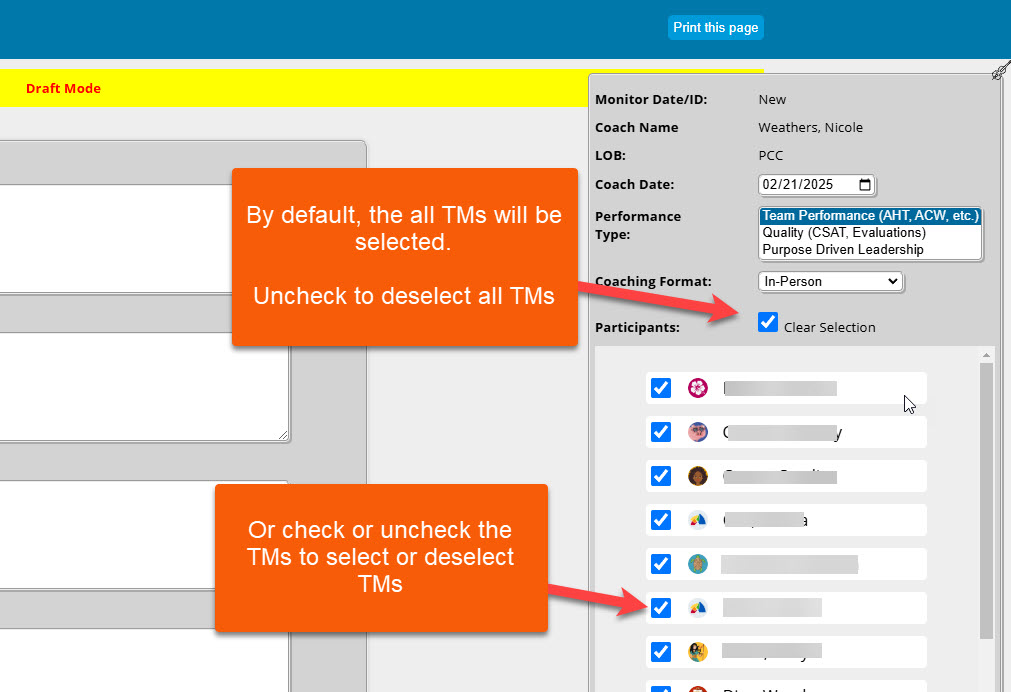
6. Fill out the Group Coaching Form
Notes:
- The form will begin in “Draft Mode”.
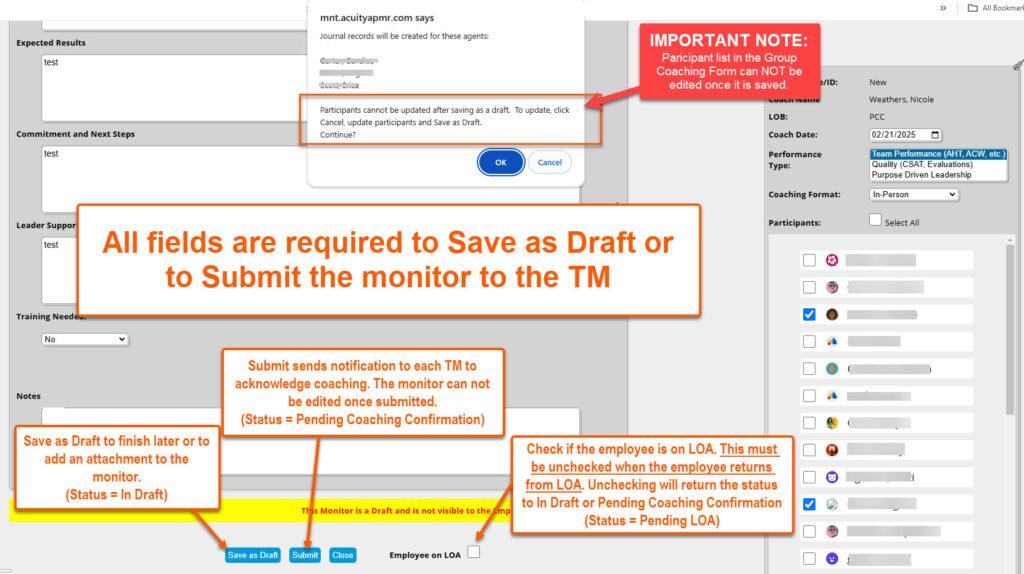
- Saving as “Draft” will allow the form to be edited. Group Coaching Forms must be edited separately for each TM. Once a form is “Saved”, it can not be edited except to indicate that the Team Member is on LOA.
- “Drafts” are not visible to Team Members.
- Attachments can be added to the form after it has been Saved as Draft.
- The reviewer will receive a reminder after 7 days for any form “In Draft” status. This form needs to be completed or deleted.
- If a form is “In Draft” for over 30 days, it will automatically be deleted.
- Team Members will receive notice via Acuity Messages when there is a coaching form that needs to be reviewed/acknowledged once the form is Submitted.
- The term “monitor” in Acuity is synonymous with “form”.
All Monitors will have a status to indicate where it is in the process.
Group Coaching Participants:
Select the TM members that were included in the group coaching session. This can not be edited after being saved In Draft or Submitted.
Monitor Statuses:
- Pending LOA – Employee is on LOA, the LOA box on the form must be unchecked upon their return.
- In Draft – The Monitor was saved in Draft and must be finalized and Saved. “In Draft” monitors are not visible to the employee. Group Coaching Forms must be edited separately for each TM.
- Pending Coaching Confirmation – Waiting for the Team Member to confirm coaching.
- Complete – Team Member confirmed/acknowledged the coaching.
7. View or Edit the Coaching Form in Sidekick
Once the form is saved or saved in Draft. You will be navigated back to Sidekick. To refresh this view, click on the – then +. The form will be there. If Saved as Draft, it can be opened and edited from here. This can also be done in the Coaching Form – Pending Status Report. (see the Reports for Individual & Group Coaching Form section of this guide below)
8. Click on Pencil to Edit or View
9. Edit Form
If the form was saved as Draft, the form will still be editable. Group Coaching Forms must be edited separately. If the form was Submitted, the fields will be grayed out and can not be edited. Once the form is In Draft status an Attachment can be added. If needed, update the form and click Update/Submit to deliver the coaching form to the employee. They will receive notification via Acuity Messages. (see Review & Acknowledge the Individual Coaching Form (for TMs) section of this guide below)
NOTE: When a monitor is Saved as Draft, the coaching form is not visible to the employee. If a monitor is “In Draft” over 7 days, an Acuity message will be sent to the Reviewer to complete or delete the draft. Only monitors that are “In Draft” can be deleted.
Review & Acknowledge the Individual & Group Coaching Form (for TMs)
1. Review & Acknowledge Individual & Group Coaching Form
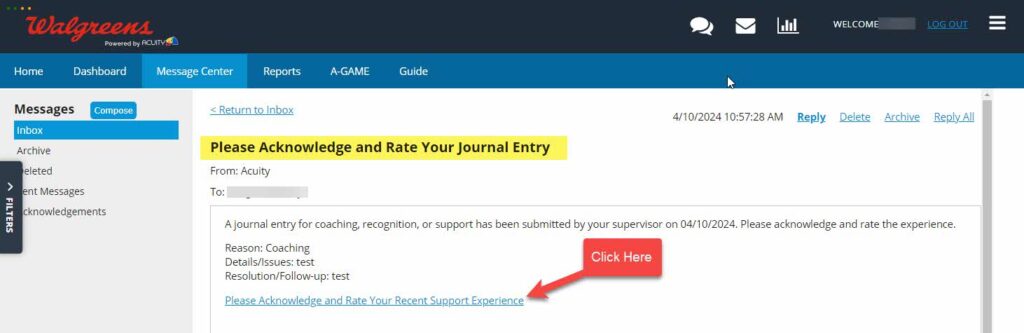
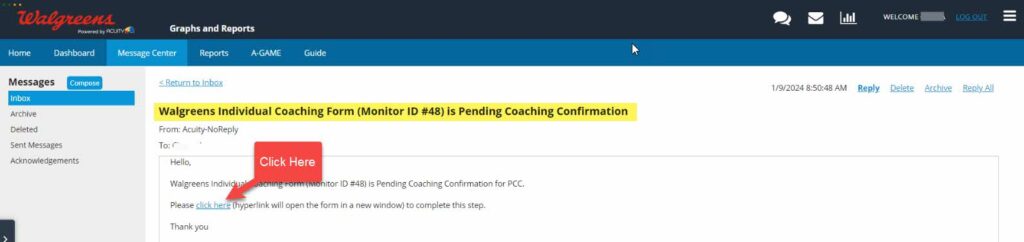
After an Individual Coaching Form is entered and saved, the monitor status will change to “Pending Coaching Confirmation” and it will be delivered to the Team Member. The TM must review and acknowledge the coaching interaction, they also have the option to rate the coaching interaction quality.
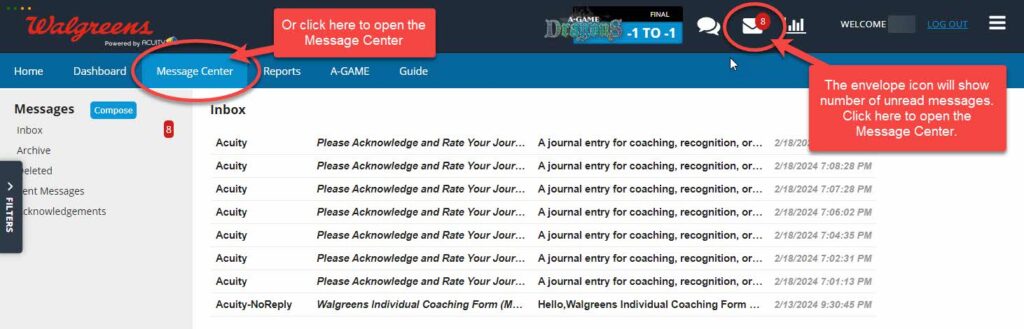
The Team Member is notified of the new Coaching Form via Acuity Messages. New unread messages are indicated in the following places:
- Envelope Icon
- Messages Tab in the Dashboard View
- Message Center – click here to view the entire message
NOTE: The term “monitor” in Acuity is synonymous with “form”.

2. View Acuity Message
- Click on the Message Center tab
- Click on the unread message in bold to open

3. Open Individual or Group Coaching Form
Below is an example of the Individual or Group Coaching form message. Click on the hyperlink in the message to open the form. It will open in a new browser window. The forms can also be viewed/completed via the Reports. (see the Reports for Individual & Group Coaching Form (for FLs & TMs) section of this guide below)

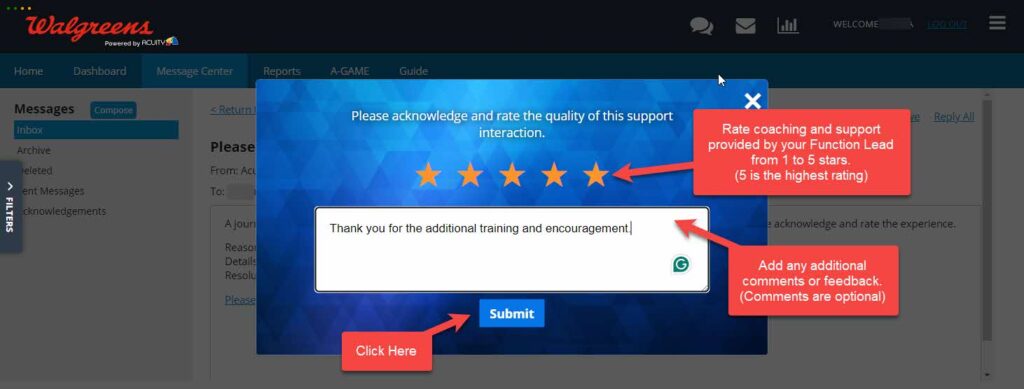
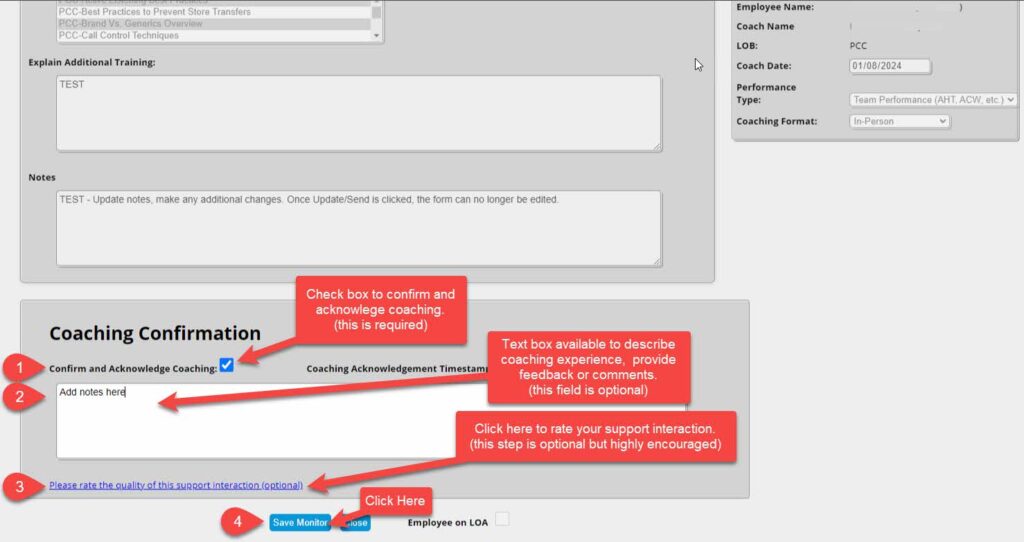
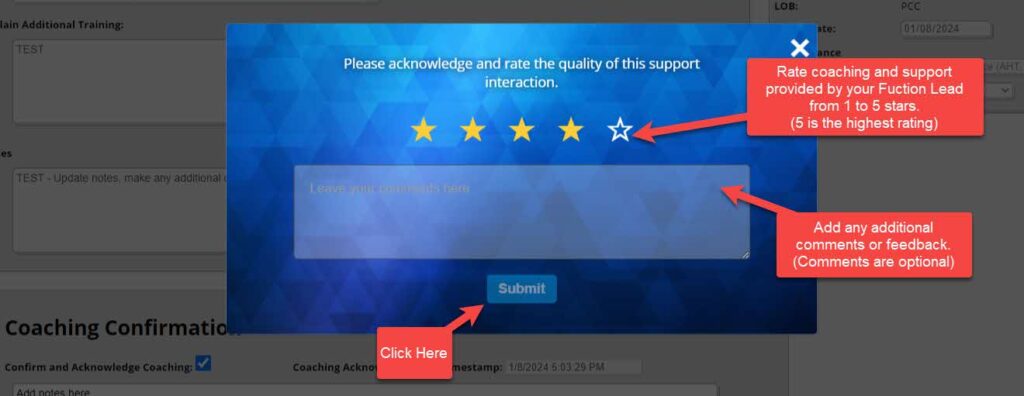
4. Confirm & Acknowledge
Scroll through the form to review. Each Individual or Group Coaching Form must be confirmed and acknowledged that coaching was delivered.
Complete the following steps:
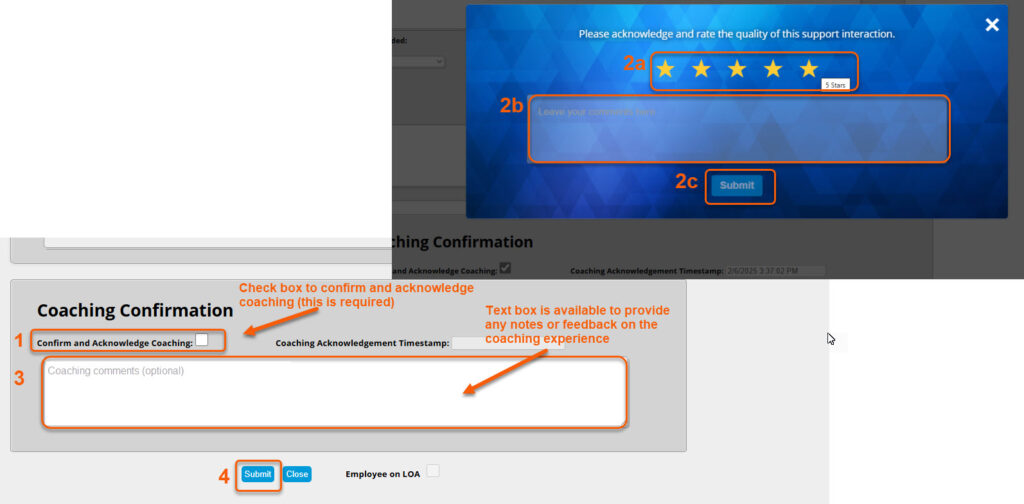
- Check the Confirm and Acknowledge Coaching box. This will create a timestamp on when this was completed. (required)
- Rating: After the Confirm and Acknowledge Coaching box is checked, the TM will be given the option to rate the quality of this support interaction. This allows the TM to rate the support interaction from 1 to 5 stars. (optional but highly encouraged)
2a. To rate the support interaction, click from 1 to 5 stars. 1 star is the lowest rating and 5 stars is the highest rating.
2b. There is also an additional section to provide feedback.
2c. Click Submit. Once the rating is submitted, the message “Coaching experience rating has been submitted, thank you!” will appear at the bottom of the form. NOTE: Once rated, it can not be undone or edited.
**To skip the ratting, click the X in the box to close.**
- Coaching comments: This text box is available to provide any feedback. (optional)
- Submit (required)
IMPORTANT NOTES:
- Once the Monitor is saved the status will change to “Complete”. Once this step is completed, it can not be undone, rated (if that step was skipped), or edited.
- If the Coaching Form is not confirmed by the TM, it will “auto-complete” after 14 days. The form status will change to “Complete” and the following note will be added to the form ” Auto-Complete: Agent Coaching Confirmation – No Response”.
Reports for Individual & Group Coaching Form (For FLs & TMs)
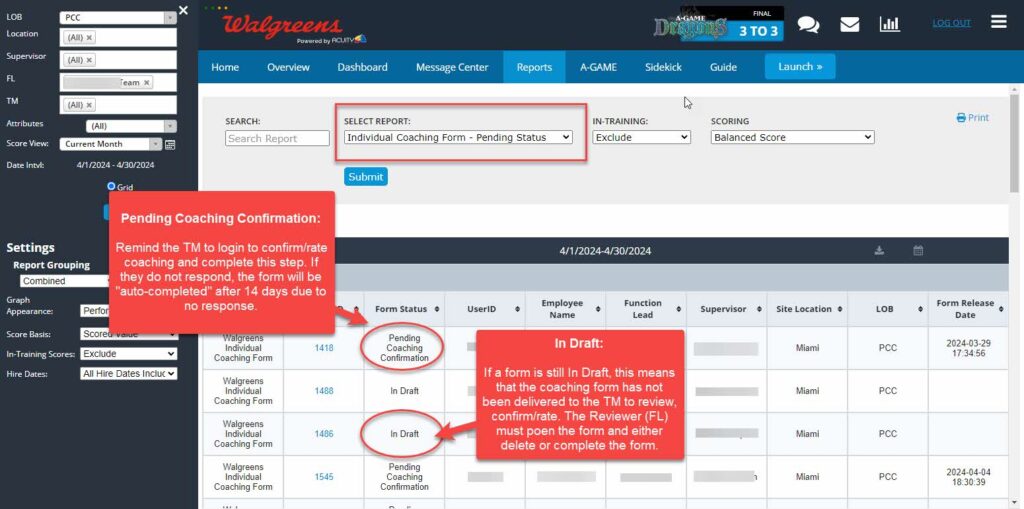
- Coaching Forms – Pending Status: this report shows any monitor that is still open and not in a “Complete” status.
- Coaching Forms – Tracker: this report is a download of each monitor with the answers to the questions on each form.
Coaching Forms – Pending Status
To run the report:
- Click on the Reports menu
- Select the report under the Sidekick report section
- Click Submit to display the results
Notes:
- For Function Leads and above, the report will only display monitors for the team(s) in your hierarchy. Team Members will only see their monitors.
- The Scoreview (or date range) is bypassed for the “Pending Status” report.
- Team Members will not see any form that is “In Draft”.
- The monitors can be viewed/edited by clicking on the Monitor ID hyperlink. The form will open in a new browser window.

Coaching Forms – Tracker
To run the report:
- Click on the Reports menu
- Select the report under the Sidekick report section
- Click Submit to display the results
Notes:
- For Function Leads and above, the report will only display monitors for the team(s) in your hierarchy. Team Members will only see their monitors.
- The Scoreview (or date range) is NOT be bypassed for the “Tracker” report.
- The monitors can be viewed/edited by clicking on the Monitor ID hyperlink. The form will open in a new browser window.

Scoring
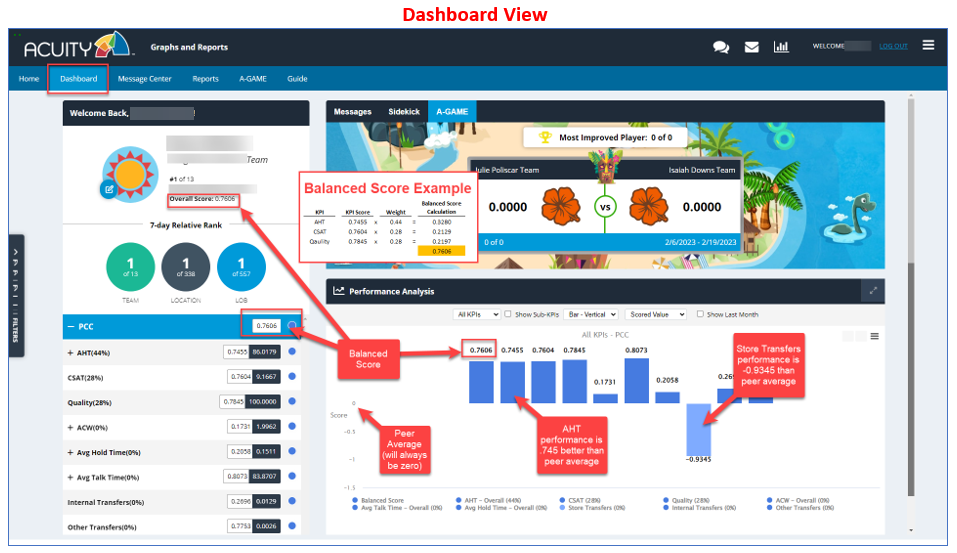
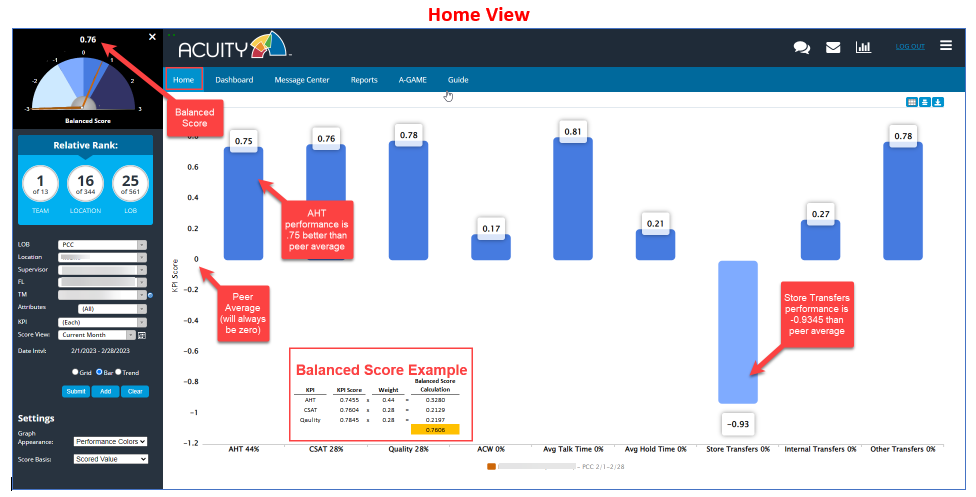
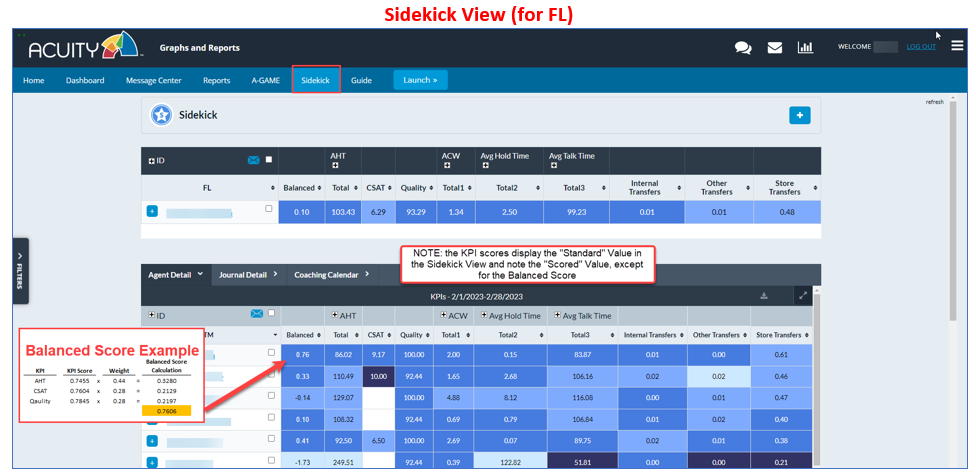
Distance From Peer & Balanced Score Calculations
Measuring performance based on Distance from Peer looks at how much variation there is in a particular set of results, whereas measuring performance against pre-defined, fixed targets looks at whether the results stay within a certain range. With Distance from Peer, you’re looking at how far away from the average the results are, and with fixed targets, you’re looking at whether the results stay within a certain range.
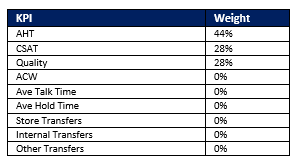 Some of the KPIs are weighted more than others to calculate the “Balanced Score”. The KPIs that have no weight do not contribute to the overall “Balanced Score”, but they are displayed within Acuity to show performance.
- Data is imported daily into Acuity and scores are updated once a day.
- The “Balanced Score” displayed is based on the date range or “score view” selected.
Team Member Team Assignments
Update Team Member Assignment
Function Leads will manage the Team Members on their team using the Roster Manager in Acuity. Walgreens provides a daily roster file from their WFM system. This roster file will be imported into Acuity and will only be used to add and deactivate users in Acuity.
There are 3 sections to the Roster Manager:
- My Team – Function Leads will see their team, while Supervisors can see each FL’s team that reports directly to them.
- User Pool
- Other Teams
Below are the steps to add or remove people from your team.
1. Click the Main Menu

2. Click on Admin (Beta)

3. Click on Roster Mgr.

4. User Pool
The User Pool contains any Team Member that is not assigned to a Function Lead’s team. Ideally, Team Members should only be in the “pool” for a very short period. A daily email is sent to Ops leadership containing Team Members who do not have an assigned Function Lead in Acuity.
To find a Team Member, search on the first name, or last name and click APPLY FILTERS. You can also scroll through the list.

5. Add Team Member to your Team from the User Pool
Click ADD to add the Team Member to the Team listed on the left.

6. Effective Date
Click in the Effective Date field to bring up the calendar. Indicate the Effective Date of the move from the User Pool to the Function Leads Team, then click SAVE.
NOTE:
- If the effective date is in the past and the TM is on another FL team, the TM will immediately appear on the new FL team.
- If the effective date is in the future and the TM is in the User Pool, the TM will immediately appear on the new FL team.
- If the effective date is in the future and the TM is on another FL team, the TM will be moved on the effective date and a note will appear next to the TM’s name about the upcoming team change.

7. Confirmation of Move
A Confirmation will appear. Click OK to proceed or CANCEL.

8. My Team Update
The Team Member from the User Pool will appear in the My Team List. If the newly added Team Member does not appear immediately, click the Refresh button.

9. Remove Team Member from your Team
Click REMOVE next to the Team Member who will be leaving your team. This will place them in the User Pool. The Team Member’s new Function Lead can add them to their team from the User Pool. However, if they are not in the User Pool because they are currently assigned to another Function Lead, they can be added to a team from the Other Teams section (see the step below).

10. Add Team Members from Another Team
To add a Team Member to your team from another Function Lead’s team, find the Team Member by filtering. Click ADD to add them to your Team.
NOTE: The Effective Date can be in the past or future. If the Effective Date is in the future, they will not appear on your list until that date.


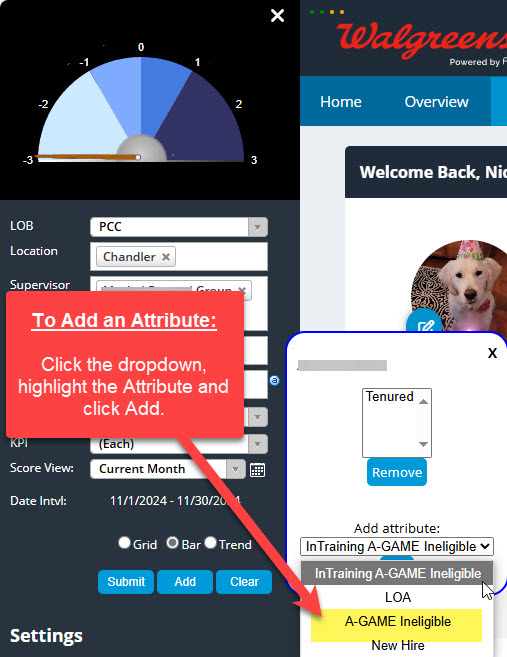
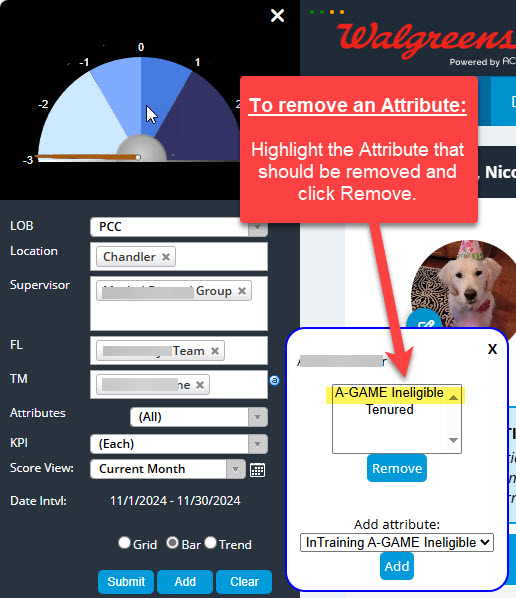
Team Member Attributes
A-GAME Ineligible, LOA, Etc.
Attributes can be added or removed from a Team Member. It is primarily the responsibility of the Function Lead to maintain the TM attributes however, anyone above the FL can also perform these steps.
Attributes:
- A-GAME Ineligible: If the TM has this attribute, they will not participate in A-GAME.
- LOA: If a TM is on LOA, the Attribute should be added. If a TM is marked as being on LOA, they will not participate in A-GAME until they return from leave. When the TM returns from LOA, the Attribute should be removed.
- Tenured: This is automatically set by Acuity. A TM is “Tenured” after 90 days of employment.
- New Hire: This is automatically set by Acuity. A TM is a “New Hire” during their first 90 days of employment.
- In Training A-GAME Ineglible: This is automatically set by Acuity. The TM is a new hire and in a training group. Once they move to a FL team, this attribute will automatically be removed.
Below are the steps to Add or Remove TM Attributes:

Daily Tips & Reminders
Daily Tips: Team Members
The following are five tips & reminders that Team Members should perform daily.
1. Log In to Acuity:
Log into Acuity at least once during every workday at https://walgreens.acuityapm.com/login.aspx
2. Check your Acuity Messages:
The envelope icon at the top of the screen will display any unread messages. Please check and read your messages daily. Some of these messages system related task notifications.
3. Acknowledge & Rate Journal Entries:
Open, read and acknowledge/rate any messages with the subject line: Please Acknowledge and Rate your Journal Entry
4. Confirm & Rate Individual Coaching Forms:
Open, read and confirm/rate any messages with the subject line: Walgreens Individual Coaching Form (Monitor ID #) is Pending Coaching Confirmation
5. Check Performance & Progress:
View your Dashboard to check performance, game results, awards, etc.
Daily Tips: Function Leads
The following are five tips & reminders that Function Leads should perform daily.
1. Log In to Acuity:
Log into Acuity at least once during every workday at https://walgreens.acuityapm.com/login.aspx
2. Check your Acuity Messages:
The envelope icon at the top of the screen will display any unread messages. Please check and read your messages daily. Some of these messages are system-related task notifications.
3. Remind and encourage Team Members to acknowledge & rate your coaching support. Create Sidekick Journal Entries or create Individual Coaching Forms:
When coaching your Team Members via Sidekick Journal Entries or Individual Coaching Forms, always remind them to login to Acuity and acknowledge/rate the coaching that you just delivered.
4. Review Individual Coaching Form – Pending Status Report:
Run the Individual Coaching Form – Pending Status Report. This report will display any coaching form that is not “Complete” for your team.
Pending Coaching Confirmation: The Team Members should be confirming/rating any form that is in a “Pending Coaching Confirmation” status. Please remind your TMs to complete this step. If they do not complete it within 14 days, the form will be auto-completed due to no response.
In Draft: If the form is “In Draft”, it has NOT been completed and released to the Team Member to review and confirm coaching. The Reviewer, typically the Function Lead, must complete or delete it.
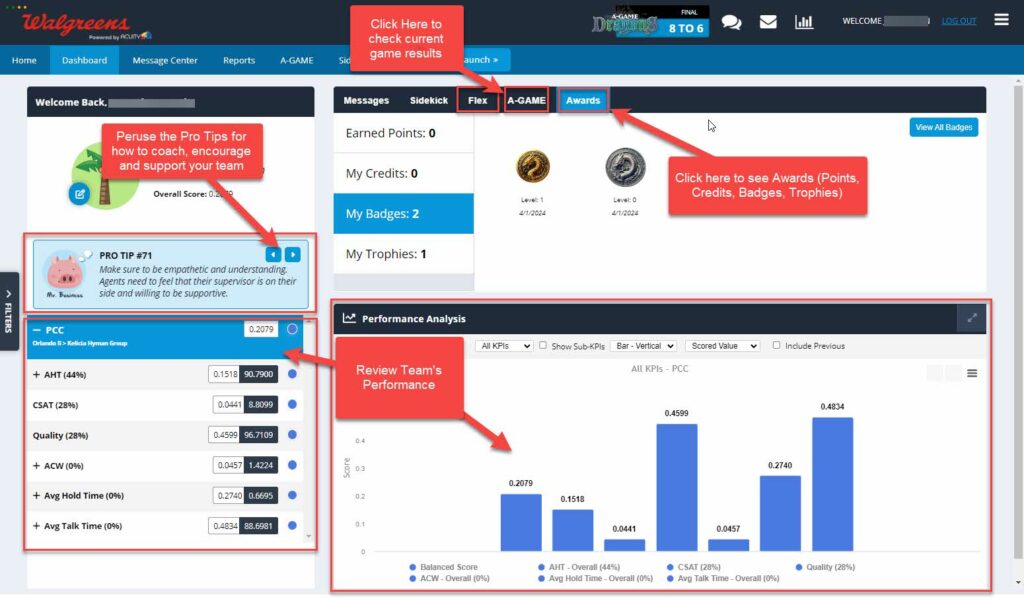
5. Check Team Performance & Progress:
View your Dashboard to check your team’s performance, get “Pro Tips” for supporting your team, view game results, awards, etc.
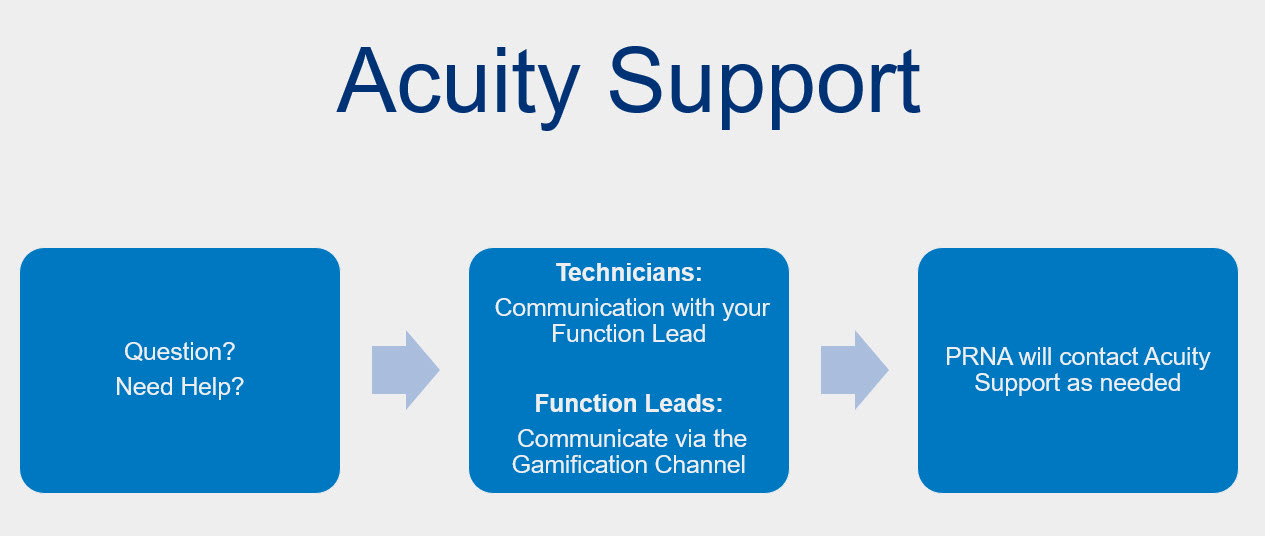
Acuity Support for Walgreens
Questions? Need Help?