User Guide – KM2
This User Guide was developed to cover custom development created specifically for KM2. Depending on your role, project, or permissions, some of the user guides may apply to you.
QA Scorecard & Compliance Audit Process
Status Descriptions
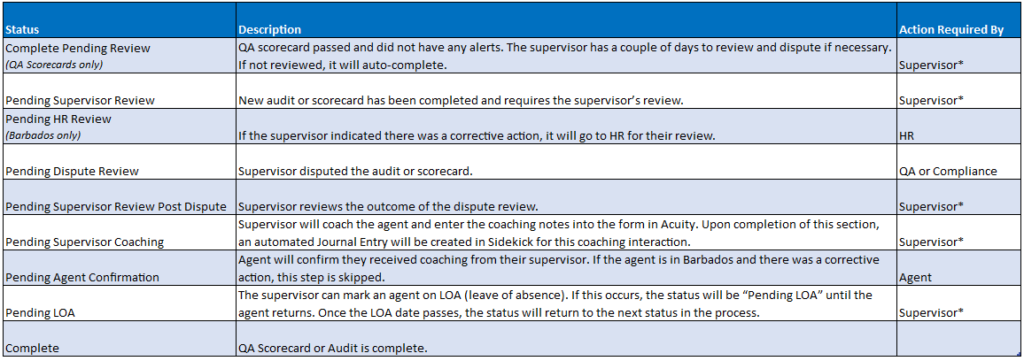
NOTE: If the Supervisor is unavailable, these steps can be completed by the Program Manager.
QA Scorecard & Compliance Audit Workflows
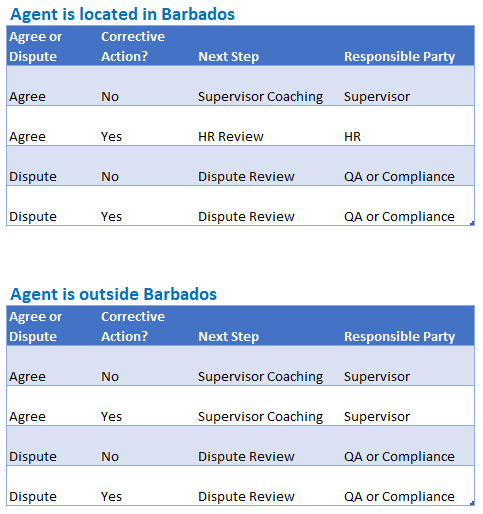
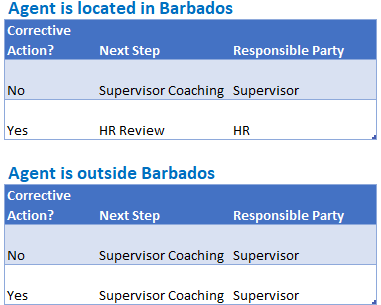
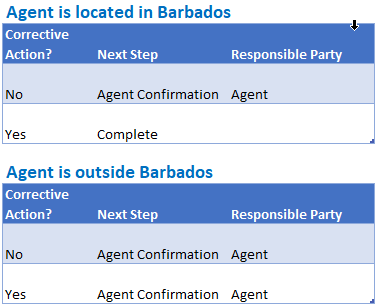
There are two workflows for QA Scorecards and Compliance Audits. These two workflows vary based on where the agent is located. If the agent is in Barbados, there is a slightly different workflow. There are 4 paths in these workflows that an audit or scorecard can follow:
- Supervisor agrees and there is no Corrective Action for the agent
- Supervisor agrees and there is a Corrective Action for the agent
- Supervisor disputes and there is no Corrective Action for the agent
- Supervisor disputes and there is a Corrective Action for the agent
Below are the simplified steps for each of the scenarios above. The steps vary if the agent is based in Barbados.
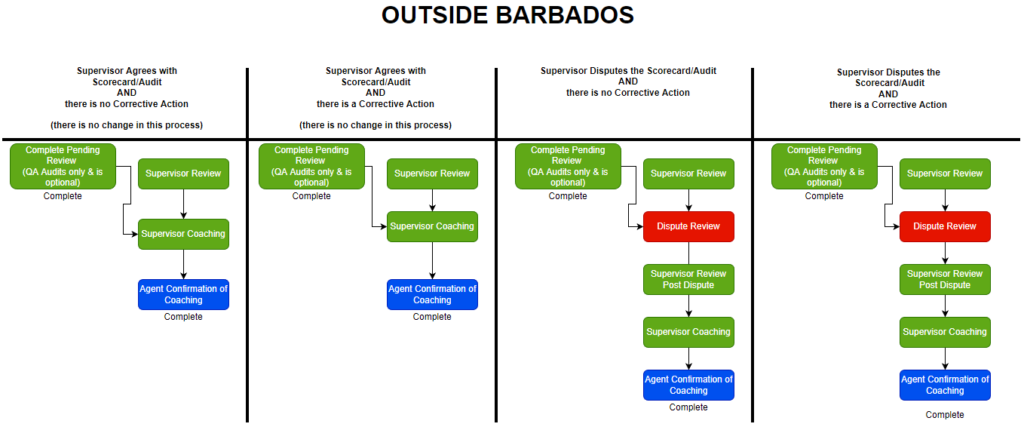
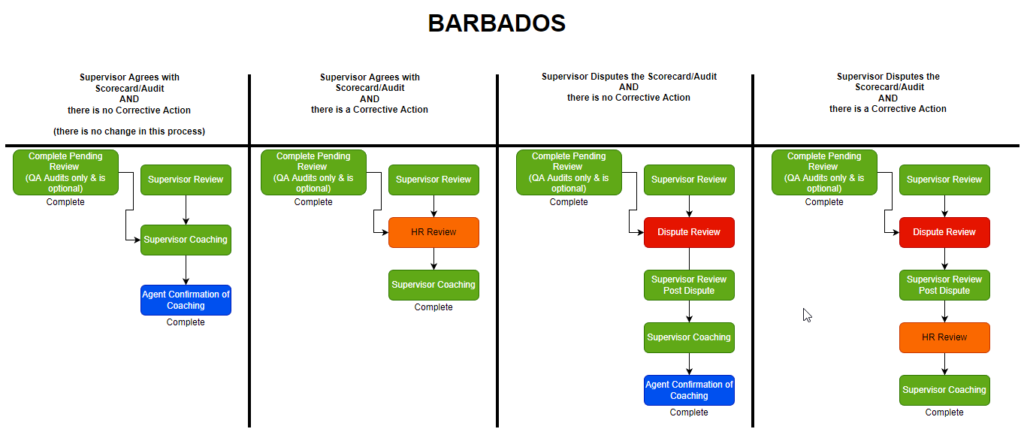
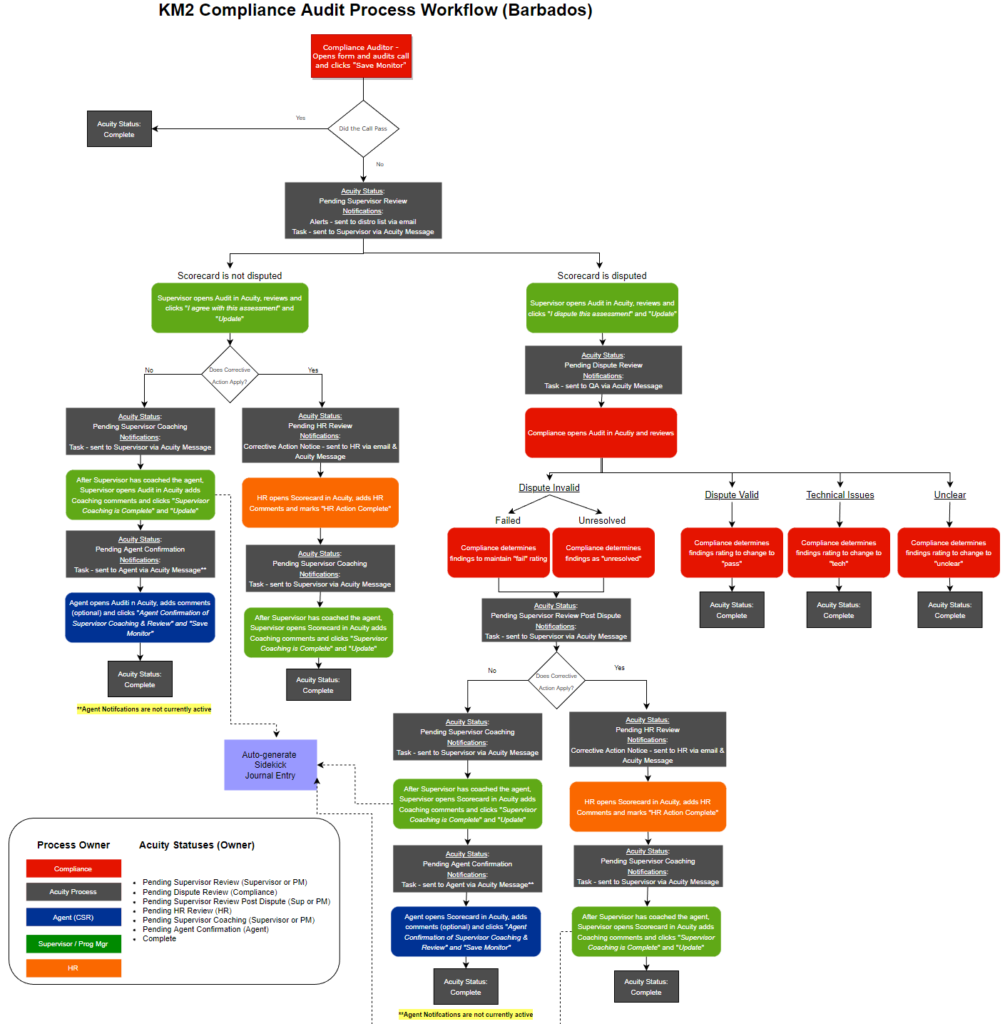
Below are the process flow charts for the Compliance Audits outside Barbados and Barbados
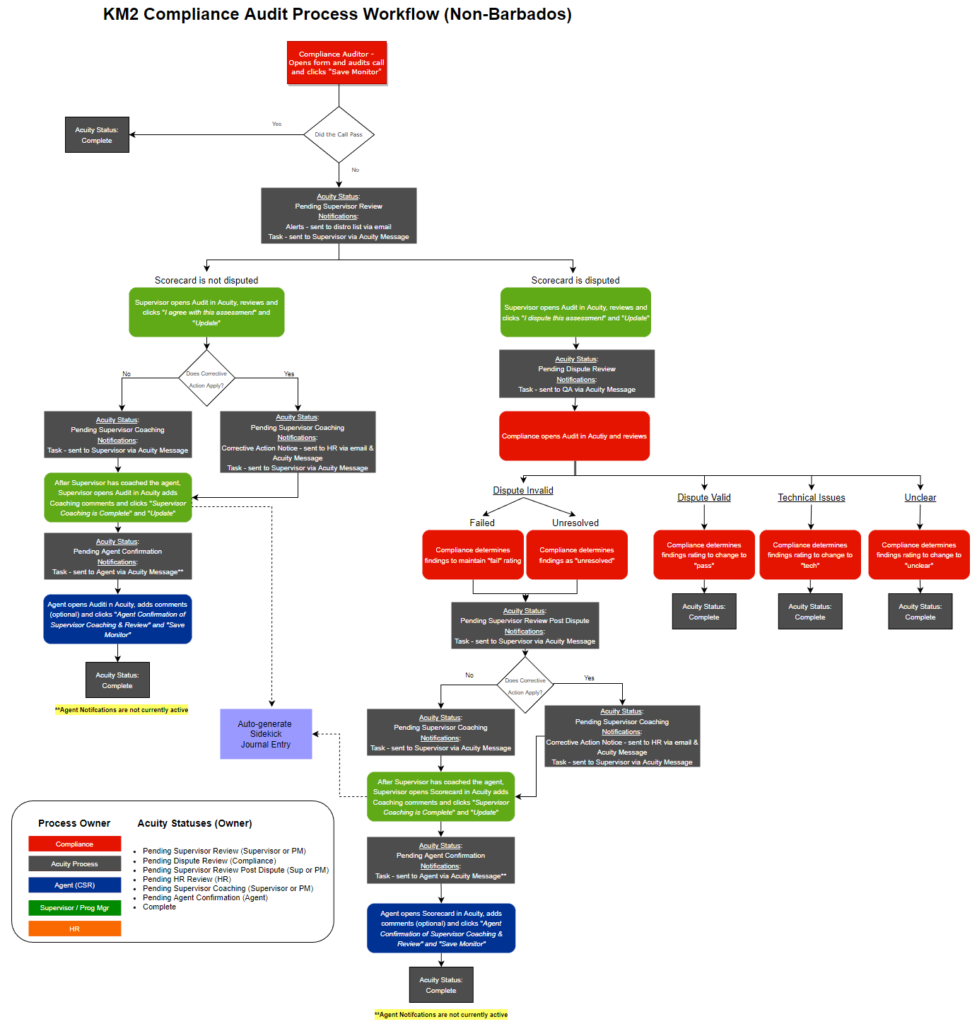
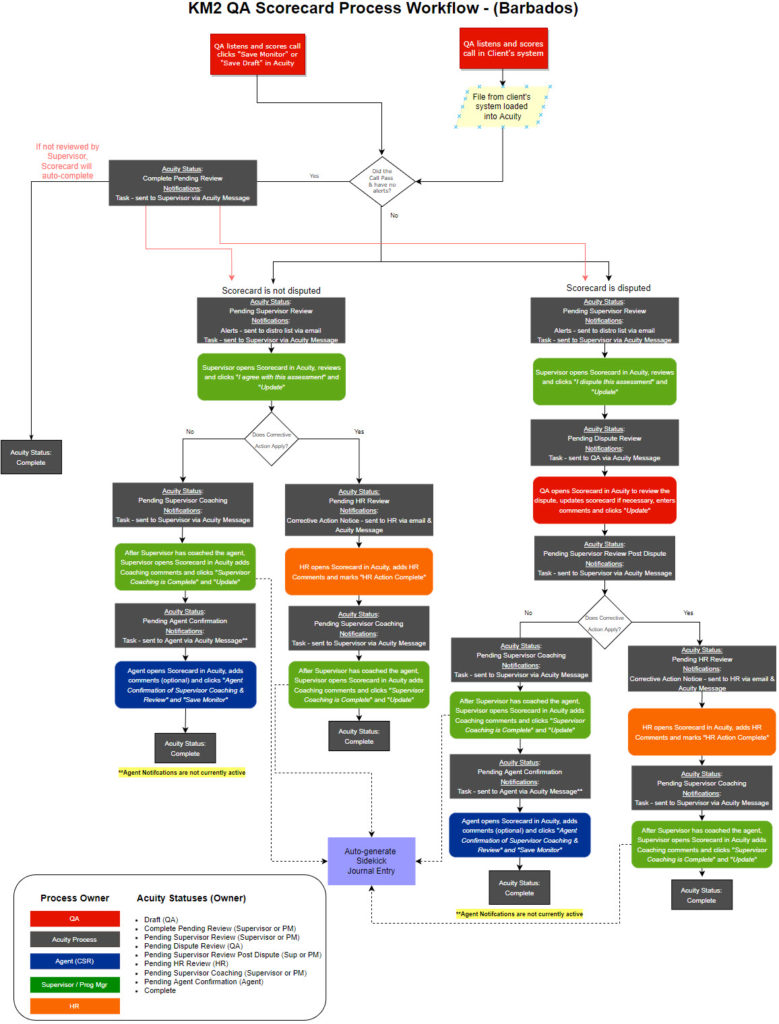
Below are the process flow charts for the QA Scorecards outside Barbados and Barbados
![]()
Creating Compliance Audit Form
Compliance will listen and audit the call and complete the following steps.
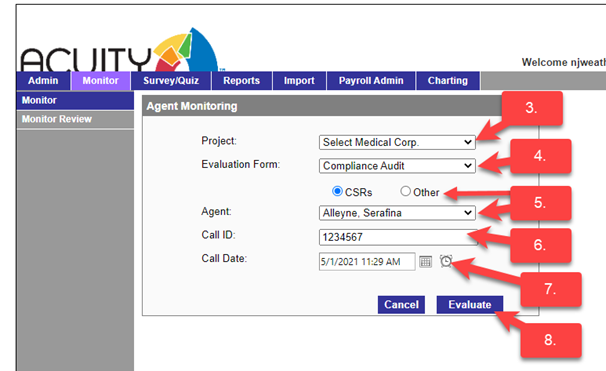
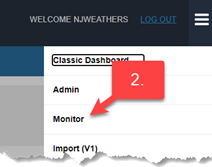
- After logging into Acuity, click on the Main Menu in the upper right-hand corner.

- Select Monitor

- Project: Select the project
- Evaluation Form: Compliance Audit. Note: The Compliance Audit form can only be created by Compliance and Admin.
- Agent: Click CSR radio button and select the agent from the dropdown menu or a non-Agent: Click Other radio button and select the name from the dropdown menu.
NOTE: these dropdown employee lists are populated from the roster file for associates assigned to the project.
- Enter Call ID
- Enter Call Date & Time – calendars & clocks icons are available for selecting the date/time.
- Click: Evaluate and a new Compliance Audit form will be displayed.
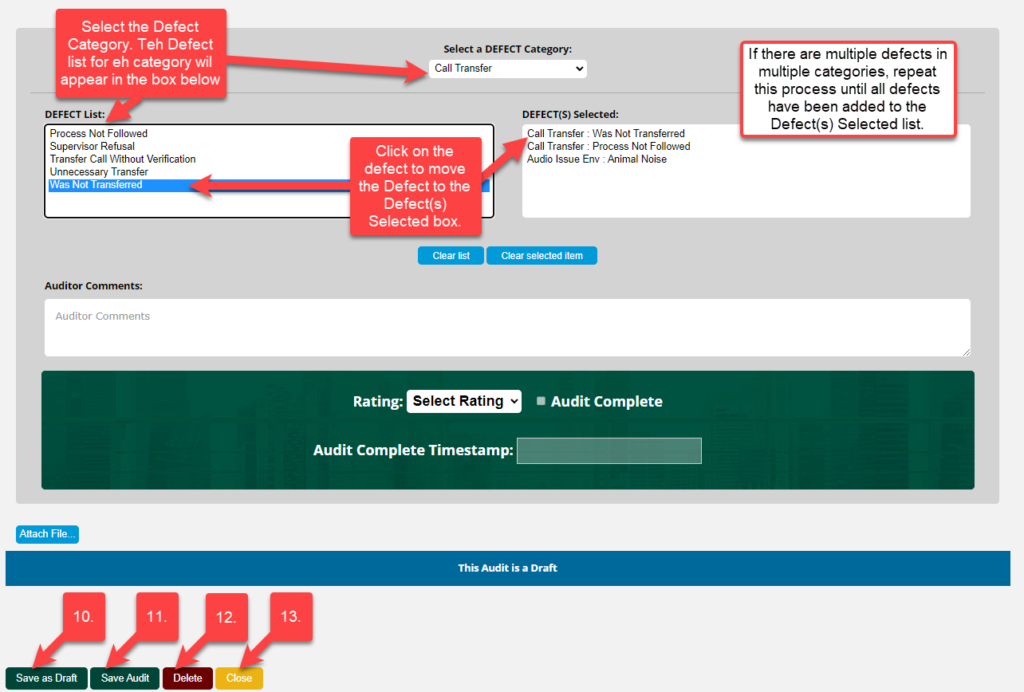
- Complete the fields on the form.
Rating / notes – there are 6 rating options. When the audit is first created, the rating should be Pass or Fail (see the Compliance Workflow diagram at the beginning of this section). Some of these Ratings will automatically complete the audit.
-
- Pass – will auto-complete
- Fail – Moves the status to “Pending Supervisor Review”
- Unresolved – Moves the status to “Pending Supervisor Review”
- Unclear – will auto-complete the audit
- Dispute Valid – will auto-complete the audit
- Tech – will auto-complete the audit
- Save as Draft: This will allow the Compliance to return and complete later. Monitors always begin in draft mode. Drafts are not visible to non-Compliance roles.
- Save Audit: this saves the Audit.
- If the Rating is Pass, the Audit will automatically be marked as “Complete”.
- If the Rating is Fail, the Audit will move to the next status, “Pending Supervisor Review”.
- Delete: deletes the form. The delete button is only available for Compliance and there is a prompt to confirm and enter a reason why the form is being deleted. NOTE: Once monitors are in a “Complete” status, they cannot be deleted.
- Close: this will close the Scorecard without saving.
![]()
When the form is saved (or Saved as Draft), the following notification will appear. This confirms that it has been saved to the Acuity database and will display the Monitor ID.
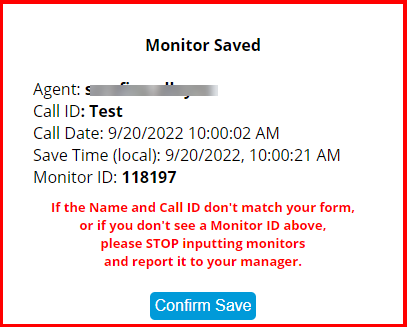
Click Confirm Save to return to the Agent Monitoring screen.
Creating QA Scorecard
QA will listen to the call and complete the following steps. Note: Some of the screenshots below may be from the Harley (HDFS) scorecard however, the process is the same for all QA Scorecards.
1. After logging into Acuity, click on the Main Menu in the upper right-hand corner.

2. Select Monitor.
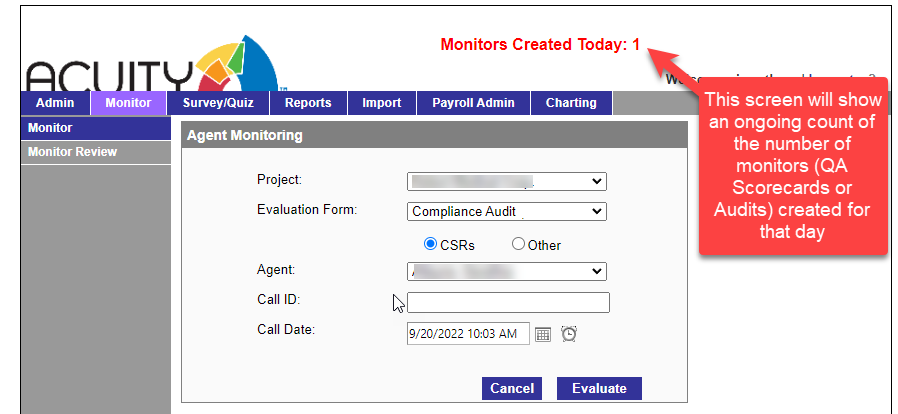
3. Project: Select the project.
4. Evaluation Form: Select the scorecard.
5. Agent: Select the agent from the dropdown menu.
6. Enter Call ID.
7. Enter Call Date & Time – calendars & clocks icons are available for selecting the date/time.
8. Click: Evaluate and a new QA Scorecard monitor will be displayed.
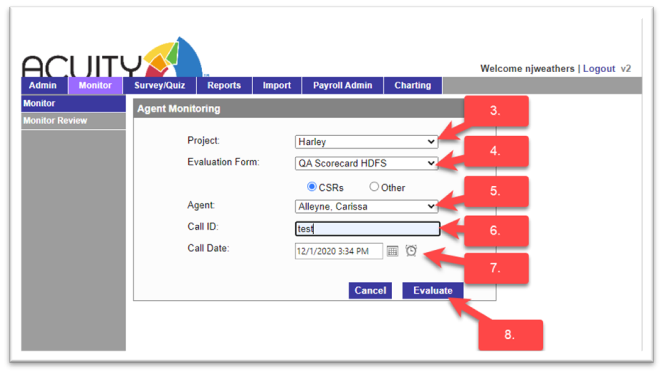
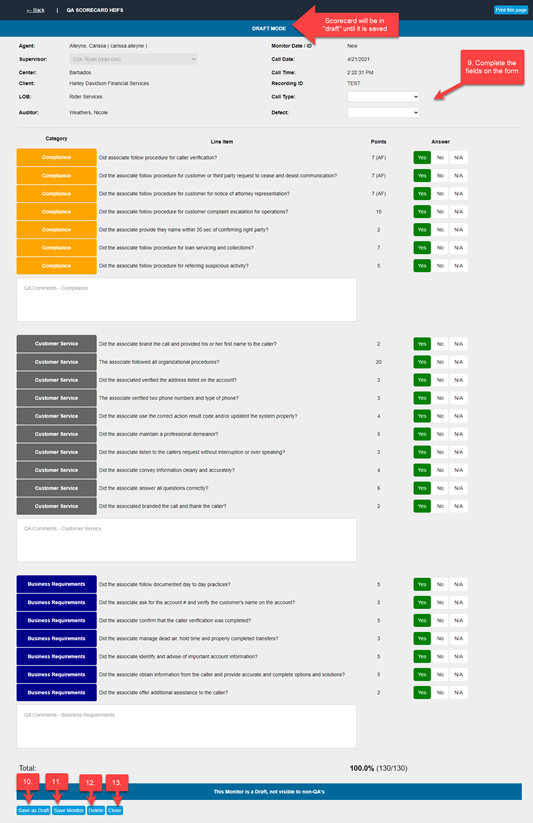
9. Complete the fields on the scorecard, the scores are automatically calculated based on the evaluation.
10. Save as Draft: this will allow the QA specialist to return and complete the scorecard later. Monitors always begin in draft mode. Drafts are not visible to non-QA roles.
11. Save Monitor: this saves the scorecard and moves it to the next status of Pending Supervisor Review.
12. Delete: deletes the scorecard. The delete button is only available for QA and there is a prompt to confirm if a scorecard should be deleted. NOTE: Once monitors are in a “Complete” status, they cannot be deleted.
13. Close: this will close the scorecard without saving.
When the form is saved, the following notification will appear. This confirms that it has been saved to the Acuity database and will display the monitor ID.
Click Confirm Save to return to the Agent Monitoring screen.
Supervisor Review
After the QA Scorecard or Compliance Audit has been created and saved, the next step in the workflow is the Supervisor Review. The assigned supervisor at the time the Scorecard or Audit was created will be responsible to review the scorecard and coach the agent. NOTE: If the supervisor is unavailable, these steps can be completed by the program manager. To review, the supervisor will complete the following steps:
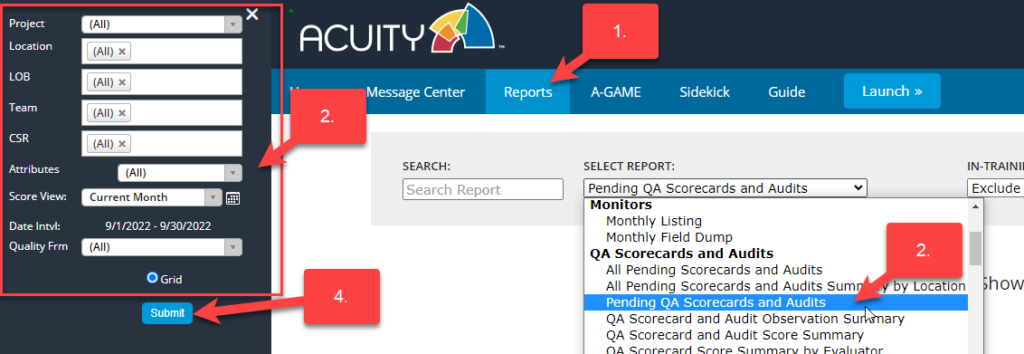
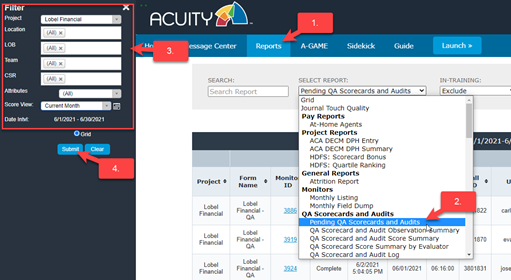
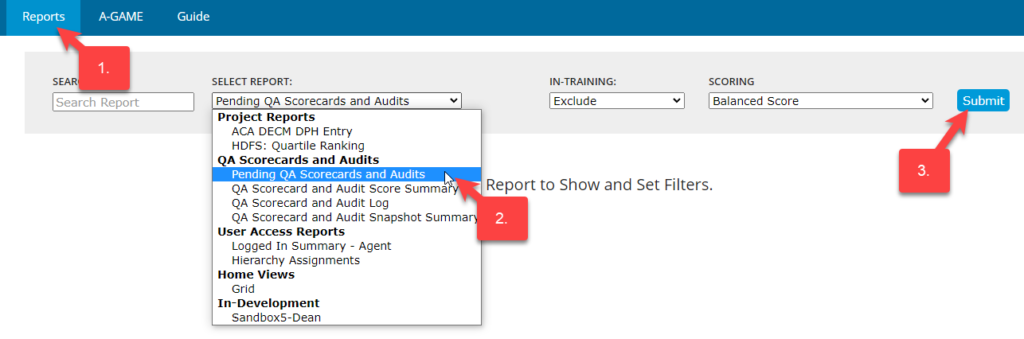
1. Click on the Reports tab.
2. Select the Pending QA Scorecards and Audits Report.
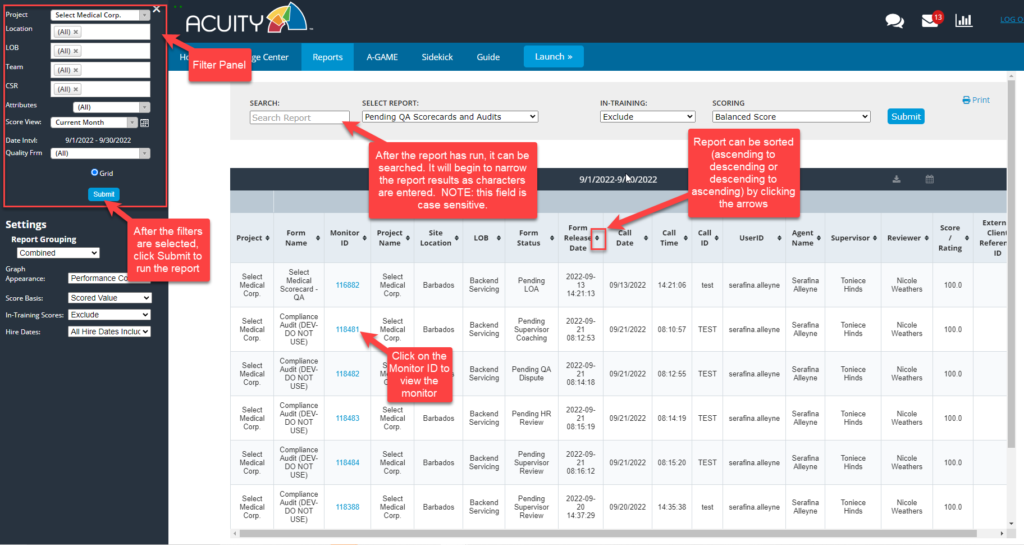
3. Open the Filter panel to change the search parameters (project, LOB, Team, CSR, or Quality Form).
Notes:
- The Score View (date range) might be set to “Current Month” but this report will display ALL “Pending” QA Scorecards or Audits regardless of the date range.
- Some of the filter settings may automatically be set depending on your role and permissions in Acuity.
4. Click Submit to run the report.
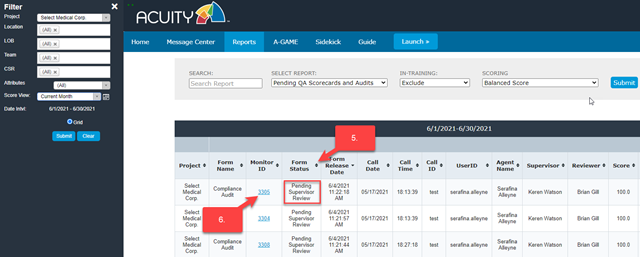
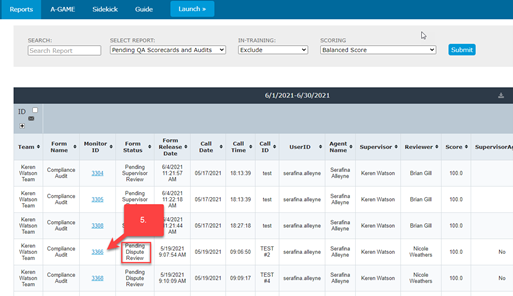
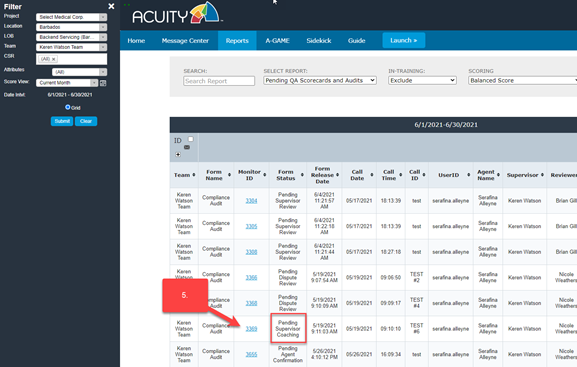
5. Click on the arrow of any column to sort the report. This report will show any pending or incomplete QA Scorecard or Compliance Audit.
6. Click on the Monitor ID of any form that is “Pending Supervisor Review”. The scorecard or audit monitor form will open in a separate window.
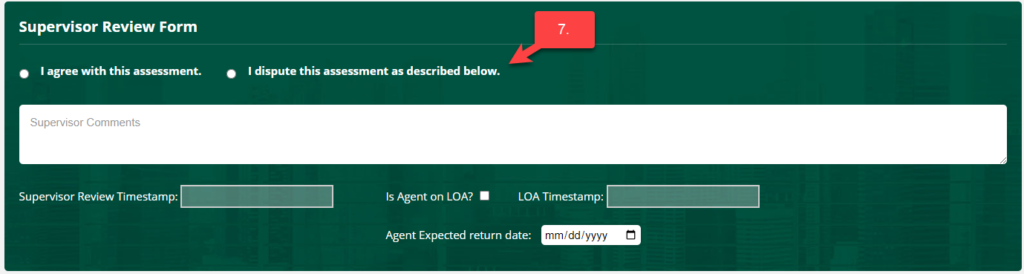
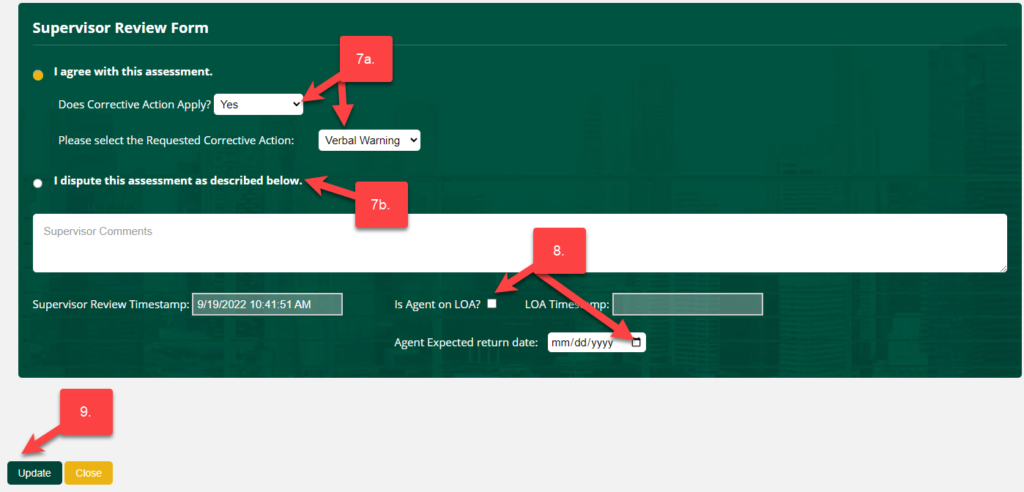
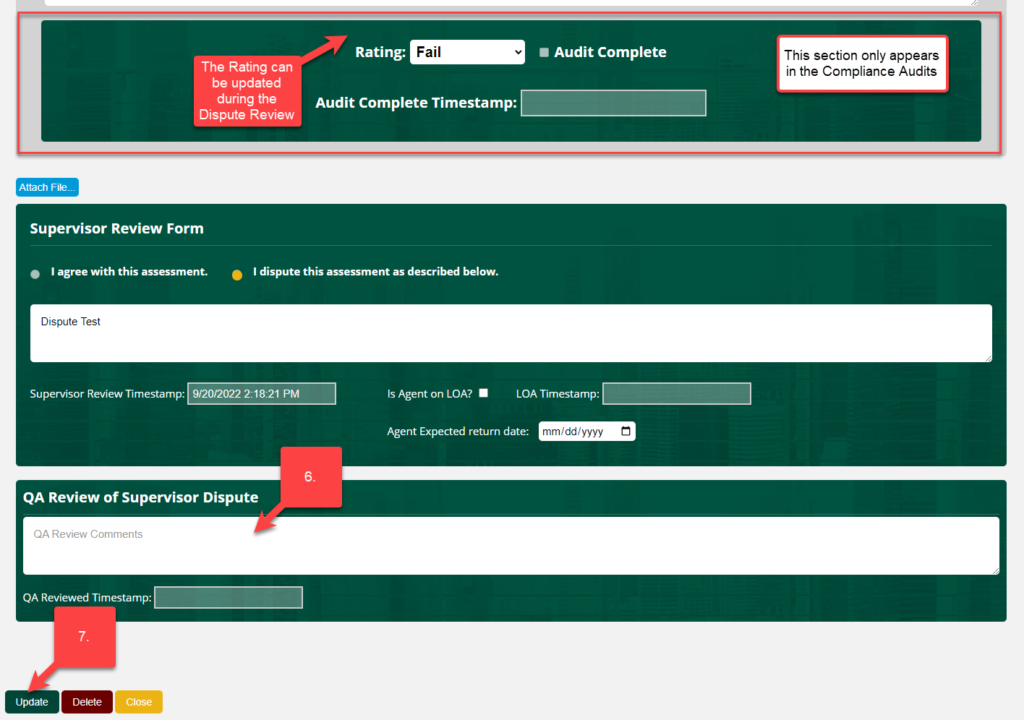
7. The Supervisor Review Section is located at the bottom of the scorecard or audit monitor. The supervisor can either agree with the audit or dispute it. Select one of these options.
7a) If the supervisor agrees, then the question “Does Corrective Action Apply?” will appear. If yes, then select the Corrective Action from the list.
7b) If the supervisor disputes the audit, then comments are required.
8. If the agent is on LOA (Leave of Absence), check Is Agent on LOA? box and enter the agent’s expected return date. To do this, click on the calendar icon, and select the date. If the agent is on LOA, the status will change to “Pending LOA”. “Pending LOA” pauses the review process. After the expected return date has passed, the audit will return to the next status in the review process.
If the agent is no longer on LOA, the supervisor can uncheck the Is Agent on LOA? This will change the status from “Pending LOA” to the next status in the review process.
9. When the review is complete, click Update. Note: if Close is clicked, the form will close and not be saved. It will remain in Pending Supervisor Review status.
NEXT STEPS:
After the Supervisor Review step is completed there are several possible next steps. These next steps will vary based on how the questions were answered and if the agent is located in Barbados or elsewhere.
Complete Pending Review (QA Scorecards only)
*****IMPORTANT NOTICE***
The status of “Complete Pending Review” was removed in February 2026. If a QA scorecard passes and there are no alerts, it will automatically be marked as “Complete”. No further action is required.
QA Scorecards may have a status called “Complete Pending Review“. Newly created QA scorecards will have this status if the scorecard passes and does not have any alerts. If the scorecard failed and/or had alerts, then the status is “Pending Supervisor Review” and must be reviewed. The “Complete Pending Review” status provides the supervisor with the option of reviewing. If the supervisor does not review the scorecard, it will auto-complete after several days.
NOTE: QA Scorecards in this status will NOT appear in the Pending QA Scorecard and Audits report as requested by KM2, however, they ARE visible in the QA Scorecard and Audit Log and the Tracker reports.
Dispute Review
After the QA Scorecard or Compliance Audit has been reviewed and disputed by the supervisor, the next step in the workflow is Pending Dispute Review. QA or compliance will now review the dispute by completing the following steps:
1. Click on the Reports tab.
2. Select the Pending QA Scorecards and Audits report from the dropdown menu.
3. Set the data filters in the Filter panel (project, location, group, team, CSR, score view, or Quality Form).
4. The results will appear in the window along with any scorecards and audits that are in a “pending” status regardless of the date range.
5. Open any audit that is in the Pending Dispute Review status and the audit will open in a separate window.
6. After reviewing the dispute, QA or compliance will make their final decision on the audit. Any of the fields can be updated during this process.
**Compliance Audit only** In the compliance audit, the Rating can be changed during the Dispute Review process. If the Rating is changed, the following will be the outcome after the review:
• Pass – will auto-complete
• Fail – Moves the status to “Pending Supervisor Review Post Dispute”
• Unresolved – Moves the status to “Pending Supervisor Review Post Dispute”
• Unclear – will auto-complete the audit
• Dispute Valid – will auto-complete the audit
• Tech – will auto-complete the audit
7. When the Dispute Review is complete, click Update. Note: Delete will delete the monitor. This is only to be used in rare circumstances. Deleted monitors require a reason and are logged and reviewed. Close will close without saving and the audit will remain in Pending Dispute Review status.
NEXT STEPS:
After the Dispute Review step is completed, the next step is Supervisor Review Post Dispute.
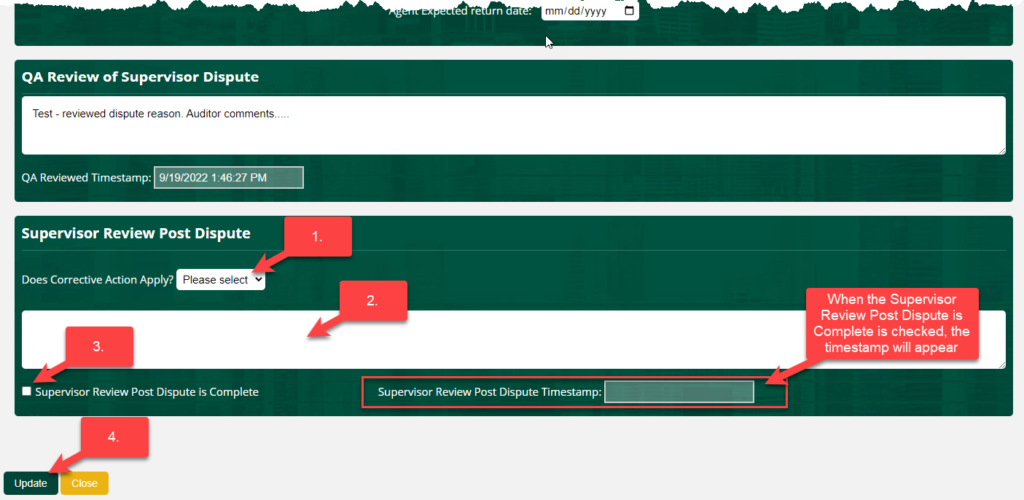
Supervisor Review Post Dispute
If the QA Scorecard or Audit was disputed, the supervisor will be required to review the audit again after QA or compliance completed the Dispute Review. This will be displayed in the Pending QA Scorecard and Audits Report and the status will be “Pending Supervisor Review Post Dispute”. The assigned supervisor at the time the Scorecard or Audit was created will be responsible to review the scorecard or audit.
- Answer the question, “Does Corrective Action Apply?” If yes, then select the Corrective Action from the list provided.
- Enter any comments in the field provided
- Check “Supervisor Review Post Dispute is Complete”. When this box is checked, the timestamp will appear.
- When the Post Dispute review is complete, click Update. Note: if Close is clicked, the form will close and not be saved. It will remain in Pending Supervisor Review Post Dispute status.
NEXT STEPS:
After the Supervisor Review Post Dispute step is completed there are several possible next steps. These next steps will vary based on how the questions were answered and if the agent is located in Barbados or elsewhere.
HR Review
There are two scenarios that will require the HR Review Process in Acuity: the Agent is located in Barbados AND there is a Corrective Action. This will be displayed in the Pending QA Scorecard and Audits Report and the status will be “Pending HR Review”.
1. Click on the Reports tab.
2. Select the Pending QA Scorecards and Audits Report.
3. Open the Filter panel to change the search parameters (project, LOB, Team, CSR, or Quality Form).
Notes:
- The Score View (date range) might be set to “Current Month” but this report will display ALL “Pending” QA Scorecards or Audits regardless of the date range.
- Some of the filter settings may automatically be set depending on your role and permissions in Acuity.
4. Click Submit to run the report.
5. Click on the arrow of any column to sort the report. This report will show any pending or incomplete QA scorecard or compliance audit.
6. Click on the Monitor ID of any form that is “Pending HR Review”. The form will open in a separate window.
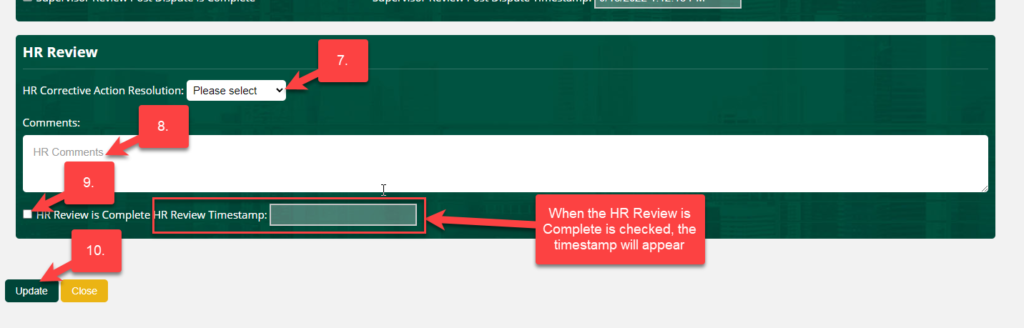
7. Select the HR Corrective Action Resolution from the list.
8. Enter comments and notes.
9. Check the box that the HR Review is Complete.
10. When the Post Dispute review is complete, click Update. Note: if Close is clicked, the form will close and not be saved. It will remain in Pending HR Review status.
NEXT STEPS:
After the HR Review step is complete, the next step is Supervisor Coaching.
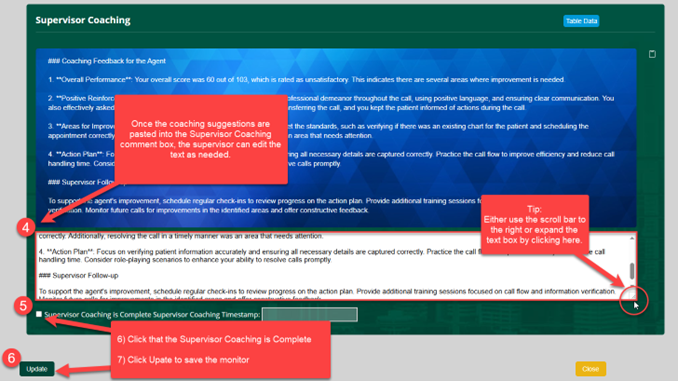
Supervisor Coaching
Once the prior steps (Supervisor Review, Dispute Review, Supervisor Review or HR Review) have been completed, the next step in the workflow is Supervisor Coaching. The assigned supervisor at the time the Scorecard or Audit was created will be responsible for coaching the agent. The supervisor will document the coaching in the QA scorecard or compliance audit form by completing the following steps:
1. Click on the Reports tab.
2. Select the Pending QA Scorecards and Audits report from the dropdown menu.
3. Set the data filters in the Filter panel (project, location, group, team, CSR, score view)
4. The results will appear in the window along with any Scorecards and Audits that are in a “pending” status regardless of the date range.
5. Open any Compliance Audit with the Pending Supervisor Coaching Status and the audit will open in a separate window.
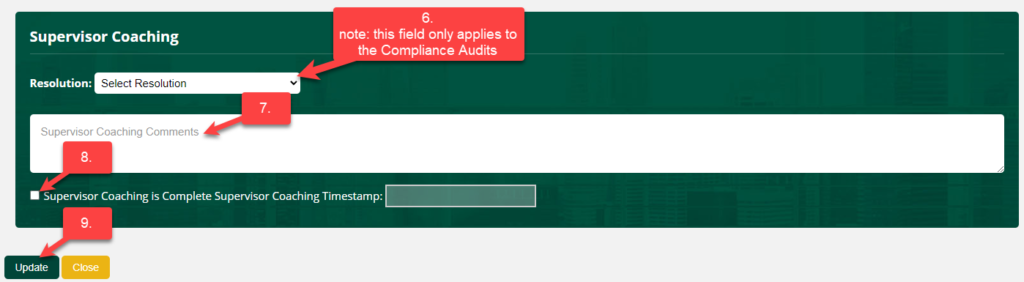
6. The Supervisor must select a Resolution. Note: this field only appears in the compliance audit monitor forms.
7. Enter comments regarding the coaching session in the space provided.
8. Click the box Supervisor Coaching is Complete.
9. When complete, click Update. Note: if Close is clicked, the form will close and not be saved. It will remain in Pending Supervisor Coaching status.
NEXT STEPS:
Automated Acuity Process to document the Coaching Interaction in Sidekick
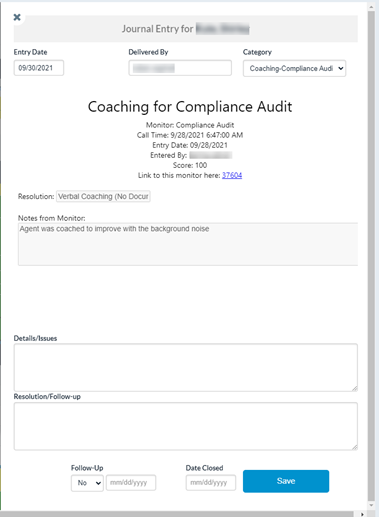
When Supervisor Coaching is complete in the QA Scorecard or Compliance Audit, an Auto-generated Journal Entry will be created in Sidekick to document the coaching interaction. The Journal Entry category for Auto-generated Journal Entry from the Compliance Audit will be designated as follows:
AUTO Coaching-QA Scorecard
AUTO Coaching-QA Scorecard-CA (this is for monitors where a Corrective Action was indicated)
AUTO Coaching-Compliance Audit
AUTO Coaching-Compliance Audit-CA (this is for monitors where a Corrective Action was indicated)
The agents do not receive a separate message notification regarding the Journal Entry since they will see the coaching comments when they confirm the coaching interaction in the Compliance Audit.
Below is a screenshot of an example of an Auto-generated Journal Entry from Sidekick. These entries contain a hyperlink to the monitor.
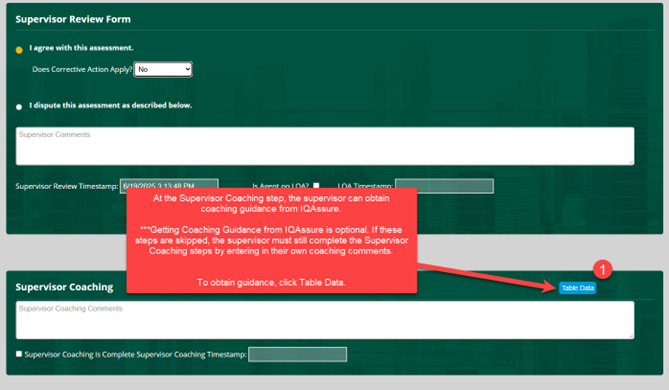
Supervisor Coaching with IQAssure
The following steps guide supervisors in using IQAssure to deliver coaching guidance using QA scorecards. ***PLEASE NOTE: Use of IQAssure is optional, and it is enabled on select scorecards only.
What is IQAssure? IQAssure, an AI coaching assistant that leverages existing quality monitoring data to enhance supervisor coaching. The system analyzes quality evaluations – including scores, analyst notes, and contextual feedback – to generate customizable coaching guidance for supervisors. Supervisors maintain full discretion over the implementation of suggested coaching strategies.
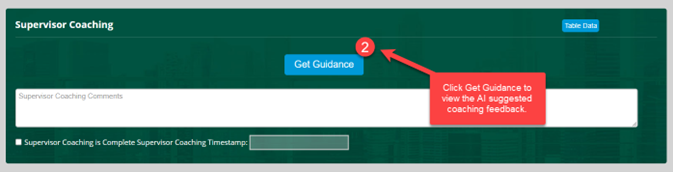
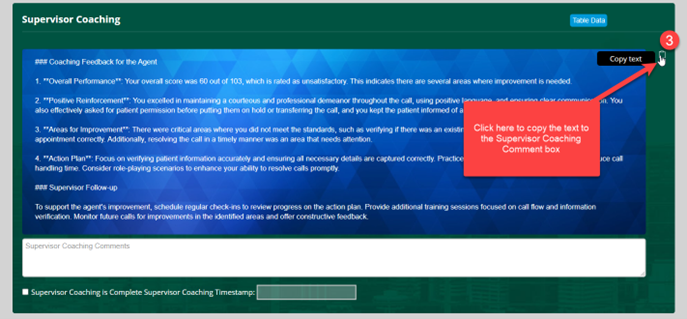
Supervisors will complete the same steps to complete the Supervisor Coaching for the QA scorecards with one exception: they can use the AI tool (IQAssure) to obtain impactful and detailed coaching suggestions.
Agent Confirmation
After the QA Scorecard or Compliance Audit has been reviewed and the agent has been coached, the next step is for the agent to confirm that the coaching was complete. Note: this step is eliminated in Barbados if the agent has a Corrective Action.
- Click on the Reports tab.
- Select the Pending QA Scorecards and Audits report from the dropdown menu.
- Click Submit to run the report. The results will appear in the window along with any scorecards and audits that are in a “Pending Status” (incomplete).
- Open any QA Scorecard or Compliance Audit with the Pending Agent Confirmation status and the monitor will open in a separate window.

- A text box is available for the Agent to enter any comments or feedback on the coaching experience.
- Click the Agent Confirmation of Supervisor Coaching & Review checkbox.
- When complete, click Save Audit. Once saved, the audit will be complete. If Close is clicked, the monitor will close and not be saved. The status will remain in Pending Agent Review Status.

Reports - QA Scorecard & Compliance
There are several reports that are available for QA scorecards & compliance audits. Some reports can be filtered using the filter panel on the left side of the screen. The filters can be set for Project, Location, LOB, Team, CSR, Score View (date range), and Quality Form. Access to the reports and the ability to change the filters are driven by the user’s role in Acuity. For example, a supervisor can only view their team’s data and an agent can only view their data.
REPORT: Pending QA Scorecards and Audits
- This report should be checked daily by anyone responsible for completing the review process (supervisors, HR, QA, compliance, and agents) to view any “pending” (not complete) QA Scorecards or Compliance Audits.
- Any “pending” monitor will display regardless of the Score View (date range) selected in the filter panel.
- This report will run faster if the parameters in the filter panel are narrowed down to a specific project, team, and quality form.
- In the example below, this report is set for all of Select Medical, all locations, all LOBs, all Teams, all CSRs, and all Quality Forms.
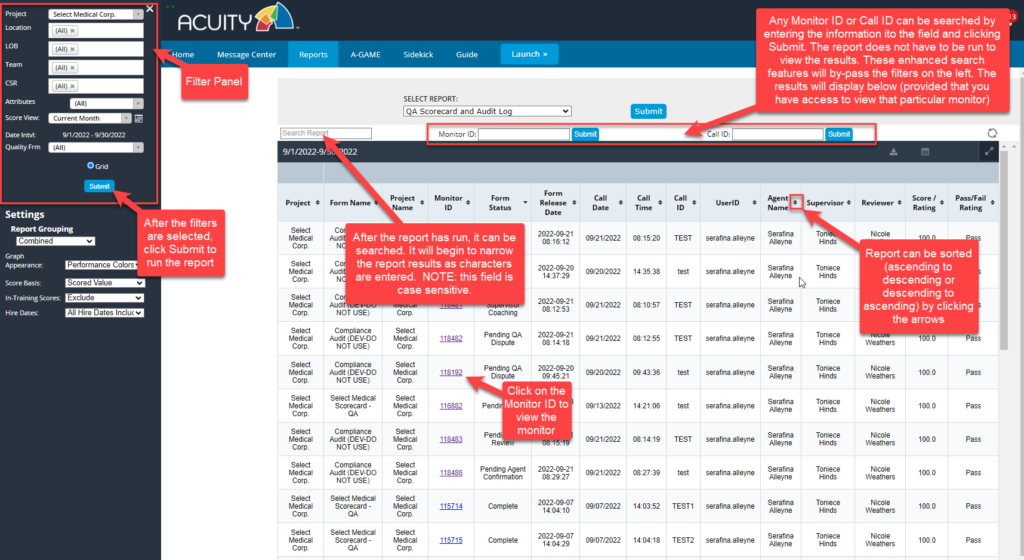
REPORT: QA Scorecard and Audit Log
-
- This report is similar to the Pending QA Scorecards and Audits report. This report will include all “pending” AND “complete” scorecards and audits.
- This report will run faster if the parameters in the filter panel are narrowed down to a specific project, team, and quality form.
- This report contains a few enhanced search features that will allow the user to find a scorecard or audit by Monitor ID or Call ID.
- In the example below, this report is set for all of Select Medical, all locations, all LOBs, all Teams, all CSRs, and all Quality Forms.
Employees who are NLE
What happens to QA Scorecards or Compliance Audits when the reviewee is no longer employed (NLE)?
There is an automated process that runs that will mark QA Scorecards or Compliance Audits that are in a pending status as “Complete” when an employee is no longer employed. The employee’s record must be updated in Kronos and show as terminated. Acuity receives the Kronos employee roster file from KM2 each day. When the roster file is imported, a program will run and mark any outstanding or pending monitor as “Complete”. The monitor will contain the following notation to indicate why it was auto-completed.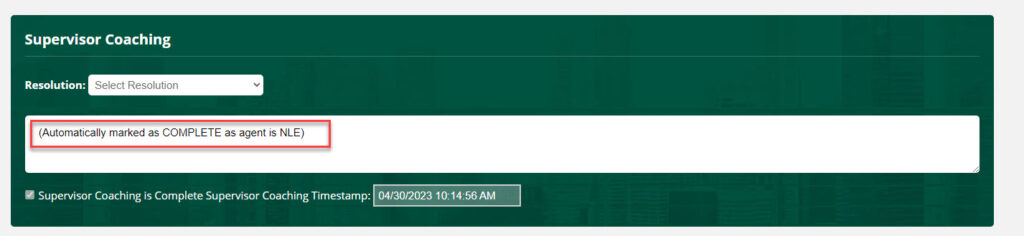
Performance Review: Agent
Creating "Performance Review - Agent" (for Supervisors)
The following steps will show how to create a “Performance Review – Agent” in Sidekick.
PLEASE NOTE: Team and agent names have been blurred out.
2. Click on Sidekick

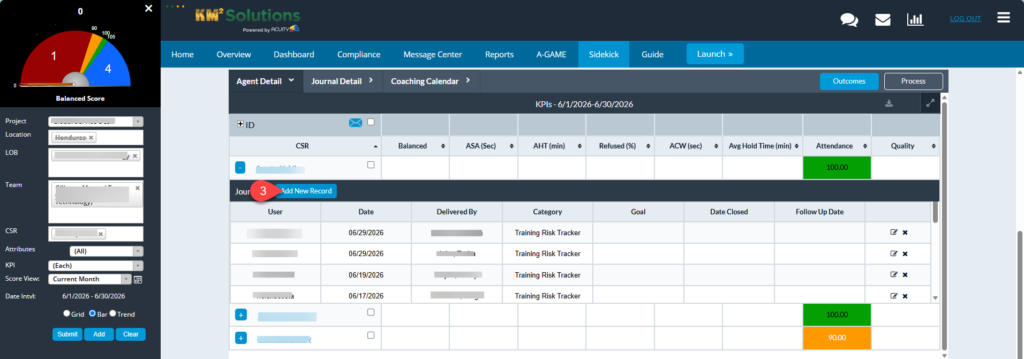
3. Select the agent’s name and click the + twice.
Click the + once to highlight the agent’s name (there will be a black bar above and below the name). Click again to view past Sidekick Journal Records and to display the Add New Record button.

4. Click on Add New Record
Click Add New Record to open a new Journal Entry (coaching form).

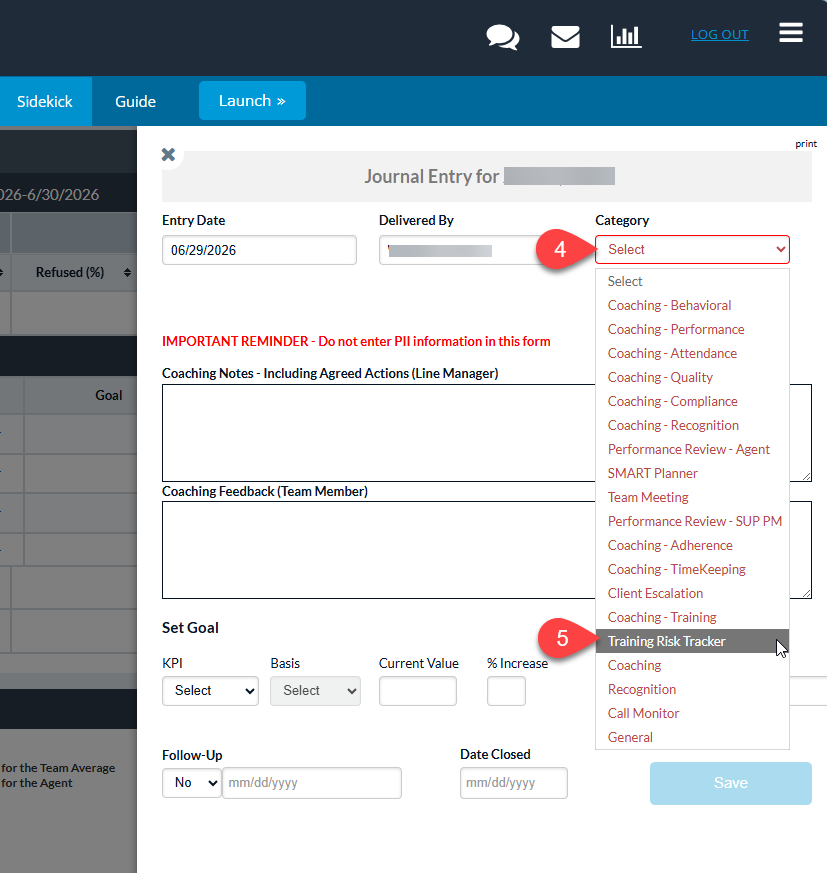
5. Journal Entry (coaching form)
Select Performance Review – Agent from the Category List.

6. Click “here” to open the Performance Review – Agent form.
The Performance Review form will open in a new browser window.

7. Select the Review Period: Section 1 – Specific Tasks
Section 1 – Specific Tasks
- The KPI results will change based on the agent’s performance for the Review Period.
- Only available Review Periods will be displayed. If a Performance Review – Agent has already been created for the agent, it can not be created again.
- This section cannot be edited.

8. Complete Section 2 – Skills & Behavior
Section 2 – Skills & Behaviors
- This section must be completed by the Supervisor.
- 1st column: describes the Capabilities
- 2nd column: enter Performance Expectations (this is a required field)
- 3rd column: select Rating (this is a required field)

9. Complete Section 3 – Feedback
Section 3 – Feedback
- This section is optional for the Supervisor to complete.
- 1st column: enter KPI/Skills Behavior Action Plan
- 2nd column: enter What specific action will be undertaken and what are the expected outcomes?
- 3rd column: enter a Follow-up date: click on the calendar icon to select the follow-up date.

10. Click on Save/Update
- Click the Save/Update button when complete.
- The Close button will close the form without saving the form.

11. Click on Confirm Save
- After the Performance Review has been saved, the following screen will appear and will display the Monitor ID #.
- Click Confirm Save and the Performance Review browser window will close.
NOTE:
- Once the Performance Review – Agent form has been saved, the status will change to “Pending Supervisor Coaching”. An Acuity Message will be sent to the Supervisor to remind them to complete the Coaching. (see step 13)
- The Performance Review – Agent form can be edited at this point. It cannot be edited after the Review has been delivered to the agent or when it is “Complete”.

12. View the newly created Performance Review – Agent form in Sidekick
The newly created Performance Review – Agent form will not display immediately in the Sidekick Journal Entries listed for the agent. To view the form immediately, click the – and then the + sign next to the agent’s name.

13. Acuity Message Notification – Performance Review – Agent Pending Supervisor Coaching

14. Edit/Open an existing Performance Review – Agent Form
Click the pencil on the right to view or edit the form.

15. Click on the Monitor ID number to view or edit
The Performance Review – Agent form will open in a separate browser window.

16. Supervisor Coaching and Agent Status
Supervisor Coaching:
- When the review has been delivered to the agent, check the box “Review Delivered & Send Notification to Agent”, then click the Update button.
- After this step is complete, the review cannot be edited.
- The review status will change to “Pending Agent Confirmation”. An Acuity Message will be sent to the agent so they can confirm that the review was delivered and the coaching was completed.
Agent Status:
- IMPORTANT: This should only be completed if the agent is NLE or on LOA. If the agent is LOA, NLE, or Other, select from the drop-down list, check the box “Agent Status is Complete”, then click the Update button. If the “Agent Status is Complete” checkbox is checked, the notification will not go to the agent to confirm/acknowledge.
- This step can be performed at any monitor status.
- After this step is complete, the review cannot be edited.
- The review status will change to “Complete”.

Confirming "Performance Review - Agent" (for Agents)
The following steps will show how to confirm supervisor coaching of Performance Review – Agent form.
PLEASE NOTE: Team and agent names have been blurred out.
2. Performance Review – Agent Notifications
Once your supervisor delivers your Performance Review – Agent, a message will be sent via Acuity Messages. The Performance Review status will be “Pending Agent Confirmation”.
Note: Any Performance Review that is “Pending Agent Confirmation” can also be viewed and accessed in the reports. (see Performance Review Reports section).

3. Unread Messages displayed in the browser tab

4. Open Performance Review – Agent Message and Confirm Coaching
Click on the Performance Review – Agent Message to open.

5. Open the Performance Review – Agent
Click on the link in the message to open the Performance Review – Agent.

6. View the Performance Review – Agent
The Performance Review – Agent will open in a separate browser window.
At the bottom of the form, check “Agent Confirmation of Supervisor Coaching & Review”. Then click the Save/Update button.
The browser window will close and the status of the Performance Review – Agent will change to “Complete”.

Performance Review - Agent Reports
Reports
To view the Reports – click on the Reports menu at the top of the screen.
The Performance Review Reports can be found in the Sidekick report section. The report view is determined based on the filters selected in the left filter panel.

1. Performance Review Pending Report
- The Performance Review Pending Report will display any outstanding Performance Reviews. These are Reviews that have been created but maybe “Pending Supervisor Coaching” or “Pending Agent Confirmation”.
- The report view is determined based on the filters selected in the left filter panel.
- Click the Submit button to run the report.

2. Click on the Review ID to view/edit the form.
The form will open in a separate browser window.

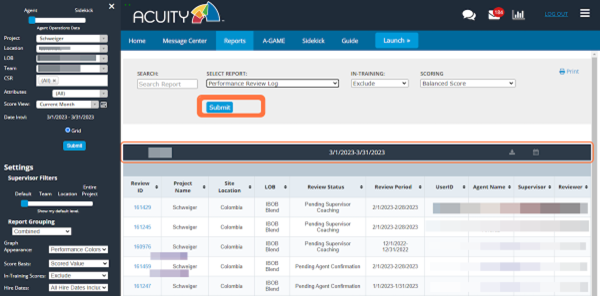
3. Click on Performance Review Log
- The Performance Review Log will display ALL Performance Reviews (“Pending Supervisor Review”, “Pending Agent Confirmation”, and “Complete”.
- The report view is determined based on the filters selected in the left filter panel.
- Click the Submit button to run the report.
Performance Review: SUP PM
Creating Performance Reviews - SUP PM (for managers)
The following steps will show how to create a “Performance Review – SUP PM” in Sidekick. These review forms are to be created for supervisors and PMs.
PLEASE NOTE: Some information has been blurred out.
1. Select the reviewee’s name in Sidekick
Select the filters, find the reviewee’s name, and click the + next to their name.

2. Click on Add New Record

3. Journal Entry (coaching form)
Select Performance Review – SUP PM from the Category list.

4. Click “here” to open the Performance Review – SUP PM form.
The Performance Review – SUP PM will open in a new browser window.

5. Enter the Review Date
Click on the calendar icon and select the date.

6. Click on here

7. Complete Section 1 – this section is to be completed MONTHLY for the previous month’s outcomes.
- The first 5 spaces are available to enter campaign-specific KPIs, Targets, and Actual. The Rating will automatically display based on the Actual vs. Target.
- Enter Actual outcomes for the 10 “generic” KM2 KPIs.

8. Complete Section 2 – this section is to be completed QUARTERLY.
- Enter the Reviewer’s comments on performance in the space provided.
- Select the Rating from the dropdown list provided.

9. Complete Section 3 – this section is to be completed QUARTERLY.
- Enter the Reviewer’s comments on performance in the space provided.
- Select the Rating from the dropdown list provided.

10. Complete Section 4 – This section is to be completed when an action plan is appropriate.
Enter KPI Action Plan.
Enter specifications that will be undertaken and the expected outcomes.
Enter a follow up date by clicking on the calendar icon.

11. Click on Save/Update or Save as Draft
- Save/Update will mark the review with a “COMPLETE” status and will send a notification via Acuity Messages to the reviewee that a Performance Review has been created. *****IMPORTANT NOTE: Once this form is saved and in a “COMPLETE” status, it can not be edited or deleted.*****
- Save as Draft will mark the review with an “In Draft” status and will hold the review until it is ready to be “COMPLETE” and sent to the reviewee. It can be updated and completed at a later date.

12. Click on Confirm Save
Once review form is Saved or Saved as Draft, a confirmation will appear and indicate the monitor ID number associated with the review.

View Completed Performance Review - SUP PM (for reviewee)
Performance Review – SUP PM Notification via Message Center
The following steps will show how the reviewee will be notified of a completed Performance Review – SUP PM and how to view the form.
Once your supervisor delivers your Performance Review, a message will be sent via Acuity Messages.
NOTE: these reports can also be accessed via the Performance Review – SUP PM Log report.

Sample Message – Performance Review SUP PM
Below is a sample message of the Acuity notification that a Performance Review was completed. Click on the link to open the review form. The form will open in a new browser window.
*****NOTE: Once reviews are sent to the reviewee, they are in a “COMPLETE” status and can no longer be edited or deleted.*****

Performance Review - SUP PM Reports
Performance Review – SUP PM Reports
- To view the Performance Review – SUP PM Log reports, click on the Reports menu at the top of the screen.
- The Performance Review – SUP PM Log report can be found in the Sidekick for Managers section.
- Select the report and click Submit. Note: the date range (score view) may need to be adjusted in the filter panel.

View Log report and Open Performance Review SUP PM forms
- The report will display the Performance Reviews – SUP PM forms.
- Click on the review ID to open the Performance Review in a new browser window.
- Reminder: Performance Reviews that are in a “COMPLETE” status can not be edited or deleted.

SMART Planner (PIP) Forms
Creating & Editing SMART Planner (PIP) Forms --- for Supervisors
1. Click on Sidekick
NOTE: The examples below are test records only and do not contain any real data.

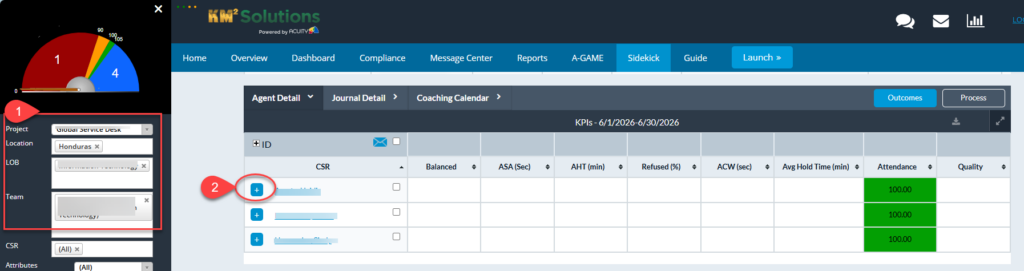
2. Select the agent or reviewee by Click on + twice

3. Click on Add New Record

4. Select SMART Planner from Category

5. Click on Here to open the SMART Planner form
NOTE: The form will open in a new browser window.

6. Enter Review Length

7. Enter the Area(s) to Improve (KPI or Behavior)
Enter a detailed description of improvement areas.

8. Enter Objectives or Targets
Enter a detailed description of the objectives or targets to be met by the agent/reviewee.

9. Enter Specific Measurable Actions
Enter detailed and specific measurable actions to be taken by the agent/reviewee to meet the objectives and targets.

10. Click on Add Row
Repeat the steps above until each area to improve has been entered. If more than three rows are needed, click the Add Row button.

11. Enter Review Date
Click on the calendar icon and select the review date.

12. Enter Results
Enter the results of the review.

13. Enter Comments
Enter any additional comments in the field provided.

14. Click on Add Row
Repeat the steps above for each review date. If more than three rows are needed, click the Add Row button.

15. Remove Last Row
If a row needs to be deleted, click the Remove Last Row button.
PLEASE NOTE: This only removes the last row.

16. Notify Agent Via Acuity Messages
By default, The Notify Agent via Acuity Messages box will be checked each time you open this form.
NOTES:
- If you do not want the agent/reviewee to be notified, uncheck this box.
- The agent will receive a message via Acuity Messages that a SMART Planner has been created. The message will contain a link to view the form. (see Viewing SMART Planner Form (PIP) — for Agents section in this guide for more details)
- Messages are batched and sent approximately 10 minutes after the form has been saved.
- This message will only be sent to the agent the first time this form is saved with the “Notify Agent via Acuity Messages” box checked.

17. Click on Save Monitor
When all of the information has been entered, click the Save Monitor button.
****NOTE: ONCE FORMS ARE SAVED, THEY CAN NOT BE DELETED****

18. Click on Confirm Save
- Once the form has been saved to Acuity, this message will be displayed and will include the monitor ID and Save Time.
- NOTE: The Call ID and Call Date don’t apply to the SMART Planner form. The Call ID will always be blank.
- Click the Confirm Save button. This will close the browser window and you will return to the Sidekick view in Acuity.

19. View the newly created SMART Planner in the list
The newly created SMART Planner form will NOT immediately appear in the agent’s list of Sidekick Journal Entries. To view it, click the – next to their name, then click the +. This refreshes the view.

20. Update or View saved SMART Planner forms
- Click on the pencil to update or view the SMART Planner form. This can also be done through the reports. (see the Report section of the guide for more information)
- Forms in the “Open” status can be edited while forms that are “Complete” can not be edited.

21. Click on the monitor ID to open the form
NOTE: The form will open in a new browser window.

22. Update Form
- Forms in an “Open” status can be updated.
- Forms in a “Complete” status are view only and can not be edited.
- When the information has been updated, click the Update button to save it.
- Once updated, the Smart Planner browser window will close and you will return to the Sidekick view in Acuity.

Viewing SMART Planner (PIP) Form --- for Agents
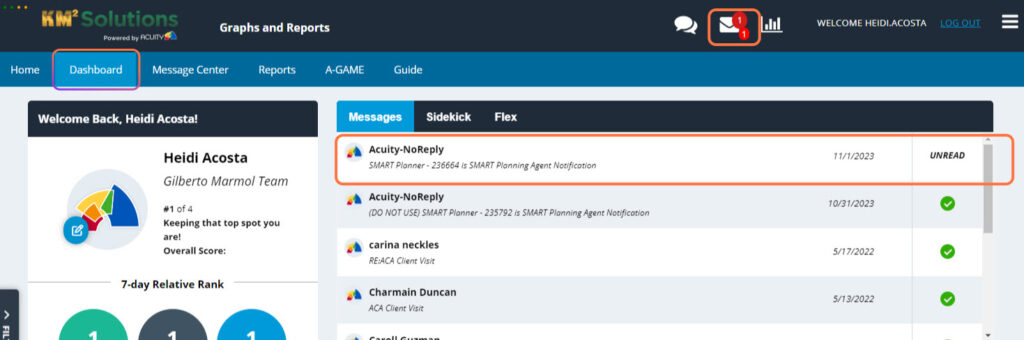
1. Dashboard View
NOTE: The examples below are test records only and do not contain any real data.
From the Dashboard tab, you will see that you have new messages in two places: the Message panel or the envelope icon at the top of the screen.
2. View Acuity Messages
Click on the Message Center tab

3. Inbox
Unread messages will appear in bold, click on the message to open.

4. SMART Planner notification message
- Below is the notification that will be received when a SMART Planner has been created.
- Click here to open and view the form. This can also be done through the reports. (see the Report section of the guide for more information)
- NOTE: the form will open in a new browser window.

5. View form
- This form is read-only and can not be edited by the agent/reviewee.
- Click the Close button to close the form.
- Once closed, the SMART Planner browser window will close and you will return to the Message Center in Acuity.

Reports SMART Planner (PIP) Form
1. Click on Reports
To view the SMART Planner (PIP) reports, click on the Reports menu at the top of the screen.

2. SMART Planner Pending Report
- The SMART Planner Pending Report can be found in the Sidekick report section. Depending on the user’s role, the report view may depend on the filters selected in the left panel. NOTE: the date range is bypassed in this view.
- The SMART Planner Pending Report will only display the monitors that are in an “Open” status.
- Click on the SMART Planner Pending report then click the Submit button.

3. Click on the Monitor ID to view/edit the form.
- The form will open in a new browser window.
- Depending on the user, the form can be viewed or edited from this report.

4. Click on Close or Save Monitor
Once the monitor is saved or closed. The browser window will close and you will return to the Report view in Acuity.

5. SMART Planner Log
- The SMART Planner Log Report can be found in the Sidekick report section. Depending on the user’s role, the report view may depend on the filters selected in the left panel. NOTE: the date range is NOT bypassed in this view.
- The SMART Planner Log Report will display the monitors that are in an “Open” and “Complete” status.
- Click on the SMART Planner Pending report then click the Submit button.

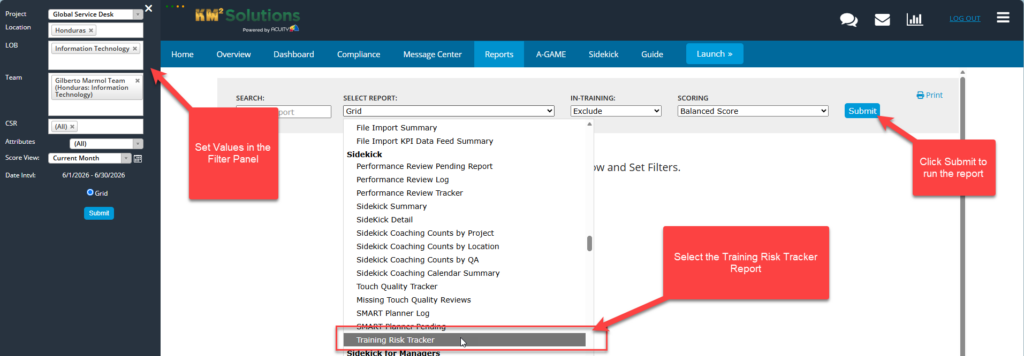
Training Risk Tracker
Create or Update Training Risk Tracker Forms
*****IMPORTANT NOTICE***
The Training Risk Tracker form may only be created or modified by members of the Training Team.
Training Risk Tracker Forms are created or updated in Sidekick. (Note: The terms “form” and “monitor” are used interchangeably)
-
- Select Project, Location, LOB, and Team in the filter panel, then navigate to the Sidekick tab.
- Find the associate’s name and click the + next to their name.
- Click Add New Record.
- Click the Category dropdown list.
- Select Training Risk Tracker.
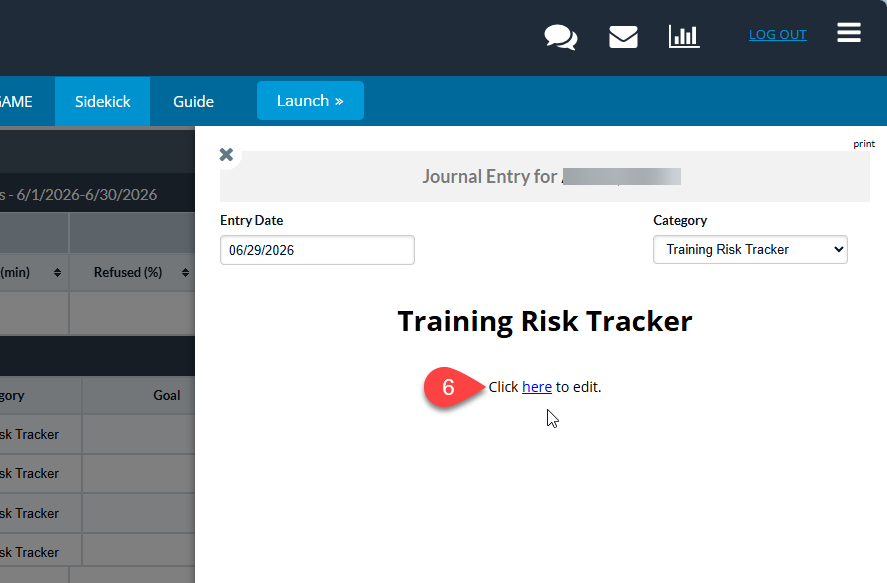
- Click Here to create or edit. A new monitor will open in a separate browser window.
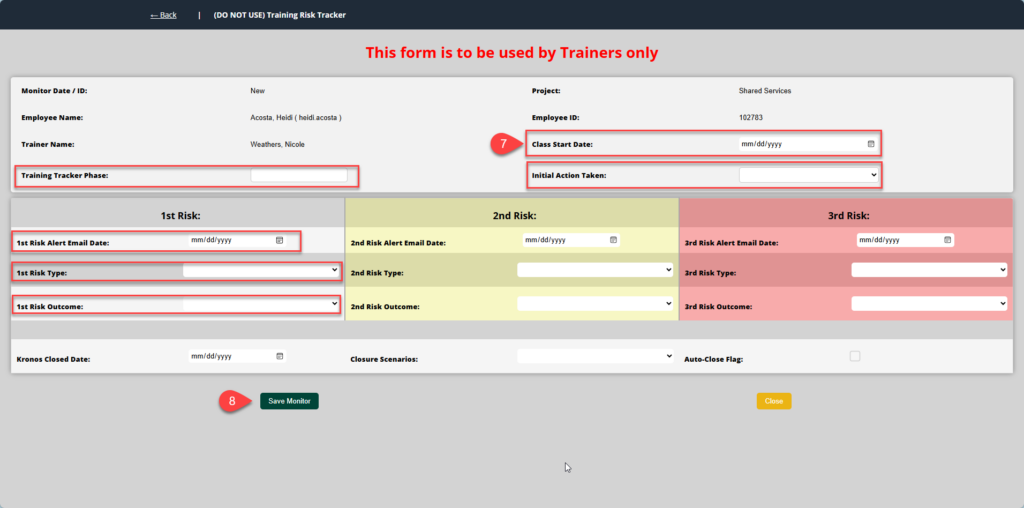
- The following fields are required:
- Class Start Date
- Training Tracker Phase
- Initial Action Taken
- 1st Risk Alert Email Date
- 1st Risk Type
- 1st Risk Outcome
- NOTE: Fields for 2nd Risk, 3rd Risk, Kronos Closed Date, and Closure Scenarios may also be completed, but they are not required when initially saving the monitor. These fields can be updated later.
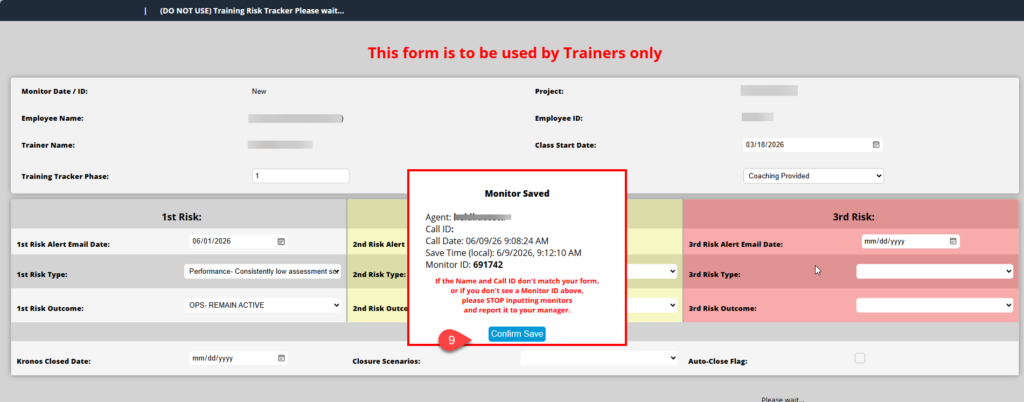
- Click Save Monitor.
- After saving the monitor in Acuity, a confirmation message appears—click Confirm Save. The window will close and return to Sidekick.
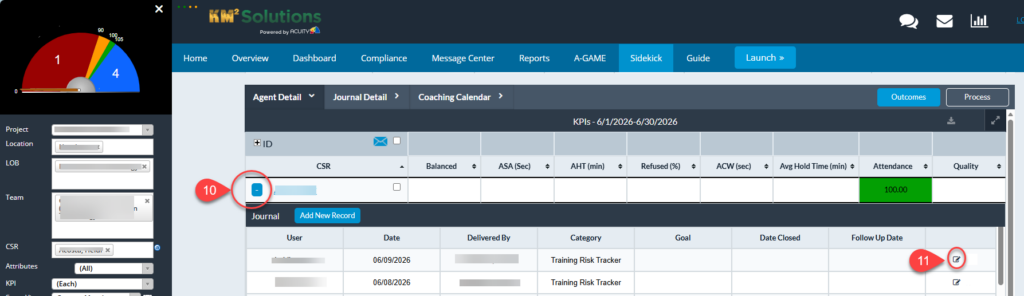
- View or edit a Training Risk Tracker: To open the same Training Risk Tracker during the same Sidekick session, click the – then + button next to the associate’s name. This will refresh the screen, and the newly created Training Risk Tracker will appear in the list.
- Click the pencil icon to edit/view the monitor.
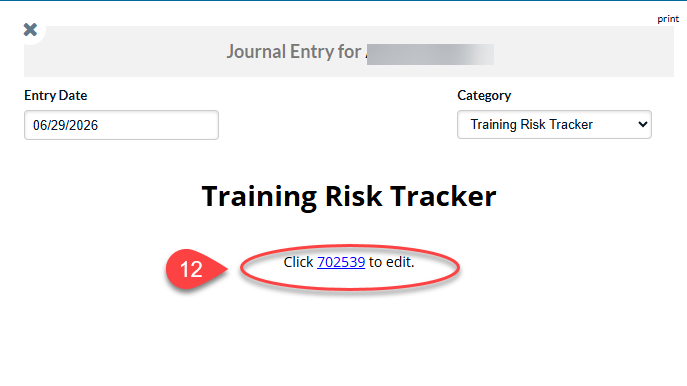
- Click on the monitor ID to open/edit the Training Risk Tracker. The monitor will appear in a new browser window.
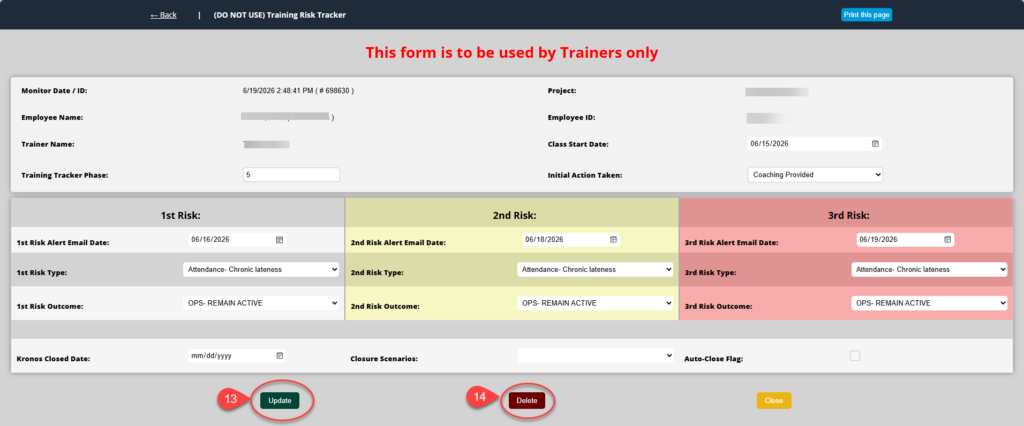
- If editing, enter the additional fields and click Update. The window will close and return to Sidekick.
- If deleting a record, click the Delete button and complete the delete reason. (NOTE: Delete function is only available the training team and admin. Please see below under the Training Risk Tracker Statuses section of this guide for more information about the Delete functionality.)
Training Risk Tracker Statuses
- Open:
-
- Records remain Open and editable until the Kronos Closed Date is entered or until it is auto-closed by Acuity.
-
- Closed:
-
- When the trainer enters a Kronos Closed Date, the record will be marked as Closed.
- If no Kronos Closed Date is entered, Acuity records will automatically close 30 days after the last risk date on the form. The Kronos Closed Date will be set to the auto-close date, and a flag will indicate that the record was system-closed.
- Once Closed, records cannot be updated or deleted.
-
- Delete:
-
- Only open monitors can be deleted.
- After deletion, the record is permanently removed, except for the following details retained for tracking and auditing: Monitor ID, Form Name, Project, Agent ID, Agent Name, Deleted By, Deleted Date, and Delete Reason.
- Any associated Journal Entries would then be deleted in batch.
- Only Admin or people in the Training Department have access to delete these records.
-
Training Risk Tracker Reports
- The Training Risk Tracker report can be found under the Sidekick Report section.
- The report is run using the filter panel on the left.
- Report access will be limited to users in the Training Team and Management roles.