User Guide – Chime
This User Guide was developed to cover custom development created specifically for Chime. Depending on your role, project, or permissions, some of the user guides may apply to you.
Alight
Approved URC Floor Sweepers
This reference guide will provide the steps for approving an agent as a Floor Sweeper for the current month in Acuity.
Important Notes:
- The functionality to approve an agent as a Floor Sweeper is provided to supervisors and above.
- Floor Sweeper hours are provided to Acuity from Workday. Once an agent has Floor Sweeper hours (greater than zero) in Workday, that agent is approved as a Floor Sweeper for the month. This new report provides the ability for supervisors and above to view and manually approve agents as a Floor Sweeper in Acuity for that month even if they do not have Floor Sweeper Hours in Workday.
- URC Hours are provided to Acuity from the URC Files.
To view and approve agents as a Floor Sweeper:
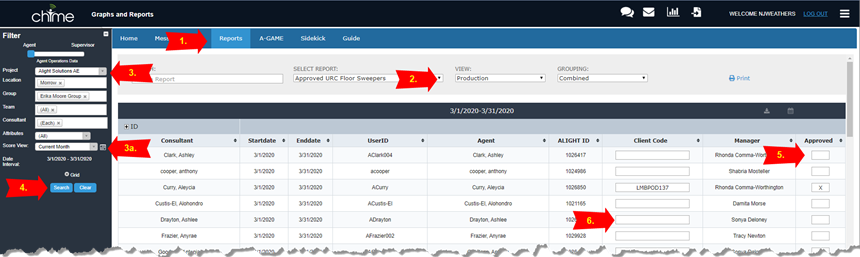
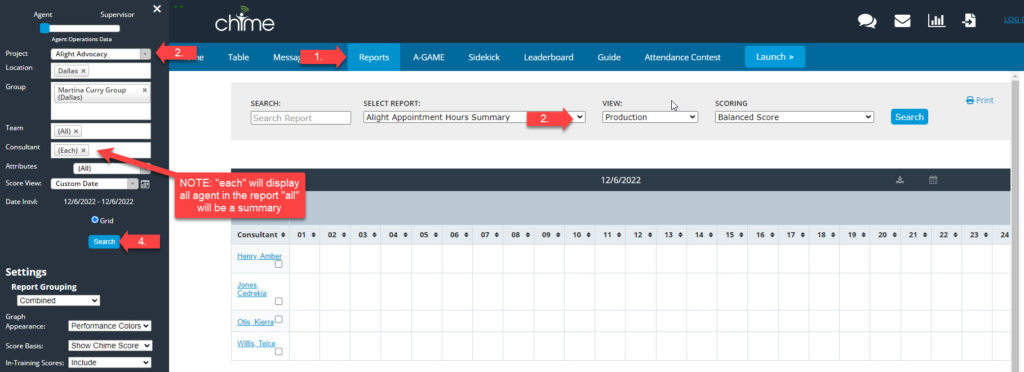
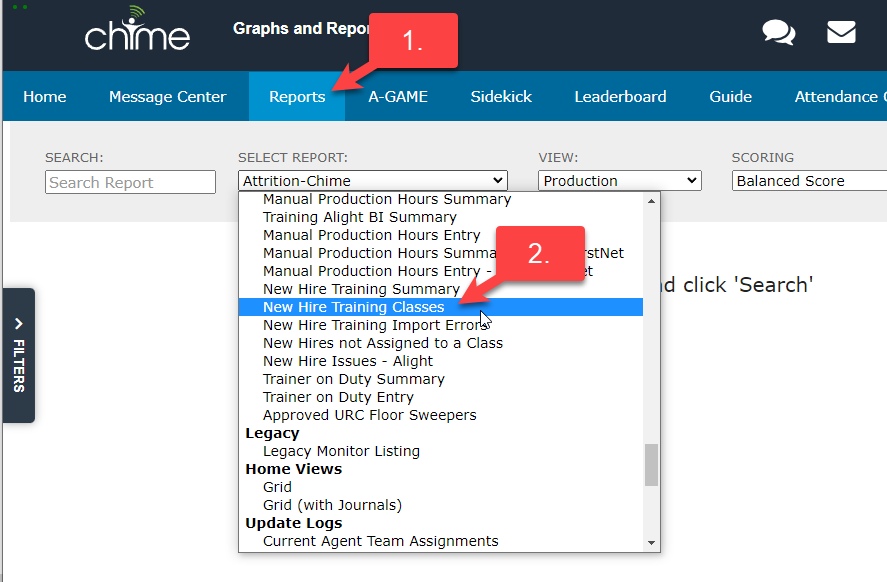
- Click on the Reports tab located in the top bar in Acuity.
- Select Approved URC Floor Sweepers under the Training Reports section.
- Select the filters by Project, Location, Group, Team, Consultant, and Score View time period.
3a. Select the Current month in the Score View (date range)
- Click Search to display the report results. The report will display the agents and show if they have been approved as a Floor Sweeper.
- To mark an agent as approved, place an “X” in the Approved column.
- Add the client code (not a required field).
- When completed, close the report and the changes will be saved.
Manual Production Hours for Advocacy Agents
This reference guide will provide the steps to manually add production hours for select Advocacy agents.
Notes:
- The functionality to view and add production hours is limited to specific supervisors and above. If access to these reports is required, contact the TouchPoint One Acuity team for assistance.
- There are several agents that require manual entry for production hours. If additional agents need to be added or removed from this report, please contact the TouchPoint One Acuity team for assistance.
VIEW SUMMARY REPORT
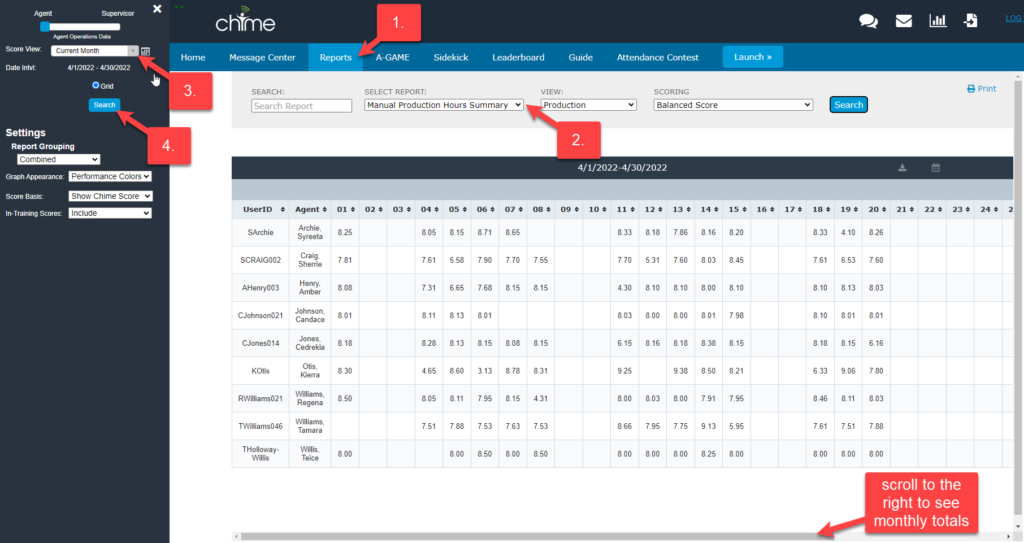
To view the Manual Production Hours Summary report:
- Click on the Reports tab located in the top bar in Acuity.
- Select Manual Production Hours Summary under the Training Reports section.
- Select the Score View (date range) filter to view the time period. (Example: Previous Month or Current Month)
- Click Search to view the report
MANUALLY ENTER PRODUCTION HOURS
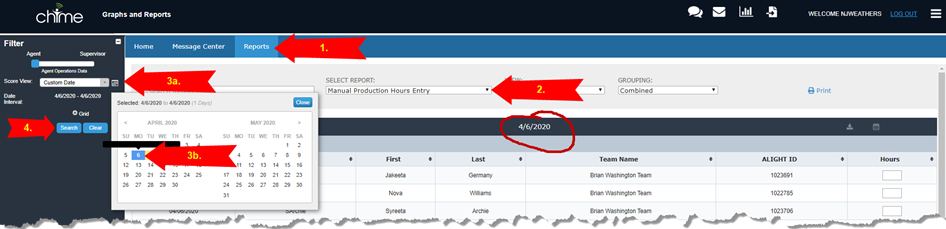
To enter Manual Production Hours:
- Click on the Reports tab located in the top bar in Acuity.
- Select Manual Production Hours Entry under the Training Reports section.
- Select the Score View (date range):
a. Click on the calendar icon for a custom date.
b. Double-click on the date.
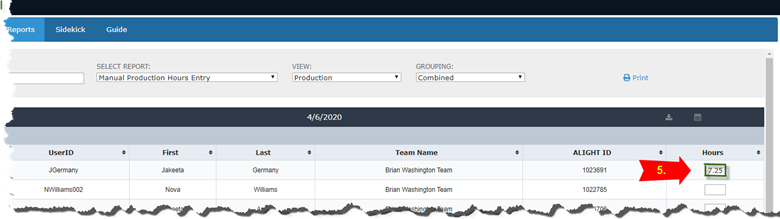
4. Click Search to view the report for the selected date.
** NOTE: if any date range is entered – the report will display the first date of the date range.
5. Enter the hours for each agent and press TAB. After pressing TAB, the box will turn green for a moment to show the time was saved.
** NOTE: to remove the hours, delete the time and press TAB. The box will turn green for a moment to show the time was deleted.
Manually Add Boost Training Hours (AKA Cont Ed) directly into Acuity
OVERVIEW
This reference guide will provide the steps for manually adding Continuing Education (CE) Training hours in Acuity.
Import Notes:
- The functionality to manually update CE hours are provided to SDMs and above.
- The Boost Training Time must be submitted thru ALIS or Cognos. If it has NOT been submitted and/or approved by Alight, only then should the hours be manually entered into Acuity. If the training time has been approved by Alight, the time will come over in the ALIS or Cognos files so it should not be entered in Acuity.
ENTER CE (Boost Training) HOURS – DAILY CONTINUE ED HOURS ENTRY (ACTIVE CSRs)
Hours can be entered in the Daily Continue Ed Hours Entry report by doing the following steps:
- Click on the Reports tab located in the top bar in Acuity.
- Select Daily Continue Ed Hours Entry under the Training Reports section.
- Select the filters by Project, Location, Group, Team, Consultant, and Score View time period. (Note: the filter only displays active CSRs, to enter time for inactive CSRs, see below)
3a. Click on the calendar to display the dates. To enter the hours, click on the date. Each day needs to be added separately. Double-click on the desired date.
- Click Search to display the results.
- The Date in the report indicates which date is being updated (top of the report in the blue bar).
- Click in the POD and Hours fields and add the information then press TAB or ENTER. The box around the value should turn GREEN indicating it has been saved. If the line around the box turns RED, this indicates an error in saving. Please contact Touchpoint One to investigate.
ADJUST CE HOURS – DAILY CONTINUE ED HOURS ENTRY (INACTIVE CSRs)
Hours can be entered in the Daily Continue Ed Hours Entry report for inactive CSRs by doing the following steps:
- Click on the Reports tab located in the top bar in Acuity.
- Select Daily Continue Ed Hours Entry under the Training Reports section.
- Select the filters by Project, Location set to All, Group set to All, Team set to ALL, Consultant set to ALL, and time period
3a. Click on the calendar to display the dates. To adjust the hours, click on the date that needs to be adjusted. Double-click on the desired date.
- Click Search to display the results. This will display all agents (active and inactive in the project). Sort by the last name to find the agent.

- The Date in the report indicates which date is being entered.
- Click in the Hours field and add the information then press TAB or ENTER. The box around the value should turn GREEN indicating it has been saved.
- Click in the POD field and add the information then press TAB or ENTER. The box around the value should turn GREEN indicating it has been saved.
REVIEW CE HOURS – CONTINUE ED SUMMARY REPORT
Hours can be reviewed in the Continue Ed Summary Report by doing the following steps:
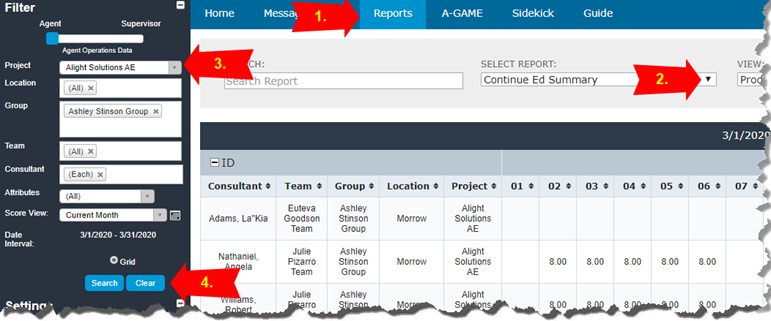
- Click on the Reports tab located in the top bar in Acuity.
- Select Report Continue Ed Summary under the Training Reports section.
- Select the filters by Project, Location, Group, Team, Consultant, and Score View time period.
- Click Search to display the results.
Tips & Hints:
- Slide the cursor over to the right side of the report to view the Total column. This column can be sorted by clicking the arrows to sort from lowest to highest and again to sort from highest to lowest.
Manually Appointment Hours directly into Acuity
OVERVIEW
This reference guide will provide the steps for manually adding Appointment hours in Acuity.
Import Notes:
- The functionality to manually add Appointment hours are provided to SDMs and above.
- The Appointment time must be submitted thru ALIS or Cognos. If it has NOT been submitted and/or approved by Alight, only then should the hours be manually entered into Acuity. If the training time has been approved by Alight, the time will come over in the ALIS or Cognos files so it should not be entered in Acuity.
ENTER APPOINTMENT HOURS – ALIGHT APPOINTMENT HOURS ENTRY
Hours can be entered in the Alight Appointment Hours Entry report by doing the following steps:
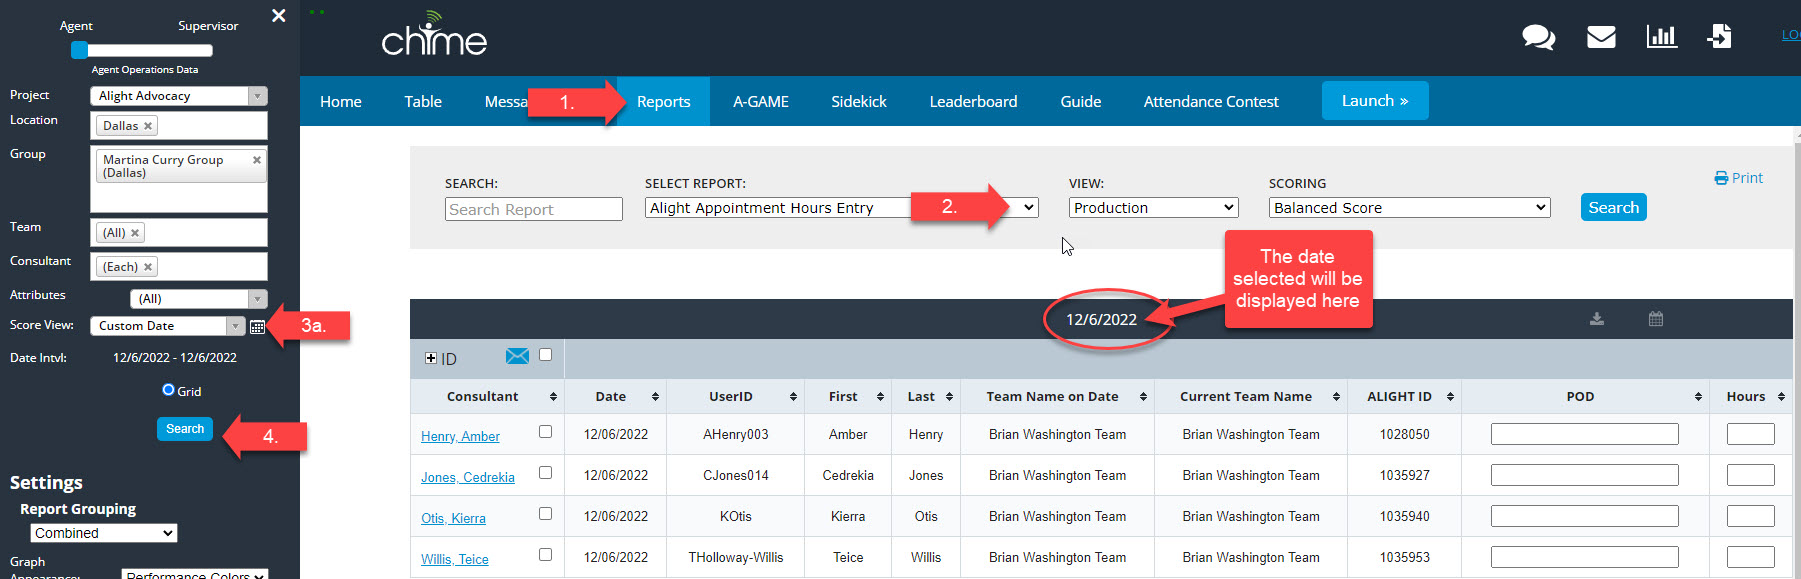
- Click on the Reports tab located in the top bar in Acuity.
- Select Alight Appointment Hours Entry under the Training Reports section.
- Select the filters by Project, Location, Group, Team, Consultant, and Score View time period.
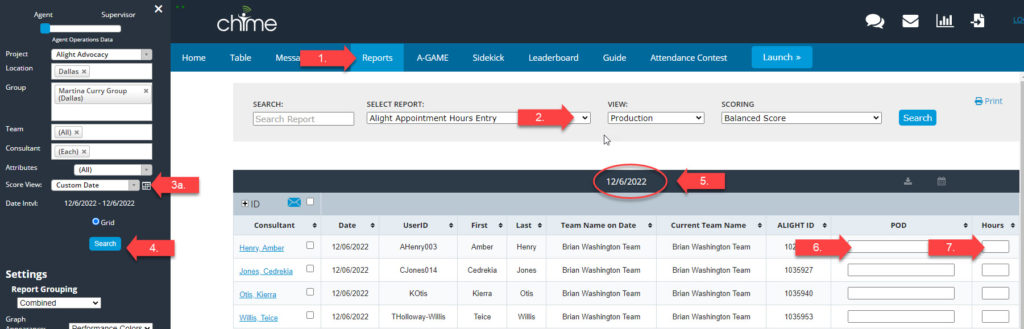
3a. Click on the calendar to display the date. To enter the hours, click on the date. Double-click on the desired date.
- Click Search to display the results.
- The Date in the report indicates which date is being updated (top of the report in the blue bar).
- Click in the POD field, enter the POD name, and press TAB or ENTER. The box around the value will turn GREEN indicating it has been saved.
- Click in the Hours field, enter the POD name, and press TAB or ENTER. The box around the value will turn GREEN indicating it has been saved.
REVIEW APPOINTMENT HOURS – ALIGHT APPOINTMENT HOURS SUMMARY REPORT
Hours can be reviewed in the Alight Appointment Hours Summary Report by doing the following steps:
- Click on the Reports tab located in the top bar in Acuity.
- Select Report Alight Appointment Hours Summary under the Training Reports section.
- Select the filters by Project, Location, Group, Team, Consultant, and Score View time period.
- Click Search to display the results.
Tips & Hints:
- Slide the cursor over to the right side of the report to view the Total column. This column can be sorted by clicking the arrows to sort from lowest to highest and again to sort from highest to lowest.
Training Classes
Setup New Hire Training Class
IMPORTANT & CRITICAL NOTES:
- All Chime employees are considered in production UNLESS they are assigned to a New Hire Training Class.
- It is critical for reporting and billing purposes that New Hire Training Class Rosters are set up timely and maintained in Acuity. Classes must be set up in Acuity by the first day of the class.
- The dates of the training class will determine the dates the employee is in a t-code. If these dates are very important to billing. If the dates change, they must be updated in Acuity.
- Trainees MUST be set up in the proper Project in Workday. If the trainee is in the wrong Project, it will have a negative effect on reporting and billing.
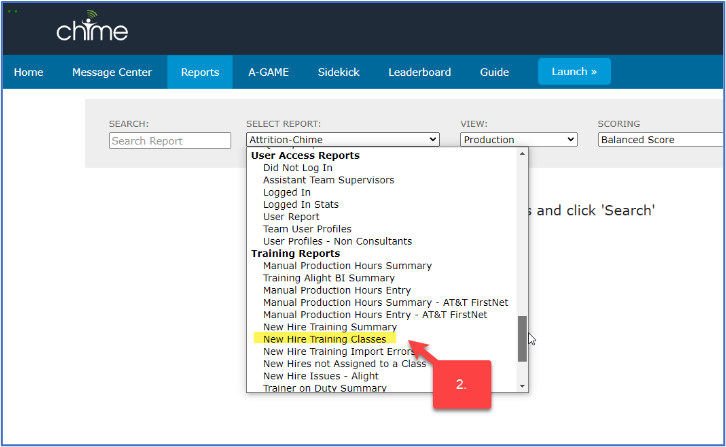
- After logging into Acuity, click on the Report menu
- Under the Training Reports section, select New Hire Training Classes
- Click on the New Training Class button
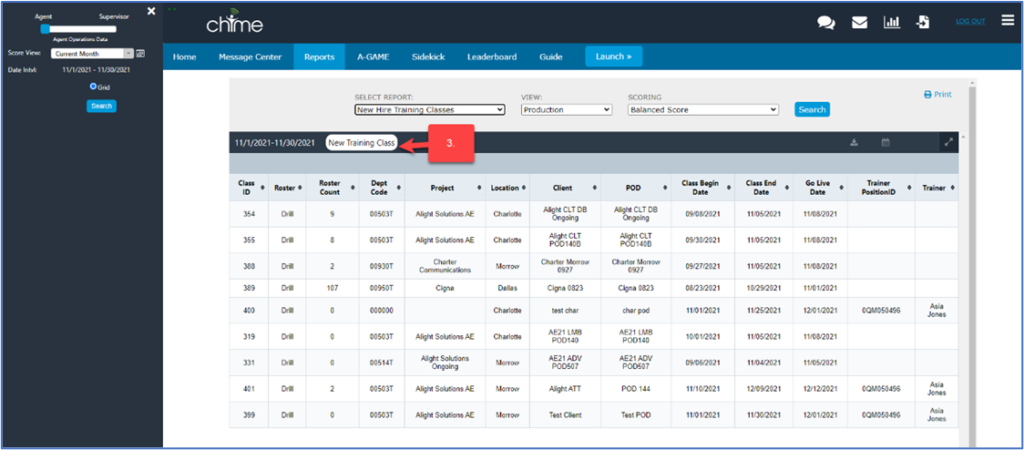
- The following window will appear:
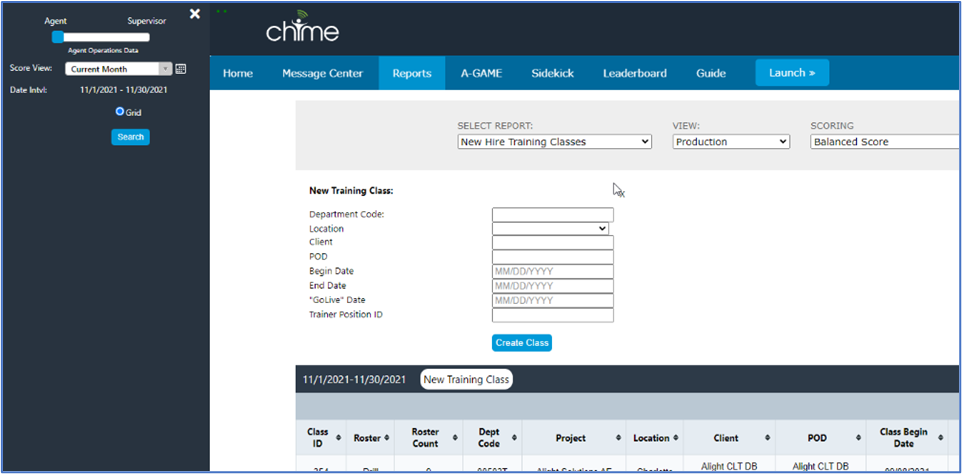
- Complete all the fields and click Create Class
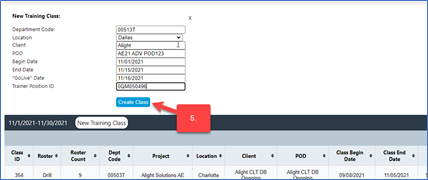
- The newly created class will appear in the New Hire Training Class list:
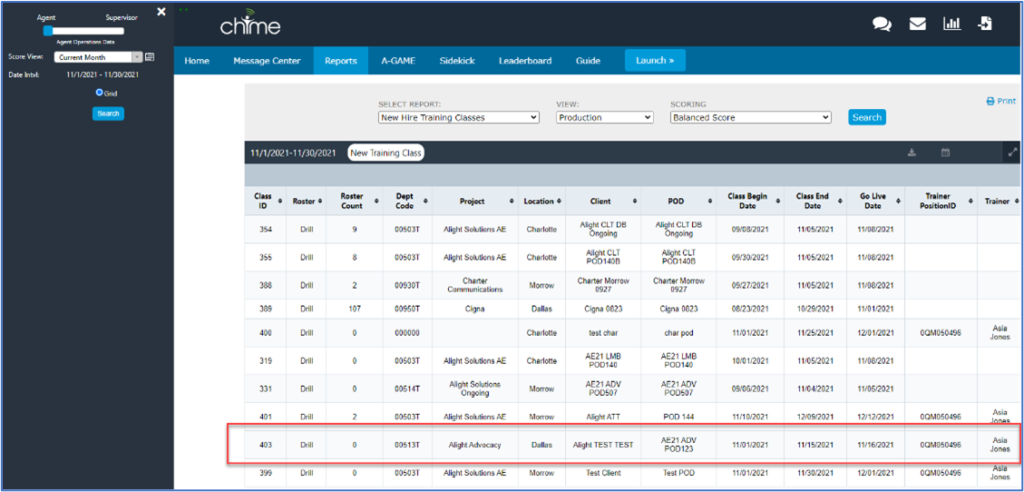
NOTE: The Training Class ID is the ID number assigned to the training class in Acuity.
Add Trainees to a New Hire Training Class Roster
IMPORTANT NOTE: All Chime employees are considered in production UNLESS they are assigned to a New Hire Training Class. It is critical for reporting and billing purposes that New Hire Training Class Rosters are set up timely and maintained in Acuity. The dates of the training class will determine the dates the employee is in a t-code.
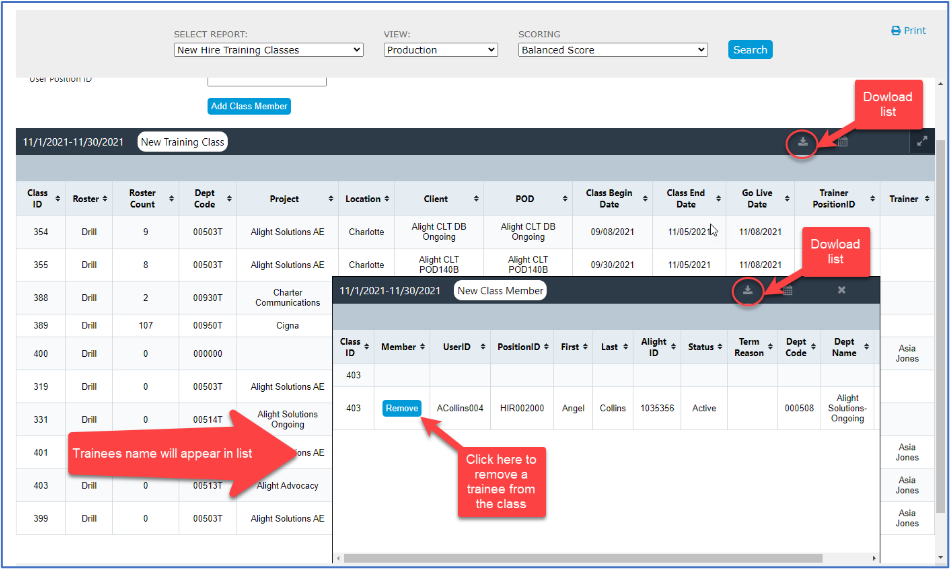
- Select the class and click Drill. The Class List will appear in a separate window.
- Click New Class Member to add trainees to the class.
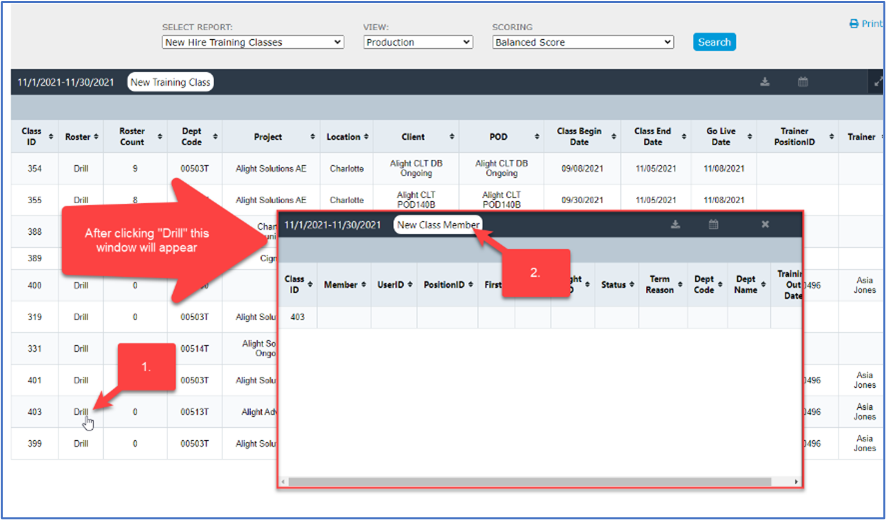
- Enter the Trainee’s User Workday ID and click Add Class Member. Note: The User Workday ID can be cut and pasted into this field.

- The trainee will appear in the class list. Repeat Step 3 until all the trainees have been added to the class roster. Note: Trainees who are accidentally added to the list can be removed by clicking the Remove button. The new Training Class list or New Training Class roster can be downloaded from Acuity by clicking the Download button.
Training Class Assessment Score Entry
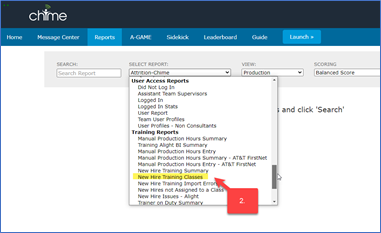
- After logging into Acuity, click on the Report menu

- Under the Training Reports section, select New Hire Training Classes
- The list of training classes will appear for the Score View (date range) selected. Find the class and click on Scores
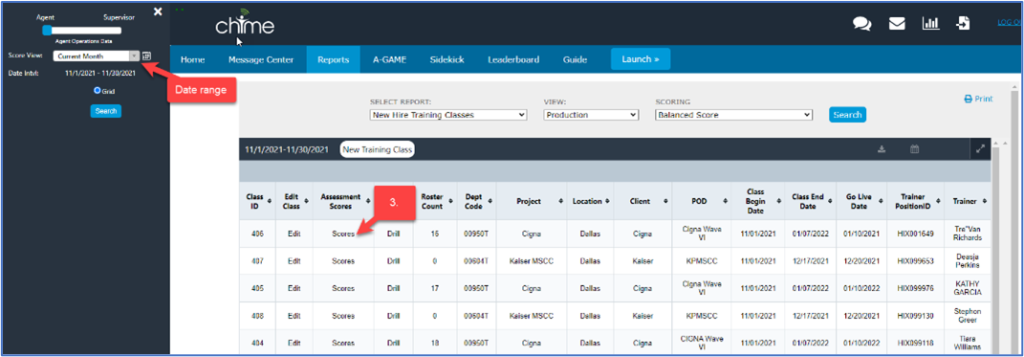
4. Enter the scores for each associate in Score 1 up to Score 20 (scroll right to enter more scores). The field will briefly turn green when the score has been entered.

Training Class Surveys
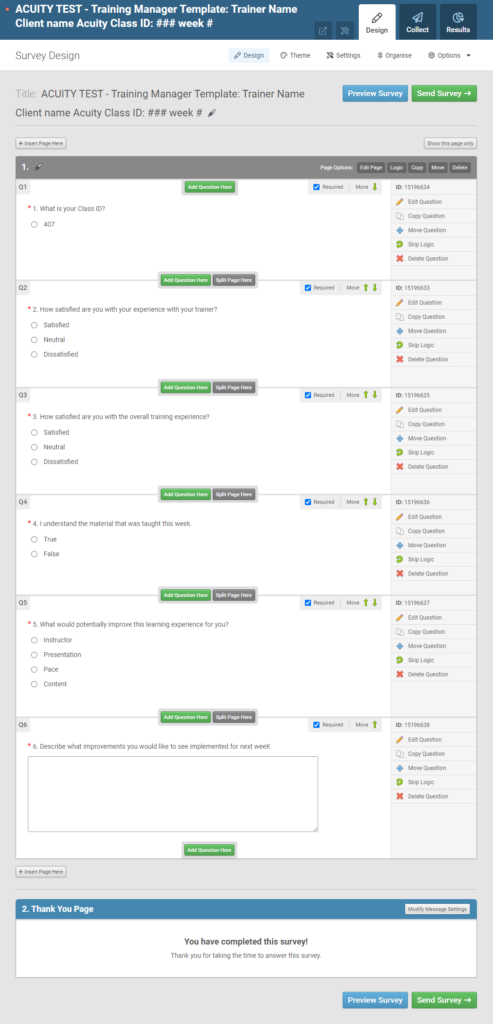
IMPORTANT: The surveys are created in Smart Survey and they MUST follow the EXACT following format (question order, question, responses/response type) to be loaded into Acuity. All questions must be in the exact same order. The first question, “What is your Class ID?” and the answer must contain the correct Acuity Class ID. This is how we link the survey results to the class. The survey results are imported via API every day directly from Smart Survey.
***If the survey varies from the format outlined below, it cannot be imported into Acuity. Also if the Class ID is not the correct Class ID, then the survey data will import into the wrong class.***
Observation Scores
Below are the step to adding Training Class Observation Scores into Acuity:
- Click on Reports menu
- Select New Hire Training Classes, located in the Training Reports section
- Change the Score View (date range), if necessary
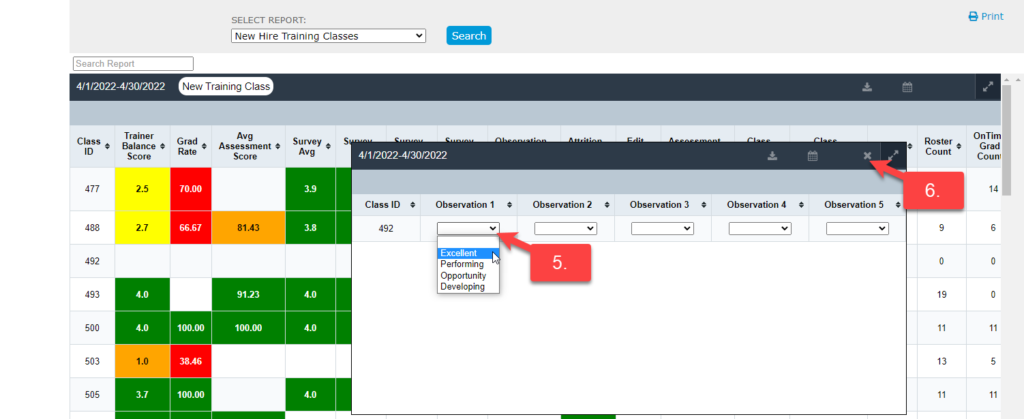
- Click on Observations for the desired Class ID

- Select Observation 1 thru Observation 5 from the dropdown selection
- Click on the X when complete to close the window