Acuity User Guide
Acuity Performance Management System
Acuity is designed to inform, align, engage and develop agents, managers, and other employees. It’s easy to use and has a range of great features to help you succeed! This guide will help you become familiar with the system and become proficient in its basic operation.
Acuity System Access
System Login & Temporary Password for Initial Acuity Login
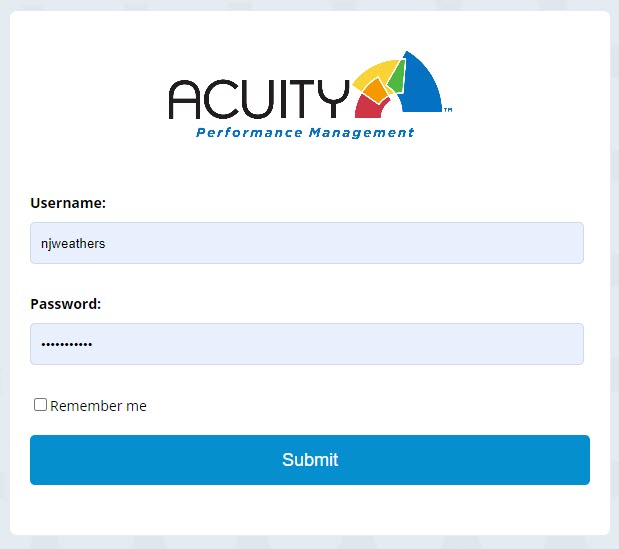
The first time the user accesses Acuity they need an Acuity Username (or Acuity ID) and the temporary password below. Upon log-in, they will be prompted to change the password .
Temporary password: P@ssw0rd
NOTE:
- The temporary password is case sensitive
- Make sure to use a “zero” and not an “o” in “w0rd”
- If you forget your password, your supervisor can reset it for you
Reset Agent / Consultant Password
-
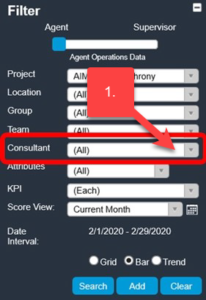
- To reset an agent’s password, first, select that employee from the “Consultant” filter on the left.
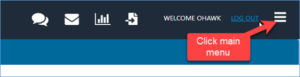
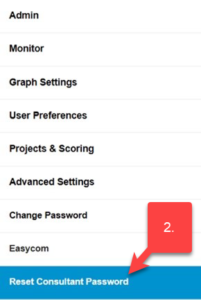
- Open the Main Menu by clicking on the 3 lines in the upper right-hand corner and selecting “Reset Consultant Password”.
- After clicking on “Reset Consultant Password”, a prompt will appear asking you to confirm the password change. To confirm the password change, click “OK”.

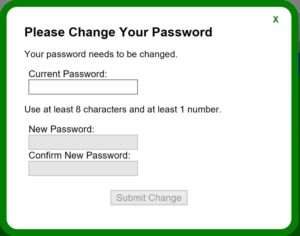
The password will be reset to a temporary password. When the agent logs in to Acuity, they will use the temporary password. Upon login, they will be prompted to change their password.
Temporary password: P@ssw0rd
NOTE:
-
- The temporary password is case sensitive
- Make sure to use a “zero” and not an “o” in “w0rd”
Reset Other’s Passwords
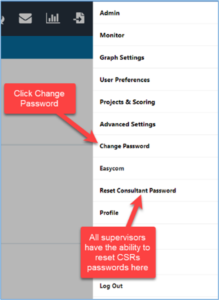
Some Acuity users have the ability to reset passwords for anyone in their organization. Not everyone has this access, however, all supervisors and managers can reset an agent’s password.
- Click on the Main Menu.
- Select Change Password. This menu option will allow the user to change their own password or the password for others within their organization. The Reset Consultant Password is an option that is available to supervisors and managers (see Reset Agent / Consultant Password section of the Guide).
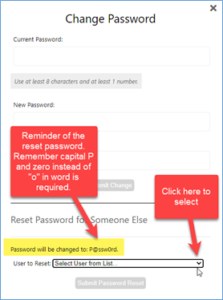
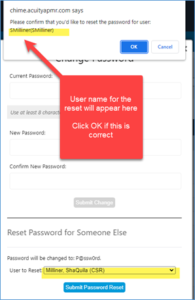
- The following box will appear. From here, select the user from the list.
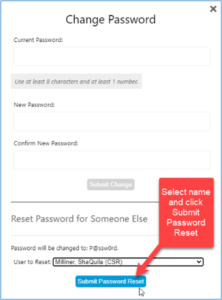
- After selecting the name, click Submit Password Reset.
- The following confirmation box will appear. It will also provide the Acuity Username. Click OK to proceed.
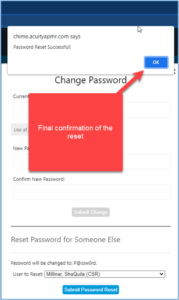
- Once the password has been reset the following box will appear. The password will be reset to a temporary password. Upon login, they will be prompted to change their password.
Temporary password: P@ssw0rd
NOTE:
-
- The temporary password is case sensitive
- Make sure to use a “zero” and not an “o” in “w0rd”
Acuity Navigation
Filters and Views
Filters located in Acuity’s left panel, enabled or disabled based on the user’s role, determine what information is displayed in the main report window.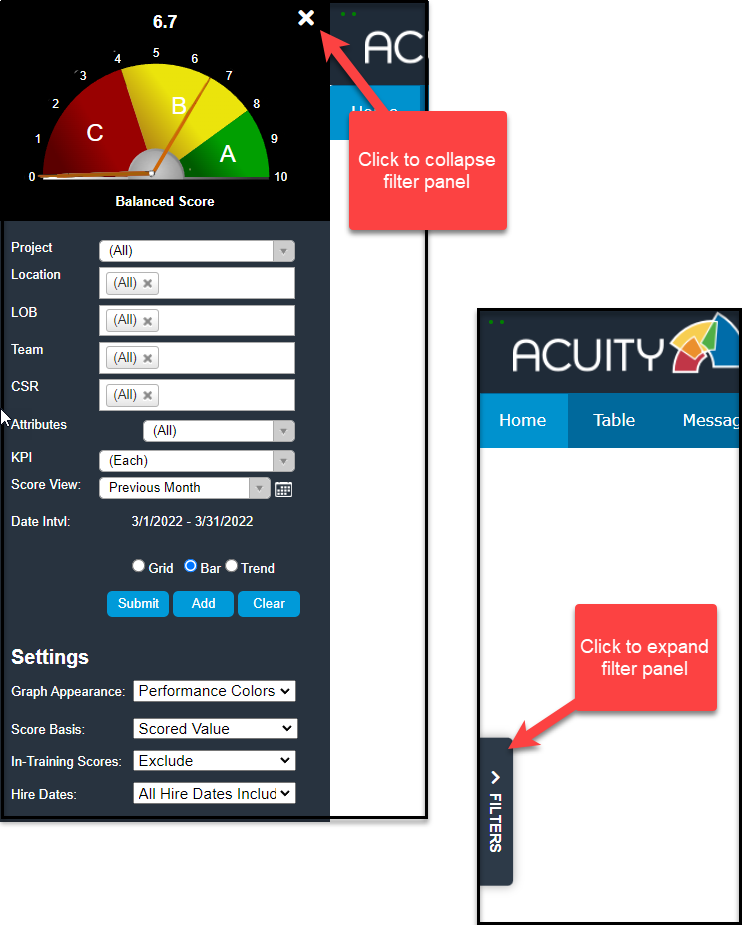
To isolate a specific KPI, use the KPI filter. To view historical performance, select a previous date range from the Score View filter.
TIP: After selecting filters, click the Submit button to run the new or modify the existing view or report.
Dashboard Basics
The Home tab will display the dashboard with your performance scores (actual data values as well as corresponding performance scores and levels).

The number on the top of the gauge in the upper left section of the filter panel indicates your current overall aka “balanced score” (refreshed at least daily). The gauge is divided into color-coded performance levels and scoring resets with the start of each pay period or other defined basis.
Each KPI for which you are responsible, and that make up the balanced score, is displayed so that you can quickly and easily monitor progress and pinpoint your strengths and areas that require improvement.
The weight (or relative importance) for each KPI is included in the label underneath the bar. Positioning the cursor over the bar will also display KPI details.
Sub-KPI Drill-Down
Double-clicking a specific KPI will either render a tabular view of the underlying data or display the sub-KPIs (aka KPI split) that comprise the primary KPI (see screenshot below), enabling the specific area of weakness to be pinpointed with deep granularity.
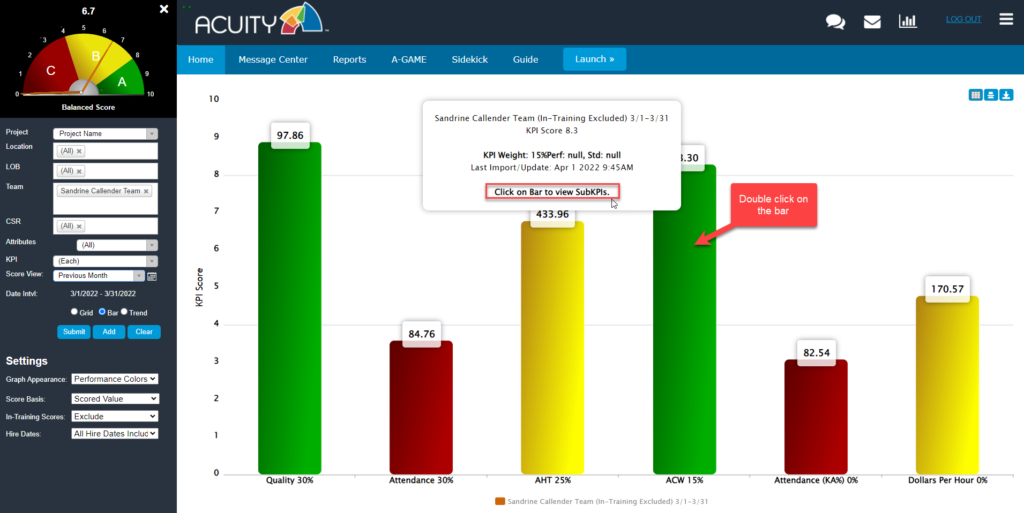
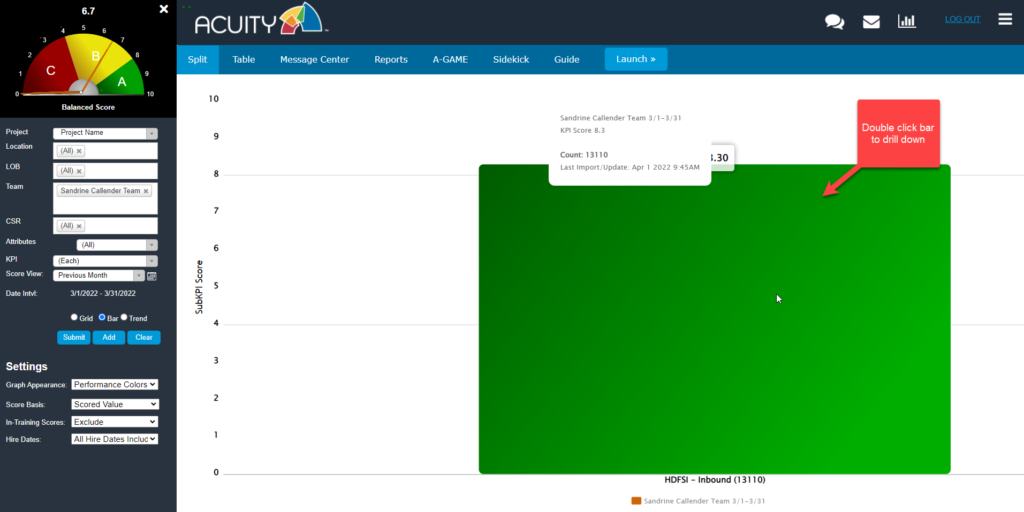
Double click on the bar again to see a drill-down of the data for the KPI.
Performance Trend Report
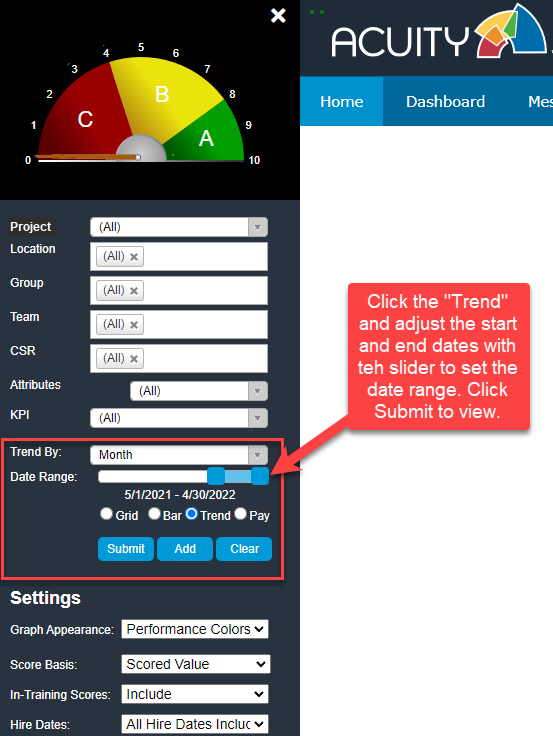 To view historical trends of overall or KPI-specific scores, click Trend and set the desired beginning and end dates using the slider.
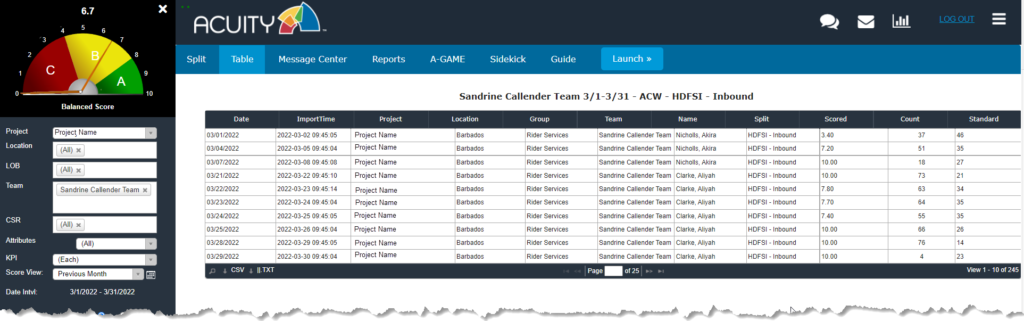
Tabular or "Spreadsheet" Views
Prefer a tabular view of the data? Select the Grid button and click Submit. Or click on a specific KPI bar in the Bar view to invoke a spreadsheet-style report.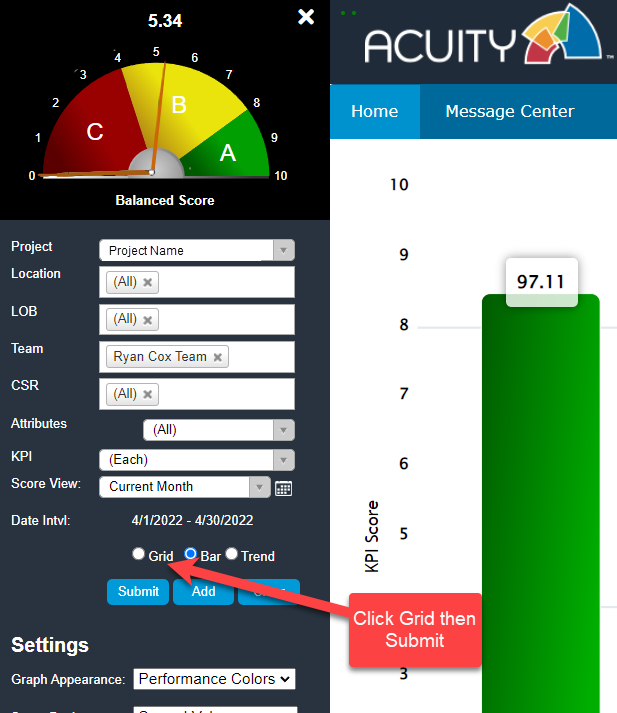

Report Settings
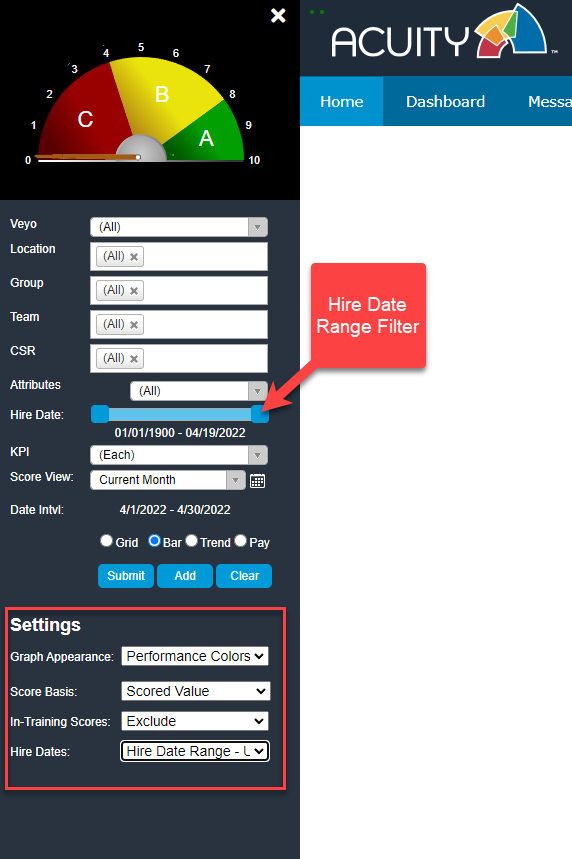
Acuity Settings allow you to change the report display appearance.
Performance Colors reflect KPI performance as calibrated to defined target levels (A/B/C…). The Series Colors options apply a distinct color to each KPI bar.
Settings can include or exclude In-Training Scores.
If specific hire dates are required, they can be set in the Hire Date range filter above.
Communication and Support
Message Center

Communication may be facilitated via Acuity’s Message Center. The Message Center is accessible via the envelope icon or Message Center.
Unread / New Messages: A round marker next to the envelope icon or Message Center Inbox indicates when a new message has been received. A second marker will indicate the number of unread messages that require acknowledgment.

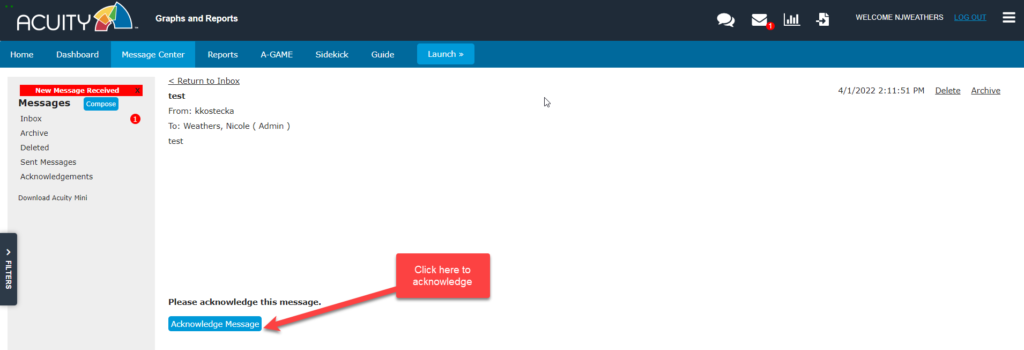
Read / Acknowledge Messages: Click on the message to open and read the message. This will mark the message as read. If the sender would like you to acknowledge receipt of the message, click on it to open it and then click the Acknowledge Message button.
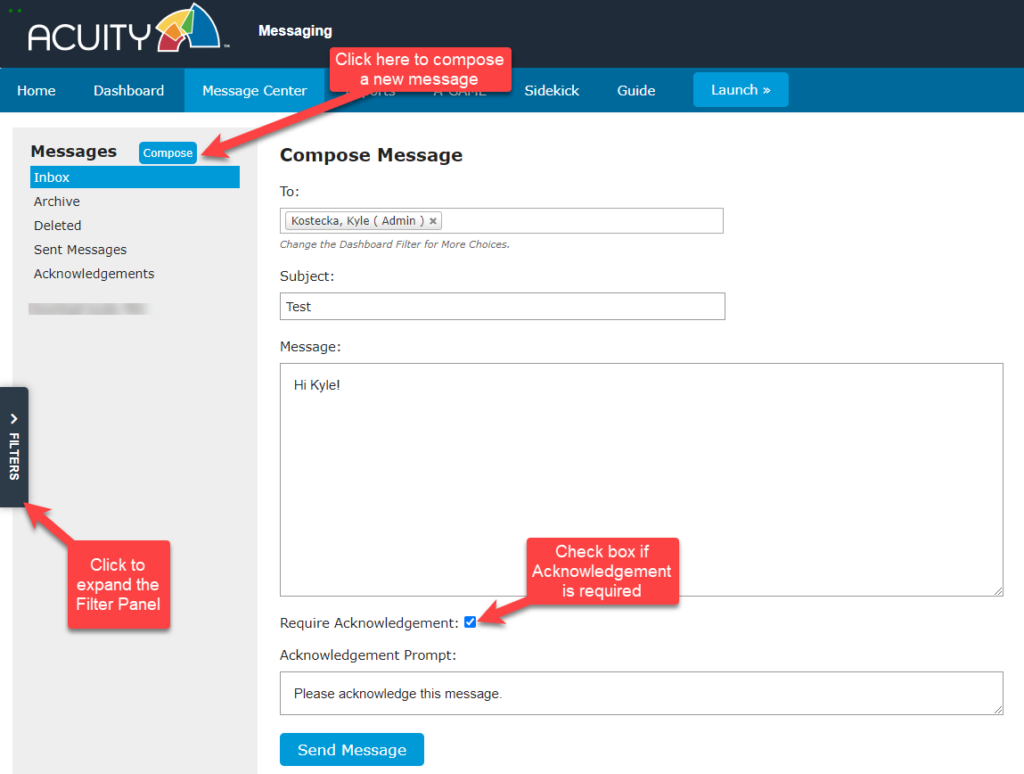
Send Messages: To compose a message, click the Compose button. The available recipients will depend on the user’s role and project. The Filter Panel on the left may be altered to present more choices. Check the box after the body of the message if an acknowledgment is required. Click the Send Message button to send.
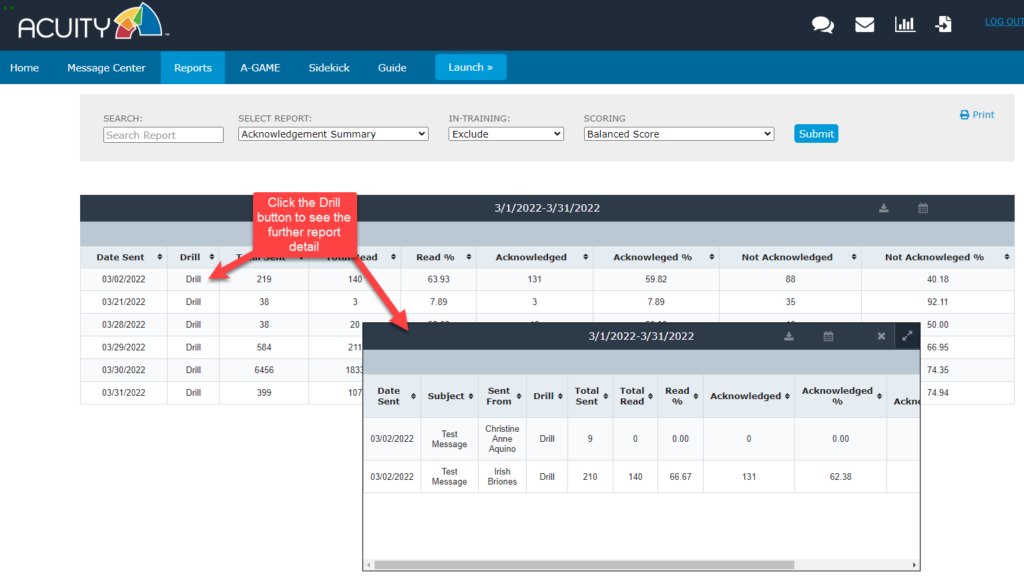
Acknowledgment Summary Report: The Message Acknowledgement report summary can be accessed via the Message Center or via the Reports Menu.
Chat
 Acuity has built-in chat functionality for either Live Chat or Group Chat.
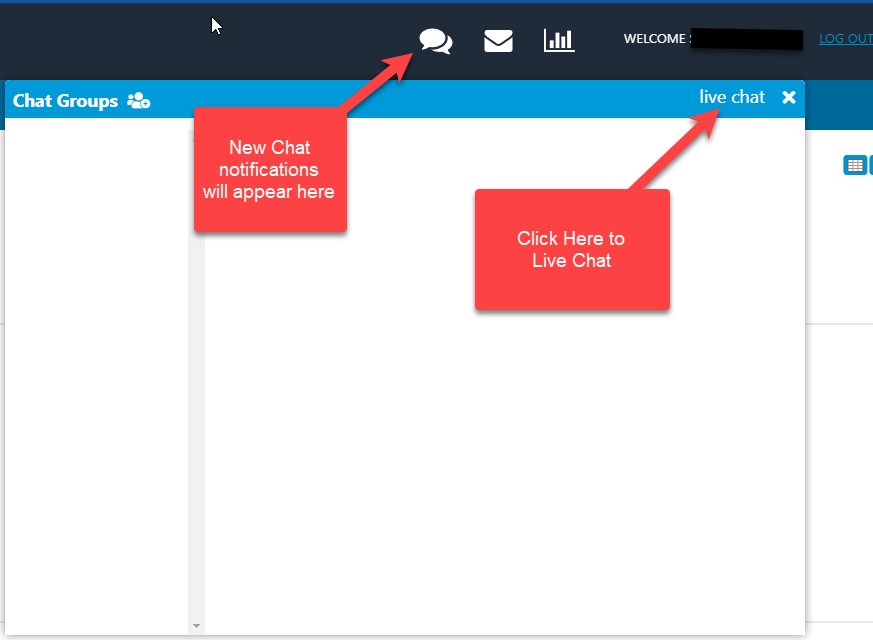
Live Chat: Allows users to chat with others who are logged in to Acuity. Agents can chat with supervisors or other members of management that are logged in and online. They cannot chat with other agents.
Group Chat: Supervisors and management can create group chats. Chat recipients do not need to be online chat. New messages will appear upon log-in. Agents cannot create a group chat but they can participate in the group chats.
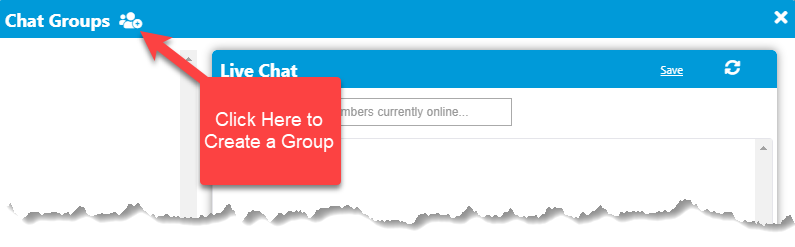
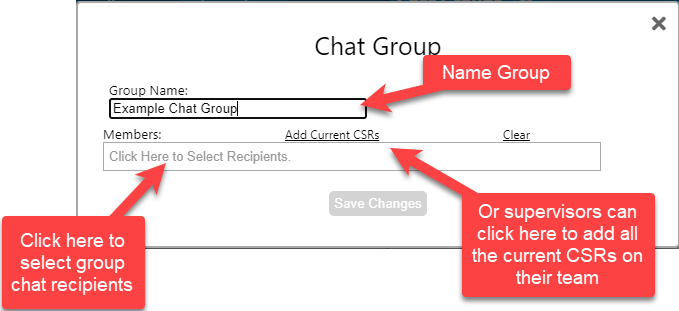
a. Create a group: Below are the steps for creating a group:
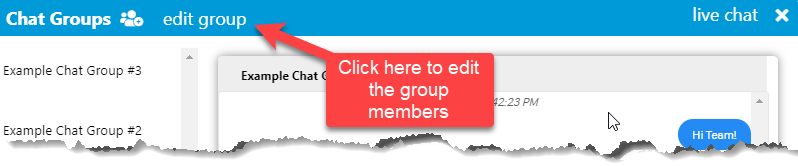
b. Edit group: Once a group is created, click on the group name and “edit group” to add or remove the members of the chat group:
c. Chat: Once a group is created, click on the group name and begin the chat.
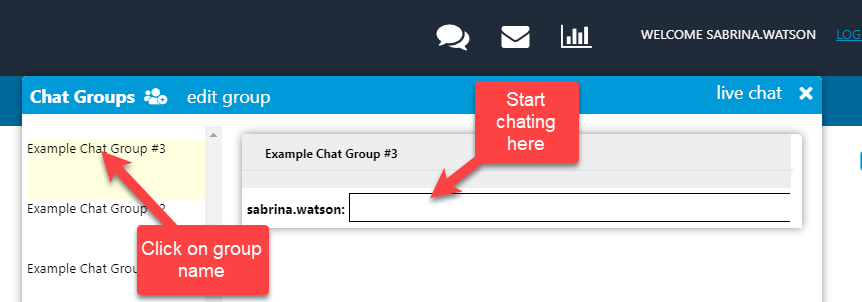
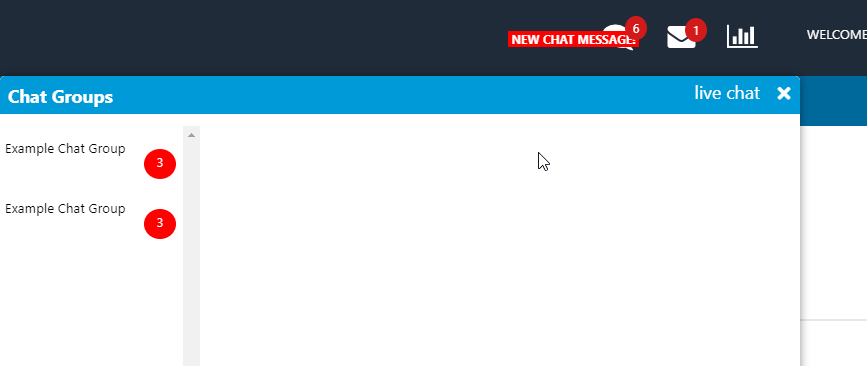
d. New Chat Message Notifications: the chat icon at the top of the screen will show if there are new chat messages. New chats will appear next to each group containing new chats. Click on the group name to read the chat messages in the group.
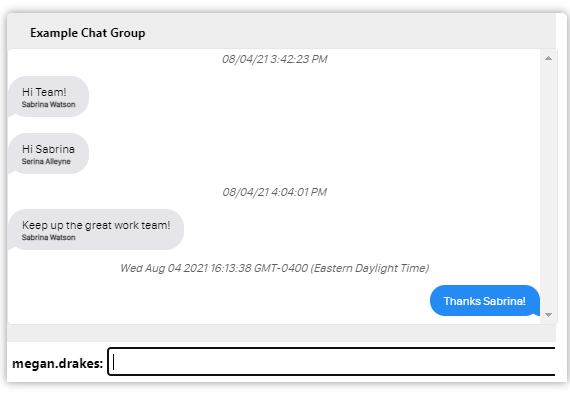
e. Chat History: the chat history will appear in the window for each chat group.
Sidekick
Sidekick is an intelligent system for coaching, recognition, review, and performance management integrated with the Acuity contact center performance management platform.
Using Sidekick is Easy…
Accessing Sidekick
 Log into Acuity.
- Select an agent from the CSR (or similar label) drop down.
- Click Sidekick from the menu and it will load in the context of the selected agent.

The Sidekick Journal
The Sidekick Journal provides a place to document all of the interactions, such as coaching, recognition, monitors, goal-setting, etc., between team leaders (aka supervisors, etc.) and their agents. Adding journaling to your regular frontline management routine will ensure that you never have to guess with whom or in what ways you’ve lead and developed your team. The Journal is your reliable digital system of record.
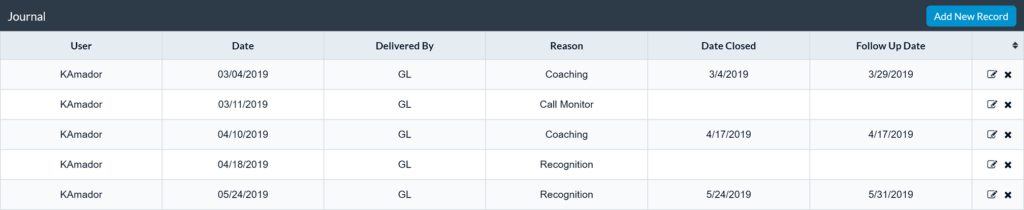
Using the Journal is easy. By default, journal entries are listed in table format by Entry Date (most recent on top). Columns are sortable so that this view can be adjusted as desired.
Adding a Journal Entry
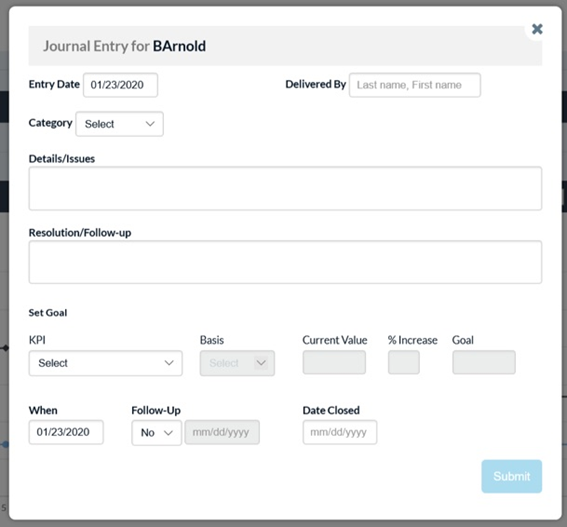
As you prepare to initiate a coaching session or other form of support interaction with an agent, click the blue Add New Record button located in the top right corner of the Journal.

1. Fill in the Entry Date (current or past) and Delivered By fields.
2. Select a Reason or Category of support type: Coaching, Recognition, Goal-setting, and Call Monitor are defaults, but other options may be presented.
3. Enter notes/comments in the Details/Issues and Resolution/Follow-up fields to adequately document the support activity.
4. If applicable, specify details for performance Goals in the Set Goal section per the relevant KPI and a date for Follow-up.
5. Once the form is complete, click the Submit button and the new entry will appear in the Journal table.
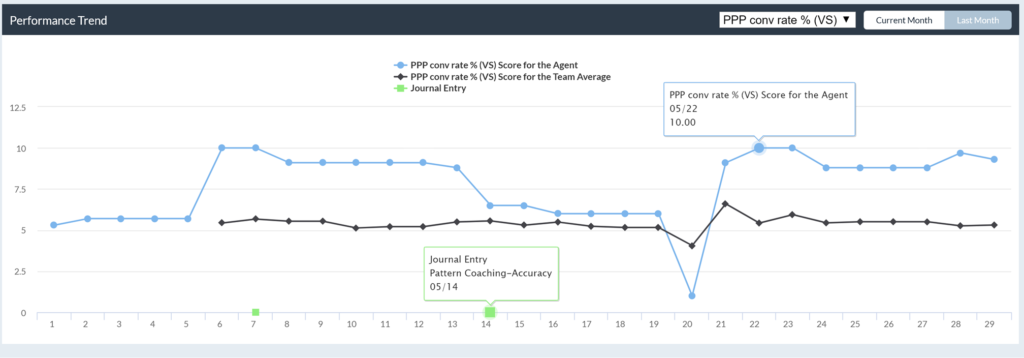
Performance Trend
The Performance Trend displays the day-by-day performance scores by Balanced Score or specific KPI for either the Current or Last Month. The Performance Trend view also includes all of the journal entries recorded that same month. In this way, it’s easy to visualize the impact of your agent support activities. Trend lines display performance for the focus agent as well as the team average. Mouse-over the dots on the black or blue trend lines will display details about the KPI or Balanced Score. Mouse-over the green dots on the x axis will display the summary for the Journal entry. Clicking the green dot will open the full Journal entry.
Leader Effectiveness
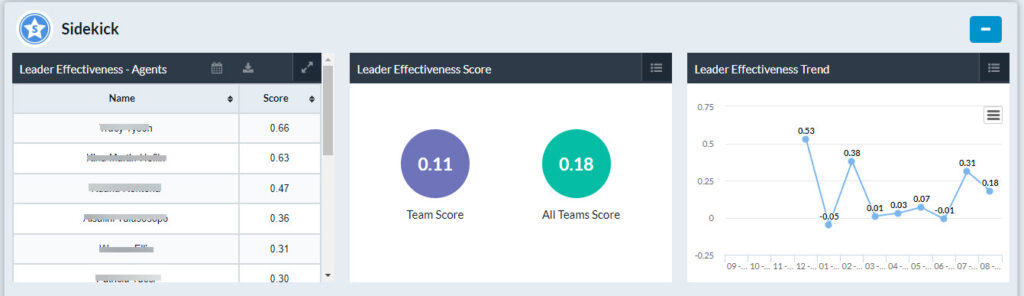
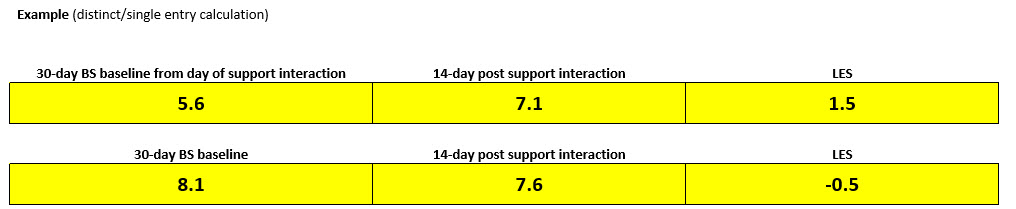
The Leader Effectiveness Score (“LES”) measures a supervisor’s impact on agent performance across the full spectrum of his or her support interactions.
The calculation uses an agent’s 30-day Balanced Score average as a historical baseline from which the agent’s Balanced Score is compared 14 days after a support interaction. Leader Effectiveness Scores will begin to begin to display on the 15th day after a journal entry was created.
Support interactions can include any category of support logged as a Sidekick journal entry (manually or as an automated workflow function) including coaching, recognition, call monitor, performance review, etc.
The average of all distinct calculations comprises the LES and is automatically calculated and displayed at the agent, team, and organization levels in the Sidekick dashboard (as well as globally in the Overview dashboard).
The LES is automatically calculated and displayed at the agent, team, and trend levels in the Sidekick dashboard.
Touch Count / Touch Rank
Touch Count:
Touch Count and Touch Rank reports provide context about the frequency of your interactions with agents and how this routine correlates with performance. Touch Rank looks at three data points:
- This CSR: Mouse-over the black bar shows the number of interactions (“touches”) with the focus agent in the current month. Mouse-over the blue bar shows the average number of touches for the focus agent up to the past six months.
- Team Average: Mouse-over the black bar shows the average number of interactions (“touches”) across all agents on the team. Mouse-over the blue bar shows the average number of touches across all agents on the focus team for up to the past six months.
- All CSRs: Functions just like Team and This CSR, but across all CSRs within the same department, program, or other comparable group.
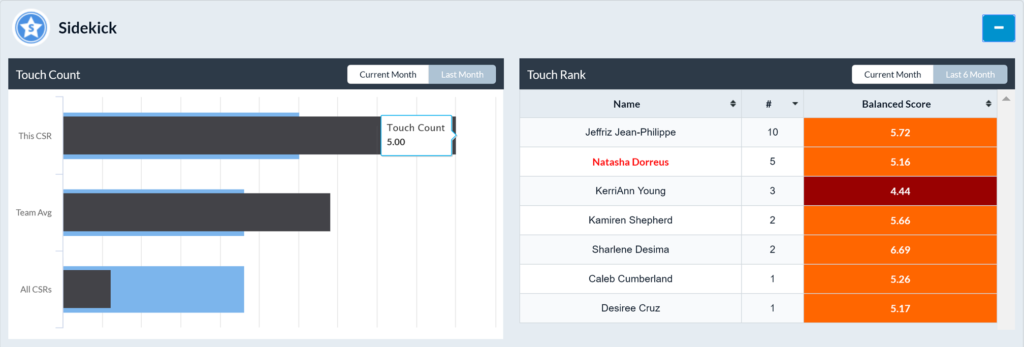
Touch Rank:
Touch Rank displays the number of “touches” and Balanced Score for each of the agents on the specified team. The focus agent is highlighted in red. The second column shows the number of touches (supervisor/team lead support interactions). The third column displays the Balanced Score (total performance score reflective of all weighted KPIs). Each column can be sorted to customize the view or be adjusted by Current and Last Month.
Touch Quality
The new Sidekick Touch Quality feature provides supervisors with real-time insight into the support quality delivered to their agents. Touch Quality allows employees to anonymously rate each one of their interactions with their supervisor on a scale from 1 to 5. The addition of Touch Quality to the Sidekick support system produces a continuous measure of employee satisfaction and ensures the integrity of support delivery.
Touch Quality Workflow
- Touch Quality is a process that takes place after a Sidekick Journal entry has been completed by a supervisor for one of their agents
2. Once a journal entry has been submitted for an agent, an automatic notification is sent to the agent to acknowledge and anonymously rate that interaction with their supervisor
a. The automatic notification will be received via the message center inside of Acuity, which can be accessed by clicking the Envelope Icon or clicking “Message Center” and opening the notification message.

b. The notification message will include the following information (also pictured below):
i. Date the journal entry was submitted
ii. Reason for the entry (example: Coaching or Recognition)
iii. Details or Issues that were discussed (areas of opportunity)
iv. Resolution or Follow Up notes (action plan)
v. Any goals that were set (Note: if no goals were set, no data will appear)
vi. Link to rate the recent support experience
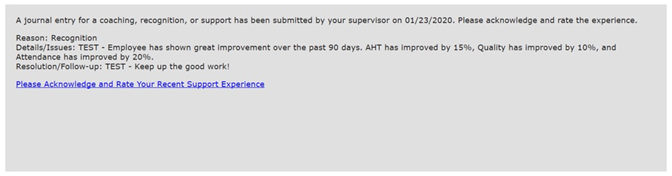
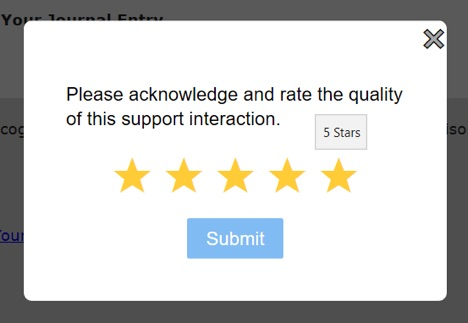
3. To rate the interaction, agents will simply click the blue link that reads, “Please Acknowledge and Rate Your Recent Support Experience” which will open a window that allows the employee to select between one and five stars to rate the interaction
a. NOTE: ALL RATINGS ARE ANONYMOUS TO SUPERVISORS
4. Once ratings are submitted, supervisors and managers will be able to track their Touch Quality scores through the Sidekick page, using the Touch Quality chart
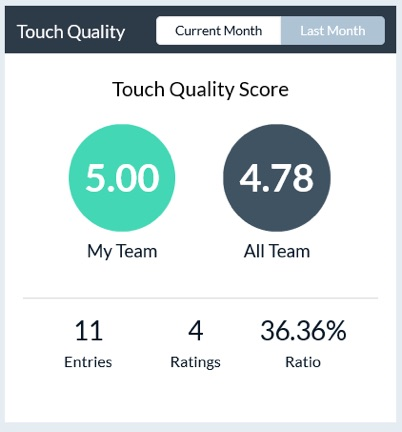
a. The “My Team” score is the average score of all ratings received for the selected supervisor’s team during the chosen date range
i. There are currently two date range options: Current Month and Previous Month
b. The “All Team” score is the average score of all ratings received for all teams assigned to the selected Project
i. This provides supervisors and managers with the ability to compare employee satisfaction against multiple teams, and the average for all teams
c. Additional information is provided along the bottom of the graph, which includes the number of entries (journal entries submitted), number of ratings (how many of the entries have been acknowledged and rated), and the ratio (Ratings / Number of Entries)
Outcomes
Sidekick – multi-dimensional Performance Scoring and Analysis
Acuity monitors, analyzes, and scores two primary dimensions of performance: Outcomes and Process.
Outcomes
Programmatically codified as Agent Scorecards, Outcomes are the metrics traditionally associated with contact center agent or team performance, i.e., Quality, Attendance, Average Handle Time (AHT), Customer Satisfaction (CSAT), Sales, etc. They are important metrics to track and understand as they indicate to what extent outcomes for both customers and the business are being met.
Acuity typically uses Balanced Scoring, wherein each KPI within the scorecard is “weighted” based on its relative importance to the other KPIs and totaled, comprises a complete “Balanced Score” measure of overall performance.
For example, a simple agent scorecard might consist of:
- Attendance – weighted 40%
- CSAT – weighted 30%
- Quality – weighted 20%
- AHT – weighted 10%
A more complex agent scorecard sample is below:

Process
Sidekick – multi-dimensional Performance Scoring and Analysis
Acuity monitors, analyzes, and scores two primary dimensions of performance: Outcomes and Process.
Process
Process is defined as “a series of actions that you take in order to achieve a result”. Consistently achieving desired outcomes requires that team leaders consistently execute specific agent support related actions, i.e., delivery high quality coaching and support to agents, setting appropriate goals, engaging the workforce, etc.
Acuity’s “Process” scorecard monitors and measures the supervisor’s actions necessary to produce the desired outcomes. Unlike Agent scorecards, in which the specific KPIs may vary across different clients or lines of business, the Process scorecard is a standard, associated with Sidekick usage, and structured as follows.

- Coach per Agent: weighted 20%. The score is based on a percentage-to-goal calculation (pro-rated daily over the respective month).
- Recognition per Agent: weighted 20%. The score is based on a percentage-to-goal calculation (pro-rated daily over the respective month).
- Touch Quality: weighted 20%. The quality of support provided by the supervisor is rated by the agent. Notifications sent to agents after each coaching or other support interaction are scored from 1 to 5 stars. Optionally, agents can provide comments regarding the support provided to them.
- Touch Rating Percentage: weighted 20%. Ratings received are divided by the number of notifications sent. Employee voice is important and it’s primarily the responsibility of supervisors to communicate to agents the importance of exercising their voice through features like Touch Quality.
- Goal Met Percentage: weighted 10%. Percentage of goals set that were met.
- Goals Set Percentage: weighted 10%. Percentage of coaching entries for which goals were set.
Sidekick Coaching Suggestions
- Acuity AI analyzes agent performance against all metrics, weights of each KPI, and frequency of coaching to determine the next best actions for the Team Leader to take
- A new set of suggestions is generated daily for each team in Acuity
- Priority level shows a quick ranking system, with higher priorities determined to make a bigger impact on overall performance
- Recognition is often suggested as one of the top priorities, as research has shown recognizing top performers often times has a larger impact on the overall team than coaching lower performers
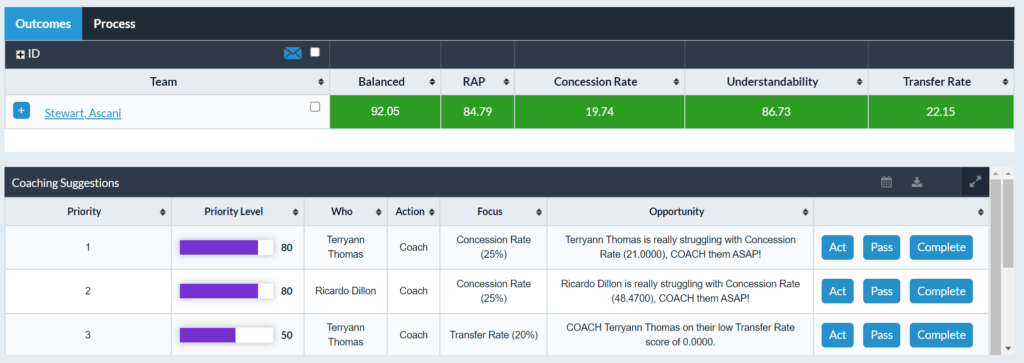
- The Act, Pass, and Complete buttons allow the Team Leaders to quickly Act or Pass on each coaching suggestion
- Pass Example: Agent A may not be working that day, prompting the Team Leader to Pass on that suggestion
- When ready to coach, Team Leaders can simply click Act to open up a Sidekick coaching form to the selected agent
It is important to note that these are simply suggestions made by system that Team Leaders can choose to follow or not. The entire list is not meant to be completed each day, rather provide the Team Leader with foundation to start the day.
Gamification
A-GAME LEAGUES
Overview
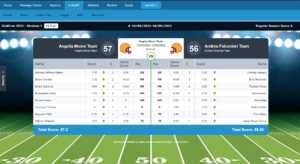
A-GAME transforms contact centers into exciting sports and other themed leagues in which teams participate in round-robin tournaments. At the end of the regular season, top teams advance to the playoffs and ultimately a season-end championship.
Team leaders select a starting lineup from their full agent roster. Team scores are updated in real time.
A-GAME tournament scoring is based on specific KPIs or balanced scores sourced from the Acuity Performance Management Platform and/or other data source/s and updated in real time.
Most valuable and improved players, coaches, owners and more are calculated automatically, providing new and meaningful ways to recognize outstanding performance.
A-GAME Season
- Before the start of each game, team owners will be able to select their starting lineups from their rosters
- Starting lineups will be locked at a specific time, at which point, will not be able to be changed until a new game begins
- Each position in the lineup also has a point multiplier assigned to it, giving some positions the opportunity to score up to 3X points
- Each game is a head-to-head matchup between teams each week. The team that scores the most points at the end of each game will record a win for that week
- At the end of the season, the teams with the best record will enter the playoffs to compete for the Championship
- The playoffs follow the same format as the regular season
Player Menus
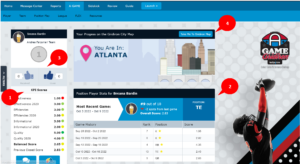
Player Home
- The player home tab displays a dashboard where agents can view their KPI scores, view their A_GAME game history, as well as give and receive kudos to and from other team members
- KPI scores display the current scores for each KPI the agent is responsible for
- Position Player Stats shows the game history for the current A-GAME Season
- Previous scores as well as the position the agent was assigned for each game are available here
- Directly above the KPI scores agents can view how many Kudos they have given and received
- If the current A-GAME Theme includes a map, agents can also access that map from the Player Home tab to view their team’s progress throughout the season
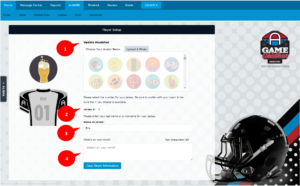
Player Setup
In the player setup menu, agents can customize their avatars, select their jerseys, and create a status to share with other members of their team.
- Update Headshot: agents can select from the provided list of avatar icons, or may choose to upload their own picture
- Jersey numbers can updated here
- Jersey names can be updated here
- What’s on your mind? : agents can create a status that will be shared next to their names for other team members to see
A-GAME XTREME
Overview
A-GAME Xtreme is a fantasy-sports style Executive Gamification solution where senior managers create Xtreme teams via fantasy draft and compete head-to-head in a round robin tournament.
Season Set Up
- Participants that will be participating in A-GAME Xtreme will need to sign up for the Xtreme draft on the Xtreme tab
- After signing up, participants will be able to enter the draft room and select a queue of agents to be drafted for their teams when the draft begins
- An equal number of agents will need to be selected from each available tier. Each tier is based on performance levels for each agent
- If no selections are made, the draft will automatically make selections when the draft begins
- On the date and time of the draft, all teams will be created and will be ready to start the season
Xtreme Season
- Before the start of each game, team owners will be able to select their starting lineups from their rosters
- Starting lineups will be locked at a specific time, at which point, will not be able to be changed until a new game begins
- Each position in the lineup also has a point multiplier assigned to it, giving some positions the opportunity to score up to 3X points
- Each game is a head-to-head matchup between teams each week. The team that scores the most points at the end of each game will record a win for that week
- At the end of the season, the teams with the best record will enter the playoffs to compete for the Championship
- The playoffs follow the same format as the regular season
Owner Set Up
- The owner set up page allows team owners to customize their teams with avatars, jerseys, jersey colors and personalized statements
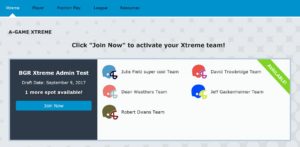
Instructions
Sign-Up
- Log into Acuity, click the Xtreme tab and then click the “Join Now” button next to the league, conference or division in which you’d like to compete
Personalize, Draft, Manage
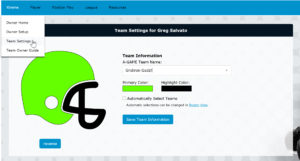
- Personalize and Name Your Team
- Click the Owner Setup tab to personalize avatars, jerseys, and team mottos
- Click the Team Settings tab to customize your team name and team colors
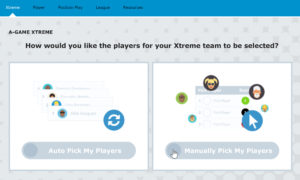
- Draft Your Team
- Manual Pick – if you want to hand-pick your players, select the Manual Pick option
- Auto Pick – if you prefer a hands-off approach, Auto Pick will automatically select players for your team
- In either mode, the roster will include an equal number of agents from low, average, and high performance tiers (referred in A-GAME Xtreme as Rank Zones)
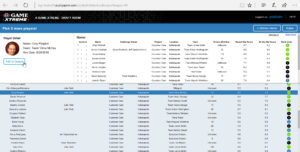
- Manual Pick – if you opted to make your Xtreme team draft picks manually and are ready to create your draft queue, click the Enter Draft Room button
-
- The Draft Room enables you to customize your team based on location, project, and performance stats
- Roster selections must include an equal number of agents from low, average, and high performance tiers
- Extra players will be included as alternates in cases where you lose a queued player to another Xtreme team owner during the draft process
- Once your queue is full, a message similar to the one below will be displayed
![]()
Connect
Your Xtreme team is drafted and now it’s time to play. Things to do…
- Contact your players!
- Let them know you care. Let them know you are there to assist, support and motivate. Let them know that your honor and pride are on the line to win.
- Communicate regularly with your team
- Log into Acuity to check KPI and Balanced Score performance
- Send messages of encouragement and inspiration via Acuity Chat and Messaging modules
- Touch base with your player’ Supervisors to verify your team is getting the coaching and training support they need to succeed
- Take an active role to support and mentor your team
Play
Playing A-GAME Xtreme is easy. Your routing will be nearly identical to that of a Supervisor’s – and it goes something like this.
- Select Your Starting Lineup
-
- Log into Acuity
- Click the A-GAME tab
- Click on the Xtreme menu
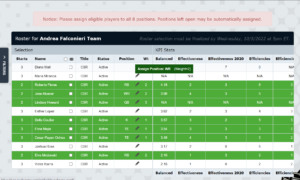
- Click Team | Roster
- Click the pencil icon next to the player you want to add to the starting lineup and select a position
- Complete the process for all six players
- Monitor Progress – Manage Performance
- Click Team | Matchup
- The Matchup view will be updated daily, and is where you will be able to track the progress and score of your team
- The Matchup view will also show you the score of your opponent for the week
- Click Team | Matchup
- Monitor Progress – League
- Click League | Scores or League | Standings
- The League Scores and League Standings will provide you with league information including scores, standings, and various statistics (individual and team)
- For statistics, including Most Valuable and Most Improved Player, click League | Stats
- To view top players by position, go to Stats | Position Play
- Click League | Scores or League | Standings
A-GAME FLEX
A-GAME Flex is a highly flexible gamification system provided within the Acuity performance management platform. Flex is designed to enable supervisors or their managers to create and deploy effective, metric-driven based contests in minutes.
- Flex games can be created by team leads (supervisors) or any higher level of management. Flex games, whether of the Leaderboard, Points-based, or Phrase variety can be created for a single agent, two agents (a duel), or multiple agents (across one or multiple teams), as well as teams.
- Flex games are also applicable for team leader competitions to motivate and incentivize performance according to outcome-oriented KPIs, i.e., Quality, CSAT, Knowledge, After Call Work, Transfer Rates, Sales, or NPS as well as behaviors, actions, or “leading indicators”, i.e., Attendance, Coaching Effectiveness, ESAT, Coaching or Recognition targets, etc. Games can also be based on “Custom Metrics” – KPIs not necessarily codified within a formal scorecard analytic model, i.e., ugliest holiday sweater, cutest pet, healthiest snack, …anything goes!
The basic steps to create and manage Flex games follow but for a comprehensive deep-dive into Flex Game game setup, please refer to the companion PDF Guide located HERE.
Setup New Game
- Click on A-GAME
- Click on the FLEX tab
- Click the Add/Edit Games button

- Click Add New Game button

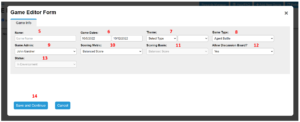
- Name: Enter game name
- Game Dates: Enter game start and end dates
- Theme:
- Select Type: select Leaderboard
- Select Theme: choose any theme for your game
- Game Type:
- Agent Battle: Agents compete individually against each other
- Team Battle: Agents compete in teams against each other
- Game Admin: Select the administrator for the game
- Scoring Metric: select from a list of KPIs to be used for the game
- Scoring Basis:
- Scored Value: the KPI score for the selected KPI (typically on a 1 to 10 scale)
- Standard Value: the underlying data for the selected KPI (EX: Quality is 85%, Shrinkage is 97%)
- Allow Discussion Board: Select yes or no
- Status: This will automatically default to In Development
- Click the Save and Continue button
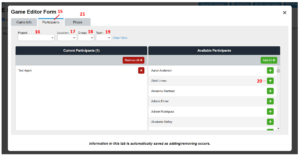
- After the game information is saved in the Game Editor Form, a new tab will appear. Click on the participants tab.
- Project: select the Project
- Location: select the Location
- Group: select the Group
- Team: select the Team, Available Participants will be displayed in the box on the right
- Click the + button next to available participants to move them to the Current Participant box or click the Add All + button to add the entire list
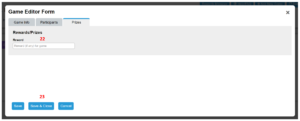
- After all participants are selected, click on the Prize tab
- (Optional) Enter the game reward
- Click the Save & Close button
- Click Refresh Game Listing button
- The game is now setup and ready to begin! Click the Start Game button

- A notification will appear to confirm that the game is ready to begin, click the OK button
- A second notification will appear to warn the settings cannot be changed after the game has started, click OK
- The game will now be active and will run until the end date
- Enjoy!
File Imports
Overview
This reference guide will provide file naming conventions, file formats, and protocols that are critical to ensure files will be imported through TouchPoint One’s (TPO) automated file import process. Anyone who is responsible for posting files to TPO’s SFTP site must read, understand and follow this guide.
TPO receives hundreds of files each day, it is important the file includes the project name (if applicable), file description, and date.
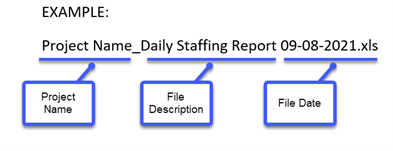
Once the naming convention is established between the client and Acuity, it must follow this format EXACTLY.
****IMPORTANT NOTE: If files do not follow the file naming conventions outlined below then the file will error out and will not be loaded.
There are 4 areas that need to be consistent once established:
- File Naming Convention
- Data Tab Naming Convention
- File format
- File Layout/Data Columns
File Naming Convention
- Examples of reasons why files will not load:
- Date format is not correct. Example: Example: “Project Name_Daily Staffing Report 9-08-2021.xls”
- File names with typos. Example: “Project Name_Daily Staffing Repot 09-08-2021.xls”
- File name has change or has abbreviations: Example: “Proj Name_Daily Staffing Report 09-08-2021.xls
- Files with extra spaces. Example: “Project Name_Daily Staffing Report 09-08-2021.xls”
Data Tab Naming Convention
- If the file contains a tab for each day, then the tab names must be consistently named as well. Example: If the date on the tab is formatted MM-DD-YY, then it should be formatted EXACTLY the same each day. If the tabs are received with a different date formant, then the file will error out and not load.
- The tab should contain the previous day’s data. Example: if the file date is 09-08-2021 then the tab must contain the previous day’s data, 09-07-2021. This is the data that will be extracted and loaded.

File Type
- The file type must also remain consistent. For example: if the file is sent as an .XLSX file, then it should always be .XLSX.
- If the file type changes from one file type to another, then the file will error out and not load. Example: An error will occur if the file is typically in an .XLSX format and one day it is sent in an .XLS format.
File Layout / Data Columns
- The data columns must be consistently named and in the same position each day. If a column is added, removed or renamed, this will cause the file to error out and not load.
File Imports & File Import Summary Report
- Files posted to the SFTP site will automatically import from the SFTP folder Monday – Friday at the top of the hour from 10:00 AM – 4:00 PM EST. Once the file imports, it is moved from the SFTP.
- The File Import Summary report in Acuity will outline the File, File Name (file naming convention) and Tab Name (if applicable). This report also will display when the file was successfully imported. See example below.
Example:
Acuity Support
TouchPoint One University
TouchPoint One offers online training resources. There are many short video training clips that are available for quick and easy reference. Please go to the following URL: https://www.touchpointone.com/university
Acuity Support
If you need additional support, please email support@touchpointone.com
Thank you!